
diff options
| author | 2021-07-15 14:13:35 -0400 | |
|---|---|---|
| committer | 2021-07-15 14:13:35 -0400 | |
| commit | 166e22bdf35b9751dc42f5cc6cb27a99b077df93 (patch) | |
| tree | e8643360c2250dda82ebf95b62281978547d5188 /docs/core-concepts | |
| parent | fb8bf7ec43f7b09348c12d5ff9f81131c70ef5e9 (diff) | |
| download | astro-166e22bdf35b9751dc42f5cc6cb27a99b077df93.tar.gz astro-166e22bdf35b9751dc42f5cc6cb27a99b077df93.tar.zst astro-166e22bdf35b9751dc42f5cc6cb27a99b077df93.zip | |
merge in docs site (#705)
Diffstat (limited to 'docs/core-concepts')
| -rw-r--r-- | docs/core-concepts/astro-components.md | 356 | ||||
| -rw-r--r-- | docs/core-concepts/astro-pages.md | 60 | ||||
| -rw-r--r-- | docs/core-concepts/collections.md | 210 | ||||
| -rw-r--r-- | docs/core-concepts/component-hydration.md | 93 | ||||
| -rw-r--r-- | docs/core-concepts/layouts.md | 154 | ||||
| -rw-r--r-- | docs/core-concepts/project-structure.md | 57 |
6 files changed, 0 insertions, 930 deletions
diff --git a/docs/core-concepts/astro-components.md b/docs/core-concepts/astro-components.md deleted file mode 100644 index 3642bb727..000000000 --- a/docs/core-concepts/astro-components.md +++ /dev/null @@ -1,356 +0,0 @@ ---- -layout: ~/layouts/Main.astro -title: Astro Components ---- - -**Astro Components** (files ending with `.astro`) are the foundation of server-side templating in Astro. Think of the Astro component syntax as HTML enhanced with JavaScript. - -Learning a new syntax can feel intimidating, so we carefully designed the Astro component syntax to feel as familiar to web developers as possible. It borrows heavily from patterns you likely already know: components, frontmatter, props, and JSX expressions. We're confident that this guide will have you writing Astro components in no time, especially if you are already familiar with HTML & JavaScript. - -## Syntax Overview - -A single `.astro` file represents a single Astro component in your project. This pattern is known as a **Single-File Component (SFC)**. Both Svelte (`.svelte`) and Vue (`.vue`) also follow this pattern. - -Below is a walk-through of the different pieces and features of the Astro component syntax. You can read it start-to-finish, or jump between sections. - -### HTML Template - -Astro component syntax is a superset of HTML. **If you know HTML, you already know enough to write your first Astro component.** - -For example, this three-line file is a valid Astro component: - -```html -<!-- Example1.astro - Static HTML is a valid Astro component! --> -<div class="example-1"> - <h1>Hello world!</h1> -</div> -``` - -An Astro component represents some snippet of HTML in your project. This can be a reusable component, or an entire page of HTML including `<html>`, `<head>` and `<body>` elements. See our guide on [Astro Pages](/guides/astro-pages) to learn how to build your first full HTML page with Astro. - -**Every Astro component must include an HTML template.** While you can enhance your component in several ways (see below) at the end of the day its the HTML template that dictates what your rendered Astro component will look like. - -### CSS Styles - -CSS rules inside of a `<style>` tag are automatically scoped to that component. That means that you can reuse class names across multiple components, without worrying about conflicts. Styles are automatically extracted and optimized in the final build so that you don't need to worry about style loading. - -For best results, you should only have one `<style>` tag per-Astro component. This isn’t necessarily a limitation, but it will often result in better-optimized CSS in your final build. When you're working with pages, the `<style>` tag can go nested inside of your page `<head>`. For standalone components, the `<style>` tag can go at the top-level of your template. - -```html -<!-- Astro Component CSS example --> -<style> - .circle { - background-color: red; - border-radius: 999px; - height: 50px; - width: 50px; - } -<div class="circle"></div> -``` - -```html -<!-- Astro Page CSS example --> -<html> - <head> - <style> - ...; - </style> - </head> - <body> - ... - </body> -</html> -``` - -Sass (an alternative to CSS) is also available via `<style lang="scss">`. - -📚 Read our full guide on [Component Styling](/guides/styling) to learn more. - -### Frontmatter Script - -To build a dynamic components, we introduce the idea of a frontmatter component script. [Frontmatter](https://jekyllrb.com/docs/front-matter/) is a common pattern in Markdown, where some config/metadata is contained inside a code fence (`---`) at the top of the file. Astro does something similar, but with full support for JavaScript & TypeScript in your components. - -Remember that Astro is a server-side templating language, so your component script will run during the build but only the HTML is rendered to the browser. To send JavaScript to the browser, you can use a `<script>` tag in your HTML template or [convert your component to use a frontend framework](/core-concepts/component-hydration) like React, Svelte, Vue, etc. - -```astro ---- -// Anything inside the `---` code fence is your component script. -// This JavaScript code runs at build-time. -// See below to learn more about what you can do. -console.log('This runs at build-time, is visible in the CLI output'); -// Tip: TypeScript is also supported out-of-the-box! -const thisWorks: number = 42; ---- -<div class="example-1"> - <h1>Hello world!</h1> -</div> -``` - -### Component Imports - -An Astro component can reuse other Astro components inside of its HTML template. This becomes the foundation of our component system: build new components and then reuse them across your project. - -To use an Astro component in your template, you first need to import it in the frontmatter component script. An Astro component is always the file's default import. - -Once imported, you can use it like any other HTML element in your template. Note that an Astro component **MUST** begin with an uppercase letter. Astro will use this to distinguish between native HTML elements (`form`, `input`, etc.) and your custom Astro components. - -```astro ---- -// Import your components in your component script... -import SomeComponent from './SomeComponent.astro'; ---- -<!-- ... then use them in your HTML! --> -<div> - <SomeComponent /> -</div> -``` - -📚 You can also import and use components from other frontend frameworks like React, Svelte, and Vue. Read our guide on [Component Hydration](/core-concepts/component-hydration) to learn more. - -### Dynamic JSX Expressions - -Instead of inventing our own custom syntax for dynamic templating, we give you direct access to JavaScript values inside of your HTML, using something that feels just like [JSX](https://reactjs.org/docs/introducing-jsx.html). - -Astro components can define local variables inside of the Frontmatter script. Any script variables are then automatically available in the HTML template below. - -#### Dynamic Values - -```astro ---- -const name = "Your name here"; ---- -<div> - <h1>Hello {name}!</h1> -</div> -``` - -#### Dynamic Attributes - -```astro ---- -const name = "Your name here"; ---- -<div> - <div data-name={name}>Attribute expressions supported</div> - <div data-hint={`Use JS template strings to mix ${"variables"}.`}>So good!</div> -</div> -``` - -#### Dynamic HTML - -```astro ---- -const items = ["Dog", "Cat", "Platipus"]; ---- -<ul> - {items.map((item) => ( - <li>{item}</li> - ))} -</ul> -``` - -### Component Props - -An Astro component can define and accept props. Props are available on the `Astro.props` global in your frontmatter script. - -```astro ---- -// Example: <SomeComponent greeting="(Optional) Hello" name="Required Name" /> -const { greeting = 'Hello', name } = Astro.props; ---- -<div> - <h1>{greeting}, {name}!</h1> -</div> -``` - -You can define your props with TypeScript by exporting a `Props` type interface. In the future, Astro will automatically pick up any exported `Props` interface and give type warnings/errors for your project. - -```astro ---- -// Example: <SomeComponent /> (WARNING: "name" prop is required) -export interface Props { - name: string; - greeting?: string; -} -const { greeting = 'Hello', name } = Astro.props; ---- -<div> - <h1>{greeting}, {name}!</h1> -</div> -``` - -### Slots - -`.astro` files use the [`<slot>`](https://developer.mozilla.org/en-US/docs/Web/HTML/Element/slot) tag to enable component composition. Coming from React or Preact, this is the same concept as `children`. You can think of the `<slot>` element as a placeholder for markup which will be passed in from outside of the component. - -```astro -<!-- Example: MyComponent.astro --> -<div id="my-component"> - <slot /> <!-- children will go here --> -</div> - -<!-- Usage --> -<MyComponent> - <h1>Hello world!</h1> -</MyComponent> -``` - -Slots become even more powerful when using **named slots**. Rather than a single `<slot>` element which renders _all_ children, named slots allow you to specify multiple places where children should be placed. - -> **Note** The `slot` attribute is not restricted to plain HTML, components can use `slot` as well! - -```astro -<!-- Example: MyComponent.astro --> -<div id="my-component"> - <header> - <!-- children with the `slot="header"` attribute will go here --> - <slot name="header" /> - </header> - <main> - <!-- children without a `slot` (or with the `slot="default"`) attribute will go here --> - <slot /> - </main> - <footer> - <!-- children with the `slot="footer"` attribute will go here --> - <slot name="footer"> - </footer> -</div> - -<!-- Usage --> -<MyComponent> - <h1 slot="header">Hello world!</h1> - <p>Lorem ipsum ...</p> - <FooterComponent slot="footer" /> -</MyComponent> -``` - -Slots can also render **fallback content**. When there are no matching children passed to a `<slot>`, a `<slot>` element will render its own placeholder children. - -```astro -<!-- MyComponent.astro --> -<div id="my-component"> - <slot> - <h1>I will render when this slot does not have any children!</h1> - </slot> -</div> - -<!-- Usage --> -<MyComponent /> -``` - -### Fragments & Multiple Elements - -An Astro component template can render as many top-level elements as you'd like. Unlike other UI component frameworks, you don't need to wrap everything in a single `<div>` if you'd prefer not to. - -```html -<!-- An Astro component can multiple top-level HTML elements: --> -<div id="a" /> -<div id="b" /> -<div id="c" /> -``` - -When working inside a JSX expression, however, you must wrap multiple elements inside of a **Fragment**. Fragments let you render a set of elements without adding extra nodes to the DOM. This is required in JSX expressions because of a limitation of JavaScript: You can never `return` more than one thing in a JavaScript function or expression. Using a Fragment solves this problem. - -A Fragment must open with `<>` and close with `</>`. Don't worry if you forget this, Astro's compiler will warn you that you need to add one. - -```astro ---- -const items = ["Dog", "Cat", "Platipus"]; ---- -<ul> - {items.map((item) => ( - <> - <li>Red {item}</li> - <li>Blue {item}</li> - <li>Green {item}</li> - </> - ))} -</ul> -``` - -### Slots - -Sometimes, an Astro component will be passed children. This is especially common for components like sidebars or dialog boxes that represent generic "wrappers” around content. - -```astro -<WrapChildrenWithText> - <img src="https://placehold.co/400" /> -<WrapChildrenWithText> -``` - -Astro provides a `<slot />` component so that you can control where any children are rendered within the component. This is heavily inspired by the [`<slot>` HTML element](https://developer.mozilla.org/en-US/docs/Web/HTML/Element/slot). - -```astro ---- -// Example: components/WrapChildrenWithText.astro -// Usage: <WrapChildrenWithText><img src="https://placehold.co/400" /><WrapChildrenWithText> -// Renders: <h1>Begin</h1><img src="https://placehold.co/400" /><h1>End</h1> ---- -<h1>Begin</h1> -<!-- slot: any given children are injected here --> -<slot /> -<h1>End</h1> -``` - -<!-- TODO: https://github.com/snowpackjs/astro/issues/600 - If you don't provide a `<slot />` component in your HTML template, any children passed to your component will not be rendered. --> - -<!-- TODO: https://github.com/snowpackjs/astro/issues/360 - Document Named Slots --> - -## Comparing `.astro` versus `.jsx` - -`.astro` files can end up looking very similar to `.jsx` files, but there are a few key differences. Here's a comparison between the two formats. - -| Feature | Astro | JSX | -| ---------------------------- | ------------------------------------------ | -------------------------------------------------- | -| File extension | `.astro` | `.jsx` or `.tsx` | -| User-Defined Components | `<Capitalized>` | `<Capitalized>` | -| Expression Syntax | `{}` | `{}` | -| Spread Attributes | `{...props}` | `{...props}` | -| Children | `<slot>` (with named slot support) | `children` | -| Boolean Attributes | `autocomplete` === `autocomplete={true}` | `autocomplete` === `autocomplete={true}` | -| Inline Functions | `{items.map(item => <li>{item}</li>)}` | `{items.map(item => <li>{item}</li>)}` | -| IDE Support | WIP - [VS Code][code-ext] | Phenomenal | -| Requires JS import | No | Yes, `jsxPragma` (`React` or `h`) must be in scope | -| Fragments | Automatic top-level, `<>` inside functions | Wrap with `<Fragment>` or `<>` | -| Multiple frameworks per-file | Yes | No | -| Modifying `<head>` | Just use `<head>` | Per-framework (`<Head>`, `<svelte:head>`, etc) | -| Comment Style | `<!-- HTML -->` | `{/* JavaScript */}` | -| Special Characters | ` ` | `{'\xa0'}` or `{String.fromCharCode(160)}` | -| Attributes | `dash-case` | `camelCase` | - -## URL resolution - -It’s important to note that Astro **won’t** transform HTML references for you. For example, consider an `<img>` tag with a relative `src` attribute inside `src/pages/about.astro`: - -```html -<!-- ❌ Incorrect: will try and load `/about/thumbnail.png` --> -<img src="./thumbnail.png" /> -``` - -Since `src/pages/about.astro` will build to `/about/index.html`, you may not have expected that image to live at `/about/thumbnail.png`. So to fix this, choose either of two options: - -### Option 1: Absolute URLs - -```html -<!-- ✅ Correct: references public/thumbnail.png --> -<img src="/thumbnail.png" /> -``` - -The recommended approach is to place files within `public/*`. This references a file it `public/thumbnail.png`, which will resolve to `/thumbnail.png` at the final build (since `public/` ends up at `/`). - -### Option 2: Asset import references - -```astro ---- -// ✅ Correct: references src/thumbnail.png -import thumbnailSrc from './thumbnail.png'; ---- - -<img src={thumbnailSrc} /> -``` - -If you’d prefer to organize assets alongside Astro components, you may import the file in JavaScript inside the component script. This works as intended but this makes `thumbnail.png` harder to reference in other parts of your app, as its final URL isn’t easily-predictable (unlike assets in `public/*`, where the final URL is guaranteed to never change). - -[code-ext]: https://marketplace.visualstudio.com/items?itemName=astro-build.astro-vscode diff --git a/docs/core-concepts/astro-pages.md b/docs/core-concepts/astro-pages.md deleted file mode 100644 index 0aedca4bf..000000000 --- a/docs/core-concepts/astro-pages.md +++ /dev/null @@ -1,60 +0,0 @@ ---- -layout: ~/layouts/Main.astro -title: Pages ---- - -**Pages** are a special type of [Astro Component](/core-concepts/astro-components) that handle routing, data loading, and templating for each page of your website. You can think of them like any other Astro component, just with extra responsibilities. - -Astro also supports Markdown for content-heavy pages, like blog posts and documentation. See [Markdown Content](/guides/markdown-content) for more information on writing pages with Markdown. - -## File-based Routing - -Astro uses Pages to do something called **file-based routing.** Every file in your `src/pages` directory becomes a page on your site, using the file name to decide the final route. - -Astro Components (`.astro`) and Markdown Files (`.md`) are the only supported formats for pages. Other page types (like a `.jsx` React component) are not supported, but you can use anything as a UI component inside of an `.astro` page to achieve a similar result. - -``` -src/pages/index.astro -> mysite.com/ -src/pages/about.astro -> mysite.com/about -src/pages/about/index.astro -> mysite.com/about -src/pages/about/me.astro -> mysite.com/about/me -src/pages/posts/1.md -> mysite.com/posts/1 -``` - -## Page Templating - -All Astro components are responsible for returning HTML. Astro Pages return HTML as well, but have the unique responsibility of returning a full `<html>...</html>` page response, including `<head>` ([MDN](https://developer.mozilla.org/en-US/docs/Web/HTML/Element/head)) and `<body>` ([MDN](https://developer.mozilla.org/en-US/docs/Web/HTML/Element/body)). - -`<!doctype html>` is optional, and will be added automatically. - -```astro ---- -// Example: HTML page skeleton ---- -<!doctype html> -<html> - <head> - <title>Document title</title> - </head> - <body> - <h1>Hello, world!</h1> - </body> -</html> -``` - -## Data Loading - -Astro pages can fetch data to help generate your pages. Astro provides two different tools to pages to help you do this: **fetch()** and **top-level await.** - -📚 Read our [full guide](/guides/data-fetching) on data-fetching to learn more. - -```astro ---- -// Example: Astro component scripts run at build time -const response = await fetch('http://example.com/movies.json'); -const data = await response.json(); -console.log(data); ---- -<!-- Output the result to the page --> -<div>{JSON.stringify(data)}</div> -``` diff --git a/docs/core-concepts/collections.md b/docs/core-concepts/collections.md deleted file mode 100644 index 96da0b6a5..000000000 --- a/docs/core-concepts/collections.md +++ /dev/null @@ -1,210 +0,0 @@ ---- -layout: ~/layouts/Main.astro -title: Collections ---- - -**Collections** are a special type of [Page](/core-concepts/astro-pages) that help you generate multiple pages from a larger set of data. Example use-cases include: - -- Pagination: `/posts/1`, `/posts/2`, etc. -- Grouping content by author: `/author/fred`, `/author/matthew`, etc. -- Grouping content by some tag: `/tags/red`, `/tags/blue`, etc. -- Working with remote data -- Mixing remote and local data - -**Use a Collection when you need to generate multiple pages from a single template.** If you just want to generate a single page (ex: a long list of every post on your site) then you can just fetch that data on a normal Astro page without using the Collection API. - -## Using Collections - -To create a new Astro Collection, you must do three things: - -1. Create a new file in the `src/pages` directory that starts with the `$` symbol. This is required to enable the Collections API. - -- Example: `src/pages/$posts.astro` -> `/posts/1`, `/posts/2`, etc. -- Example: `src/pages/$tags.astro` -> `/tags/:tag` (or `/tags/:tag/1`) - -2. Define and export the `collection` prop: `collection.data` is how you'll access the data for every page in the collection. Astro populates this prop for you automatically. It MUST be named `collection` and it must be exported. - -- Example: `const { collection } = Astro.props;` - -3. Define and export `createCollection` function: this tells Astro how to load and structure your collection data. Check out the examples below for documentation on how it should be implemented. It MUST be named `createCollection` and it must be exported. - -- Example: `export async function createCollection() { /* ... */ }` -- API Reference: [createCollection](/reference/api-reference#collections-api) - -## Example: Simple Pagination - -```jsx ---- -// Define the `collection` prop. -const { collection } = Astro.props; - -// Define a `createCollection` function. -export async function createCollection() { - const allPosts = Astro.fetchContent('../posts/*.md'); // fetch local posts. - allPosts.sort((a, b) => a.title.localeCompare(b.title)); // sort by title. - return { - // Because you are not doing anything more than simple pagination, - // its fine to just return the full set of posts for the collection data. - async data() { return allPosts; }, - // number of posts loaded per page (default: 25) - pageSize: 10, - }; -} ---- -<html lang="en"> - <head> - <title>Pagination Example: Page Number {collection.page.current}</title> - </head> - <body> - {collection.data.map((post) => ( - <h1>{post.title}</h1> - <time>{formatDate(post.published_at)}</time> - <a href={post.url}>Read Post</a> - ))} - </body> -</html> -``` - -## Example: Pagination Metadata - -```jsx ---- -// In addition to `collection.data` usage illustrated above, the `collection` -// prop also provides some important metadata for you to use, like: `collection.page`, -// `collection.url`, `collection.start`, `collection.end`, and `collection.total`. -// In this example, we'll use these values to do pagination in the template. -const { collection } = Astro.props; -export async function createCollection() { /* See Previous Example */ } ---- -<html lang="en"> - <head> - <title>Pagination Example: Page Number {collection.page.current}</title> - <link rel="canonical" href={collection.url.current} /> - <link rel="prev" href={collection.url.prev} /> - <link rel="next" href={collection.url.next} /> - </head> - <body> - <main> - <h5>Results {collection.start + 1}–{collection.end + 1} of {collection.total}</h5> - {collection.data.map((post) => ( - <h1>{post.title}</h1> - <time>{formatDate(post.published_at)}</time> - <a href={post.url}>Read Post</a> - ))} - </main> - <footer> - <h4>Page {collection.page.current} / {collection.page.last}</h4> - <nav class="nav"> - <a class="prev" href={collection.url.prev || '#'}>Prev</a> - <a class="next" href={collection.url.next || '#'}>Next</a> - </nav> - </footer> - </body> -</html> -``` - -## Example: Grouping Content by Tag, Author, etc. - -```jsx ---- -// Define the `collection` prop. -const { collection } = Astro.props; - -// Define a `createCollection` function. -// In this example, we'll customize the URLs that we generate to -// create a new page to group every pokemon by first letter of their name. -export async function createCollection() { - const allPokemonResponse = await fetch(`https://pokeapi.co/api/v2/pokemon?limit=150`); - const allPokemonResult = await allPokemonResponse.json(); - const allPokemon = allPokemonResult.results; - const allLetters = ['a','b','c','d','e','f','g','h','i','j','k','l','m','n','o','p','q','r','s','t','u','v','w','x','y','z']; - return { - // `routes` defines the total collection of routes as `params` data objects. - // In this example, we format each letter (ex: "a") to params (ex: {letter: "a"}). - routes: allLetters.map(letter => { - const params = {letter}; - return params; - }), - // `permalink` defines the final URL for each route object defined in `routes`. - // It should always match the file location (ex: `src/pages/$pokemon.astro`). - permalink: ({ params }) => `/pokemon/${params.letter}`, - // `data` is now responsible for return the data for each page. - // Luckily we had already loaded all of the data at the top of the function, - // so we just filter the data here to group pages by first letter. - // If you needed to fetch more data for each page, you can do that here as well. - async data({ params }) { - return allPokemon.filter((pokemon) => pokemon.name[0] === params.letter); - }, - // Finally, `pageSize` and `pagination` is still on by default. Because - // we don't want to paginate the already-grouped pages a second time, we'll - // disable pagination. - pageSize: Infinity, - }; -} ---- -<html lang="en"> - <head> - <title>Pokemon: {collection.params.letter}</head> - <body> - {collection.data.map((pokemon) => (<h1>{pokemon.name}</h1>))} - </body> -</html> -``` - -## Example: Individual Pages from a Collection - -**Note**: collection.data and .params are being fetched async, use optional chaining or some other way of handling this in template. Otherwise you will get build errors. - -```jsx ---- -// Define the `collection` prop. -const { collection } = Astro.props; - -// Define a `createCollection` function. -// In this example, we'll create a new page for every single pokemon. -export async function createCollection() { - const allPokemonResponse = await fetch(`https://pokeapi.co/api/v2/pokemon?limit=150`); - const allPokemonResult = await allPokemonResponse.json(); - const allPokemon = allPokemonResult.results; - return { - // `routes` defines the total collection of routes as data objects. - routes: allPokemon.map((pokemon, i) => { - const params = {name: pokemon.name, index: i}; - return params; - }), - // `permalink` defines the final URL for each route object defined in `routes`. - permalink: ({ params }) => `/pokemon/${params.name}`, - // `data` is now responsible for return the data for each page. - // Luckily we had already loaded all of the data at the top of the function, - // so we just filter the data here to group pages by first letter. - // If you needed to fetch more data for each page, you can do that here as well. - // Note: data() is expected to return an array! - async data({ params }) { - return [allPokemon[params.index]]; - }, - // Note: The default pageSize is fine because technically only one data object - // is ever returned per route. We set it to Infinity in this example for completeness. - pageSize: Infinity, - }; -} ---- -<html lang="en"> - <head> - <title>Pokemon: {collection.params?.name}</title> - </head> - <body> - Who's that pokemon? It's {collection.data[0]?.name}! - </body> -</html> -``` - -## Tips - -- If you find yourself duplicating markup across many pages and collections, you should probably be using more reusable components. - -### 📚 Further Reading - -- [Fetching data in Astro](/guides/data-fetching) -- API Reference: [collection](/reference/api-reference#collections-api) -- API Reference: [createCollection()](/reference/api-reference#createcollection) -- API Reference: [Creating an RSS feed](/reference/api-reference#rss-feed) diff --git a/docs/core-concepts/component-hydration.md b/docs/core-concepts/component-hydration.md deleted file mode 100644 index e4d217b76..000000000 --- a/docs/core-concepts/component-hydration.md +++ /dev/null @@ -1,93 +0,0 @@ ---- -layout: ~/layouts/Main.astro -title: Partial Hydration in Astro ---- - -**Astro generates every website with zero client-side JavaScript, by default.** Use any frontend UI component that you'd like (React, Svelte, Vue, etc.) and Astro will automatically render it to HTML at build-time and strip away all JavaScript. This keeps every site fast by default. - -But sometimes, client-side JavaScript is required. This guide shows how interactive components work in Astro using a technique called partial hydration. - -```astro ---- -// Example: Importing and then using a React component. -// By default, Astro renders this to HTML and CSS during -// your build, with no client-side JavaScript. -// (Need client-side JavaScript? Read on...) -import MyReactComponent from '../components/MyReactComponent.jsx'; ---- -<!-- 100% HTML, Zero JavaScript! --> -<MyReactComponent /> -``` - -## Concept: Partial Hydration - -There are plenty of cases where you need an interactive UI component to run in the browser: - -- An image carousel -- An auto-complete search bar -- A mobile sidebar open/close button -- A "Buy Now" button - -In Astro, it's up to you as the developer to explicitly "opt-in" any components on the page that need to run in the browser. Astro can then use this info to know exactly what JavaScript is needed, and only hydrate exactly what's needed on the page. This technique is is known as partial hydration. - -**Partial hydration** -- the act of only hydrating the individual components that require JavaScript and leaving the rest of your site as static HTML -- may sound relatively straightforward. It should! Websites have been built this way for decades. It was only recently that Single-Page Applications (SPAs) introduced the idea that your entire website is written in JavaScript and compiled/rendered by every user in the browser. - -_Note: Partial hydration is sometimes called "progressive enhancement" or "progressive hydration." While there are slight nuances between the terms, for our purposes you can think of these all as synonyms of the same concept._ - -**Partial hydration is the secret to Astro's fast-by-default performance story.** Next.js, Gatsby, and other JavaScript frameworks cannot support partial hydration because they imagine your entire website/page as a single JavaScript application. - -## Concept: Island Architecture - -**Island architecture** is the idea of using partial hydration to build entire websites. Island architecture is an alternative to the popular idea of building your website into a client-side JavaScript bundle that must be shipped to the user. - -To quote Jason Miller, who [coined the phrase](https://jasonformat.com/islands-architecture/): - -> In an "islands" model, server rendering is not a bolt-on optimization aimed at improving SEO or UX. Instead, it is a fundamental part of how pages are delivered to the browser. The HTML returned in response to navigation contains a meaningful and immediately renderable representation of the content the user requested. - -Besides the obvious performance benefits of sending less JavaScript down to the browser, there are two key benefits to island architecture: - -- **Components load individually.** A lightweight component (like a sidebar toggle) will load and render quickly without being blocked by the heavier components on the page. -- **Components render in isolation.** Each part of the page is an isolated unit, and a performance issue in one unit won't directly affect the others. - -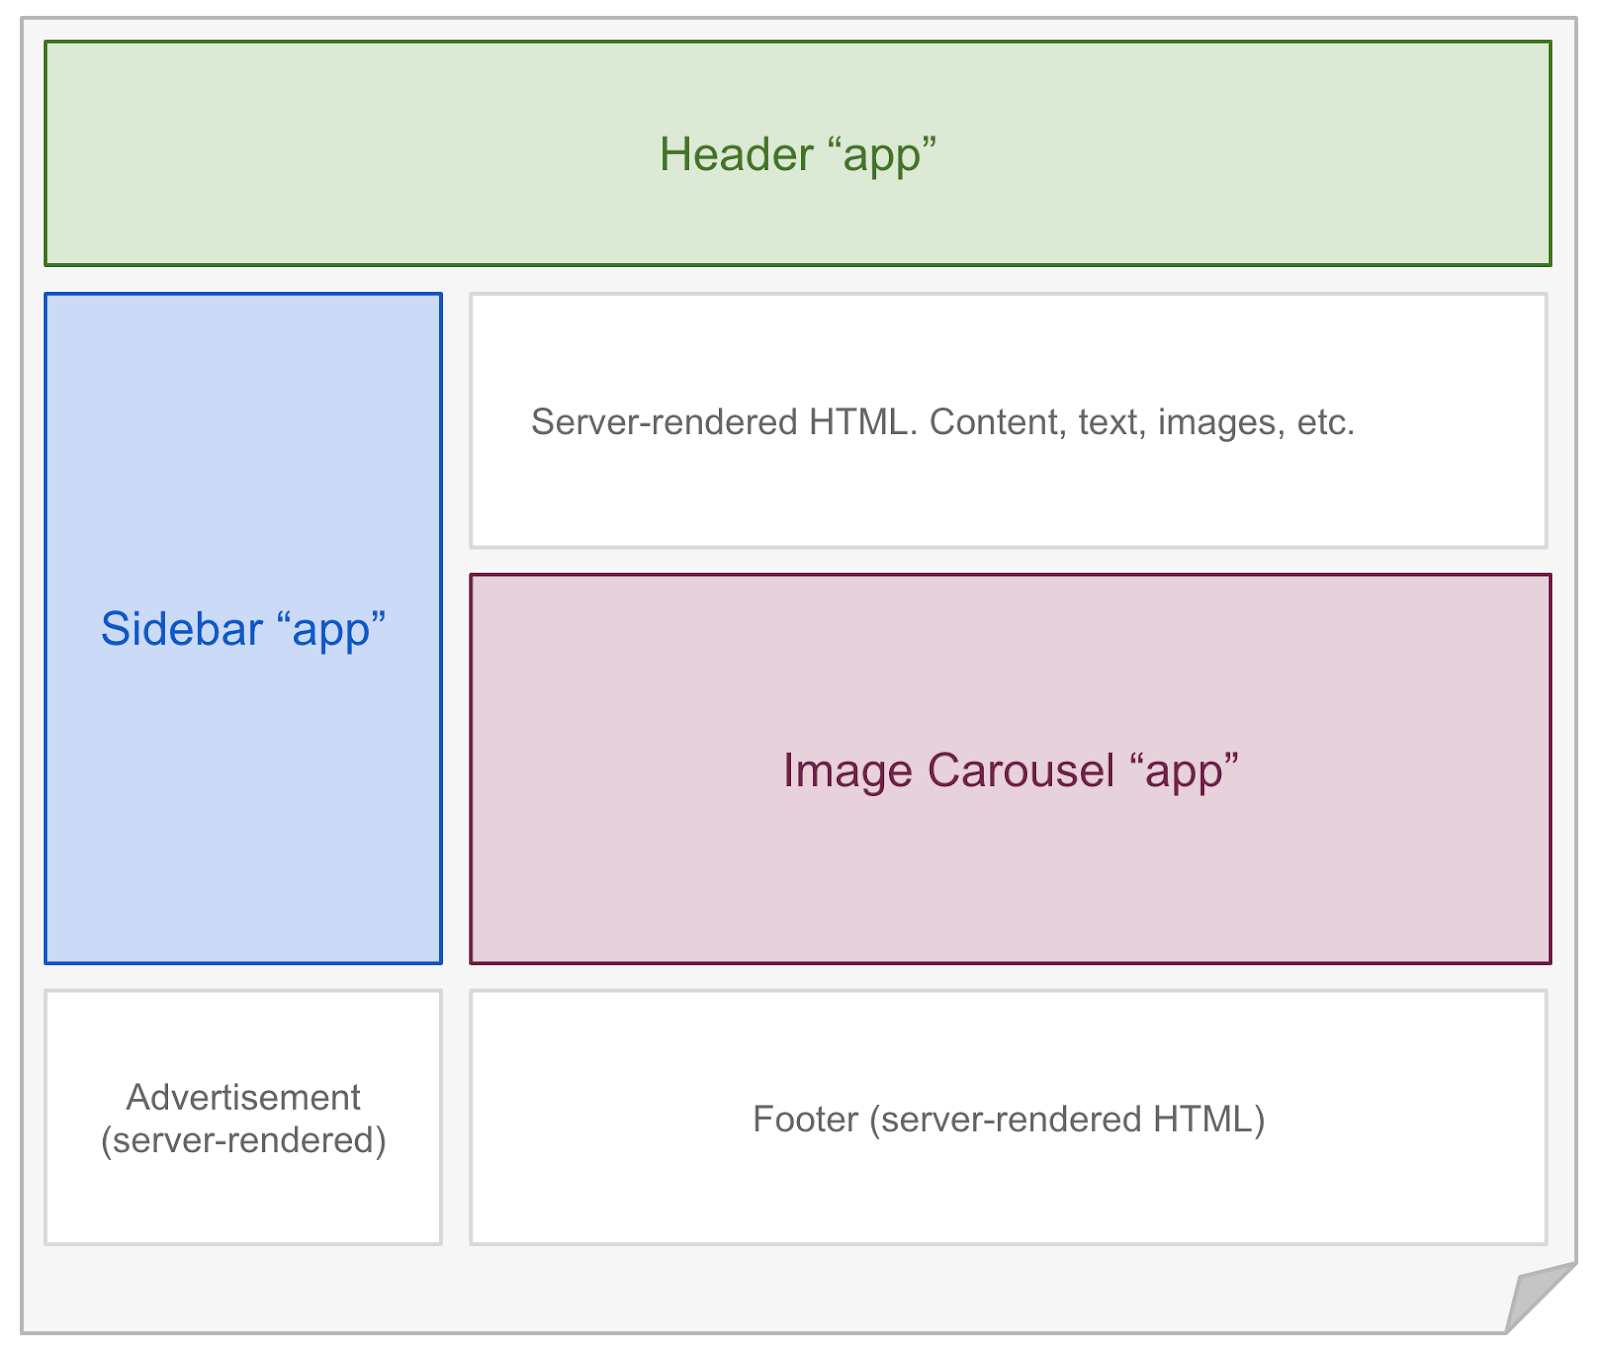 - -## Hydrate Interactive Components - -Astro renders every component on the server **at build time**. To hydrate components on the client **at runtime**, you may use any of the following `client:*` directives. A directive is a component attribute (always with a `:`) which tells Astro how your component should be rendered. - -```astro ---- -// Example: hydrating a React component in the browser. -import MyReactComponent from '../components/MyReactComponent.jsx'; ---- -<!-- "client:visible" means the component won't load any client-side - JavaScript until it becomes visible in the user's browser. --> -<MyReactComponent client:visible /> -``` - -### `<MyComponent client:load />` - -Hydrate the component on page load. - -### `<MyComponent client:idle />` - -Hydrate the component as soon as main thread is free (uses [requestIdleCallback()][mdn-ric]). - -### `<MyComponent client:visible />` - -Hydrate the component as soon as the element enters the viewport (uses [IntersectionObserver][mdn-io]). Useful for content lower down on the page. - -### `<MyComponent client:media={QUERY} />` - -Hydrate the component as soon as the browser matches the given media query (uses [matchMedia][mdn-mm]). Useful for sidebar toggles, or other elements that should only display on mobile or desktop devices. - -## Can I Hydrate Astro Components? - -[Astro components](./astro-components) (`.astro` files) are HTML-only templating components with no client-side runtime. If you try to hydrate an Astro component with a `client:` modifier, you will get an error. - -To make your Astro component interactive, you will need to convert it to the frontend framework of your choice: React, Svelte, Vue, etc. If you have no preference, we reccomend React or Preact as most similar to Astro's syntax. - -Alternatively, you could add a `<script>` tag to your Astro component HTML template and send JavaScript to the browser that way. While this is fine for the simple stuff, we recommend a frontend framework for more complex interactive components. - -[mdn-io]: https://developer.mozilla.org/en-US/docs/Web/API/Intersection_Observer_API -[mdn-ric]: https://developer.mozilla.org/en-US/docs/Web/API/Window/requestIdleCallback diff --git a/docs/core-concepts/layouts.md b/docs/core-concepts/layouts.md deleted file mode 100644 index 28bc53cf3..000000000 --- a/docs/core-concepts/layouts.md +++ /dev/null @@ -1,154 +0,0 @@ ---- -layout: ~/layouts/Main.astro -title: Layouts ---- - -**Layouts** are a special type of [Component](/core-concepts/astro-components) that help you share and reuse common page layouts within your project. - -Layouts are just like any other reusable Astro component. There's no new syntax or APIs to learn. However, reusable page layouts are such a common pattern in web development that we created this guide to help you use them. - -## Usage - -Astro layouts support props, slots, and all of the other features of Astro components. Layouts are just normal components, after all! - -Unlike other components, layouts will often contain the full page `<html>`, `<head>` and `<body>` (often referred to as the **page shell**). - -It's a common pattern to put all of your layout components in a single `src/layouts` directory. - -## Example - -```astro ---- -// src/layouts/BaseLayout.astro -const {title} = Astro.props; ---- -<html> - <head> - <title>Example Layout: {title}</title> - </head> - <body> - <!-- Adds a navigation bar to every page. --> - <nav> - <a href="#">Home</a> - <a href="#">Posts</a> - <a href="#">Contact</a> - </nav> - <!-- slot: your page content will be injected here. --> - <slot /> - </body> -</html> -``` - -📚 The `<slot />` element lets Astro components define where any children elements (passed to the layout) should go. Learn more about how `<slot/>` works in our [Astro Component guide.](/core-concepts/astro-components) - -Once you have your first layout, You can use it like you would any other component on your page. Remember that your layout contains your page `<html>`, `<head>`, and `<body>`. You only need to provide the custom page content. - -```astro ---- -// src/pages/index.astro -import BaseLayout from '../layouts/BaseLayout.astro' ---- -<BaseLayout title="Homepage"> - <h1>Hello, world!</h1> - <p>This is my page content. It will be nested inside a layout.</p> -</BaseLayout> -``` - -## Nesting Layouts - -You can nest layouts when you want to create more specific page types without copy-pasting. It is common in Astro to have one generic `BaseLayout` and then many more specific layouts (`PostLayout`, `ProductLayout`, etc.) that reuse and build on top of it. - -```astro ---- -// src/layouts/PostLayout.astro -import BaseLayout from '../layouts/BaseLayout.astro' -const {title, author} = Astro.props; ---- - <!-- This layout reuses BaseLayout (see example above): --> -<BaseLayout title={title}> - <!-- Adds new post-specific content to every page. --> - <div>Post author: {author}</div> - <!-- slot: your page content will be injected here. --> - <slot /> -</BaseLayout> -``` - -## Composing Layouts - -Sometimes, you need more granular control over your page. For instance, you may want to add SEO or social `meta` tags on some pages, but not others. You could implement this with a prop on your layout (`<BaseLayout addMeta={true} ...`) but at some point it may be easier to compose your layouts without nesting. - -Instead of defining your entire `<html>` page as one big layout, you can define the `head` and `body` contents as smaller, separate components. This lets you compose multiple layouts together in unique ways on every page. - -```astro ---- -// src/layouts/BaseHead.astro -const {title, description} = Astro.props; ---- -<meta charset="UTF-8"> -<title>{title}</title> -<meta name="description" content={description}> -<link rel="preconnect" href="https://fonts.gstatic.com"> -<link href="https://fonts.googleapis.com/css2?family=Spectral:ital,wght@0,400;0,700;1,400;1,700&display=swap" rel="stylesheet"> -``` - -Notice how this layout doesn't include your page shell, and only includes some generic elements that should go in your `<head>`. This lets you combine multiple layout components together with more control over the overall page structure. - -```astro ---- -// src/pages/index.astro -import BaseHead from '../layouts/BaseHead.astro'; -import OpenGraphMeta from '../layouts/OpenGraphMeta.astro'; ---- -<html> - <head> - <!-- Now, you have complete control over the head, per-page. --> - <BaseHead title="Page Title" description="Page Description" /> - <OpenGraphMeta /> - <!-- You can even add custom, one-off elements as needed. --> - <link rel="alternate" type="application/rss+xml" href="/feed/posts.xml"> - </head> - <body> - <!-- ... --> - </body> -</html> -``` - -The one downside to this approach is that you'll need to define the `<html>`, `<head>`, and `<body>` elements on every page yourself. This is needed to construct the page because the layout components no longer contain the full page shell. - -## Markdown Layouts - -Layouts are essential for Markdown files. Markdown files can declare a layout in the file frontmatter. Each Markdown file will be rendered to HTML and then injected into the layout's `<slot />` location. - -```markdown ---- -title: Blog Post -layout: ../layouts/PostLayout.astro ---- - -This blog post will be **rendered** inside of the `<PostLayout />` layout. -``` - -Markdown pages always pass a `content` prop to their layout, which is useful to grab information about the page, title, metadata, table of contents headers, and more. - -``` ---- -// src/layouts/PostLayout.astro -const { content } = Astro.props; ---- -<html> - <head> - <title>{content.title}</title> - </head> - <body> - <h1>{content.title}</h1> - <h2>{content.description}</h2> - <img src={content.image} alt=""> - <article> - <!-- slot: Markdown content goes here! --> - <slot /> - </article> - </body> -</html> -``` - -📚 Learn more about Astro's markdown support in our [Markdown guide](/guides/markdown-content). diff --git a/docs/core-concepts/project-structure.md b/docs/core-concepts/project-structure.md deleted file mode 100644 index 8220acf74..000000000 --- a/docs/core-concepts/project-structure.md +++ /dev/null @@ -1,57 +0,0 @@ ---- -layout: ~/layouts/Main.astro -title: Project Structure ---- - -Astro includes an opinionated folder layout for your project. Every Astro project must include these directories and files: - -- `src/*` - Your project source code (components, pages, etc.) -- `public/*` - Your non-code assets (fonts, icons, etc.) -- `package.json` - A project manifest. - -The easiest way to set up your new project is with `npm init astro`. Check out our [Installation Guide](/quick-start) for a walkthrough of how to set up your project automatically (with `npm init astro`) or manually. - -## Project Structure - -``` -├── src/ -│ ├── components/ -│ ├── layouts/ -│ └── pages/ -│ └── index.astro -├── public/ -└── package.json -``` - -### `src/` - -The src folder is where most of your project source code lives. This includes: - -- [Astro Components](/core-concepts/astro-components) -- [Pages](/core-concepts/astro-pages) -- [Markdown](/core-concepts/astro-pages) -- [Layouts](/core-concepts/astro-pages) -- [Frontend JS Components](/core-concepts/component-hydration) -- [Styling (CSS, Sass)](/guides/styling) - -Astro has complete control over how these files get processed, optimized, and bundled in your final site build. Some files (like Astro components) never make it to the browser directly and are instead rendered to HTML. Other files (like CSS) are sent to the browser but may be bundled with other CSS files depending on how your site uses. - -### `src/components` - -[Components](/core-concepts/astro-components) are reusable units of UI for your HTML pages. It is recommended (but not required) that you put your components in this directory. How you organize them within this directory is up to you. - -Your non-Astro UI components (React, Preact, Svelte, Vue, etc.) can also live in the `src/components` directory. Astro will automatically render all components to HTML unless you've enabled a frontend component via partial hydration. - -### `src/layouts` - -[Layouts](/core-concepts/layouts) are reusable components for HTML page layouts. It is recommended (but not required) that you put your layout components in this directory. How you organize them within this directory is up to you. - -### `src/pages` - -[Pages](/core-concepts/astro-pages) contain all pages (`.astro` and `.md` supported) for your website. It is **required** that you put your pages in this directory. - -### `public/` - -For most users, the majority of your files will live inside of the `src/` directory so that Astro can properly handle and optimize them in your final build. By contrast, the `public/` directory is the place for any files to live outside of the Astro build process. - -If you put a file into the public folder, it will not be processed by Astro. Instead it will be copied into the build folder untouched. This can be useful for assets like images and fonts, or when you need to include a specific file like `robots.txt` or `manifest.webmanifest`. |