
diff options
Diffstat (limited to 'docs/src/pages/en')
28 files changed, 0 insertions, 4677 deletions
diff --git a/docs/src/pages/en/comparing-astro-vs-other-tools.md b/docs/src/pages/en/comparing-astro-vs-other-tools.md deleted file mode 100644 index b760c2c14..000000000 --- a/docs/src/pages/en/comparing-astro-vs-other-tools.md +++ /dev/null @@ -1,233 +0,0 @@ ---- -layout: ~/layouts/MainLayout.astro -title: Comparing Astro -description: Comparing Astro with other static site generators like Gatsby, Next.js, Nuxt, Hugo, Eleventy, and more. ---- - -We often get asked the question, "How does Astro compare to my favorite site builder, **\_\_\_\_**?" This guide was written to help answer that question for several popular site builders and Astro alternatives. - -If you don't see your favorite site builder listed here, [ask us in Discord.](https://astro.build/chat) - -## Project Status - -A quick note on project maturity: **Astro is still in beta.** Many of the tools listed here are much more mature. Some predate Astro by over 12 years! - -A few features are still missing from Astro, and several APIs are not yet finalized. However, the project is considered stable from a bug perspective and several production websites have already been built using Astro. This is an important point to consider when choosing Astro. - -## Docusaurus vs. Astro - -[Docusaurus](https://docusaurus.io/) is a popular documentation website builder. Docusaurus uses React to generate your website UI while Astro supports React, Vue.js, Svelte, and raw HTML templating. - -Docusaurus was designed to build documentation websites and has some built-in, documentation-specific website features that Astro does not. Instead, Astro offers documentation-specific features through an official [`docs`](https://github.com/withastro/astro/tree/main/examples/docs) theme that you can use for your site. This website was built using that template! - -### Comparing Docusaurus vs. Astro Performance - -In most cases, Astro websites will load significantly faster than Docusaurus websites. This is because Astro automatically strips unnecessary JavaScript from the page, hydrating only the individual components that need it. This feature is called [partial hydration](/en/core-concepts/component-hydration). - -Docusaurus doesn't support partial hydration, and instead makes the user load and rehydrate the entire page in the browser, even if most of the page content is static. This creates a slower page load and worse performance for your website. There is no way to disable this behavior in Docusaurus. - -### Case Study: Building a Documentation Website - -[docusaurus.io/docs](https://docusaurus.io/docs) is the official Docusaurus documentation website, built with Docusaurus. The website offers a similar enough design and featureset to compare against the official Astro documentation website. This gives us a **_rough, real-world_** comparison between the two site builders. - -- **Docusaurus performance score**: 61 out of 100 [(full audit)](https://lighthouse-dot-webdotdevsite.appspot.com//lh/html?url=https%3A%2F%2Fdocusaurus.io%2Fdocs) -- **Astro performance score**: 99 out of 100 [(full audit)](https://lighthouse-dot-webdotdevsite.appspot.com//lh/html?url=https%3A%2F%2Fdocs.astro.build%2Fgetting-started) - -One big reason behind this performance difference is Astro's smaller JavaScript payload: [docusaurus.io/docs](https://docusaurus.io/docs) loads **238kb** of JavaScript on first page load while [docs.astro.build](https://docs.astro.build) loads **78.7kb** (67% less JavaScript, overall) _after_ first load. - -## Elder.js vs. Astro - -[Elder.js](https://elderguide.com/tech/elderjs/) is an opinionated static site builder built for Svelte. - -Elder.js uses Svelte to render your website. Astro is more flexible: you are free to build UI with any popular component library (React, Preact, Vue, Svelte, Solid and others) or Astro's HTML-like component syntax which is similar to HTML + JSX. - -Elder.js is unique on this list as the only other site builder to support [partial hydration](/en/core-concepts/component-hydration). Both Astro and Elder.js automatically strip unnecessary JavaScript from the page, hydrating only the individual components that need it. Elder's API for partial hydration is a bit different and Astro supports a few features that Elder.js doesn't (like `client:media`). However performance-wise, both projects will build very similar sites. - -Elder.js uses a custom routing solution that may feel unfamiliar to new developers. Astro uses [file-based routing](/en/core-concepts/routing) which should feel familiar to anyone coming from Next.js, SvelteKit, and even other static site builders like Eleventy. - -Elder.js was designed to run on large websites, and claims to build one website of ~20k pages in less than 10 minutes (on a modest VM). At the time of writing, Astro builds ~1k pages in 66 seconds but has not yet been tested on 20k+ page projects. Astro is still in early beta, and matching Elder.js build speed is a goal for Astro v1.0. - -Elder.js supports both Static Site Generation (SSG) and Server-Side Rendering (SSR). Today, Astro only supports Static Site Generation (SSG). - -## Eleventy vs. Astro - -[Eleventy](https://www.11ty.dev/) is a popular static site builder, powered by Node.js. - -Eleventy uses several [older HTML templating languages](https://www.11ty.dev/docs/languages/) to render your website: Nunjucks, Liquid, Pug, EJS, and others. Astro lets you create pages using your favorite UI component libraries (React, Preact, Vue, Svelte, and others) or a built-in component syntax which is similar to HTML + JSX. Eleventy does not support using modern UI components for HTML templating. - -### Comparing Eleventy vs. Astro Performance - -Conceptually, Eleventy is aligned with Astro's "minimal client-side JavaScript" approach to web development. Eleventy and Astro both offer similar, zero-JavaScript-by-default performance baselines. - -Eleventy achieves this by pushing you to avoid JavaScript entirely. Eleventy sites are often written with little to no JavaScript at all. This becomes an issue when you do need client-side JavaScript. It is up to you to create your own asset build pipeline for Eleventy. This can be time consuming and forces you to set up bundling, minification, and other complex optimizations yourself. - -By contrast, Astro automatically builds your client-side JavaScript & CSS for you. Astro automatically strips unnecessary JavaScript from the page, hydrating only the individual components that need it. This feature is called [partial hydration](/en/core-concepts/component-hydration). While it is possible to achieve this yourself in Eleventy, Astro offers it built in by default. - -## Gatsby vs. Astro - -[Gatsby](https://www.gatsbyjs.com/) is a popular website & application framework for React. - -Gatsby uses React to render your website. Astro is more flexible: you are free to build UI with any popular component library (React, Preact, Vue, Svelte, Solid and others) or Astro's HTML-like component syntax which is similar to HTML + JSX. - -Gatsby v4 supports both Static Site Generation (SSG) with incremental rebuilds, Deferred Static Generation (DSG), and Server-Side Rendering (SSR). Today, Astro only supports Static Site Generation (SSG). - -Gatsby requires a custom GraphQL API for working with all of your site content. While some developers enjoy this model, a common criticism of Gatsby is that this model becomes too complex and difficult to maintain over time, especially as sites grow. Astro has no GraphQL requirement, and instead provides familiar APIs (like `fetch()` and top-level `await`) for data loading close to where the data is needed. - -### Comparing Gastby vs. Astro Performance - -In most cases, Astro websites will load significantly faster than Gatsby websites. This is because Astro automatically strips unnecessary JavaScript from the page, hydrating only the individual components that need it. This feature is called [partial hydration](/en/core-concepts/component-hydration). - -Gatsby doesn't support partial hydration, and instead makes the user load and rehydrate the entire page in the browser, even if most of the page content is static. This creates a slower page load and worse performance for your website. Gatsby has [a community plugin](https://www.gatsbyjs.com/plugins/gatsby-plugin-no-javascript/) for removing all JavaScript from the page, but this would break many websites. This leaves you with an all-or-nothing decision for interactivity on each page. - -Gatsby has a great plugin ecosystem, which could make Gatsby a better choice for your project depending on your needs. [gatsby-plugin-image](https://www.gatsbyjs.com/plugins/gatsby-plugin-image/) is a popular plugin for image optimizations, which could make Gatsby a better choice for some image-heavy websites. - -### Case Study: Building a Documentation Website - -[gatsbyjs.com/docs](https://www.gatsbyjs.com/docs/quick-start/) is the official Gatsby documentation website, built with Gatsby. The website offers a similar enough design and feature-set to compare against the official Astro documentation website. This gives us a **_rough, real-world_** comparison between the two site builders for this common use-case. - -- **Gatsby performance score**: 64 out of 100 [(full audit)](https://lighthouse-dot-webdotdevsite.appspot.com//lh/html?url=https%3A%2F%2Fwww.gatsbyjs.com%2Fdocs%2Fquick-start%2F) -- **Astro performance score**: 99 out of 100 [(full audit)](https://lighthouse-dot-webdotdevsite.appspot.com//lh/html?url=https%3A%2F%2Fdocs.astro.build%2Fgetting-started) - -One big reason behind this performance difference is Astro's smaller JavaScript payload: [gatsbyjs.com/docs](https://www.gatsbyjs.com/docs/quick-start/) loads **417kb** of JavaScript on first page load while [docs.astro.build](https://docs.astro.build) loads **78.7kb** (81% less JavaScript, overall) _after_ first load. - -## Hugo vs. Astro - -[Hugo](https://gohugo.io/) is a popular static site generator, powered by Go. - -Hugo uses a custom [templating language](https://gohugo.io/templates/introduction/) to render your website. Astro lets you create pages using your favorite UI component libraries (React, Preact, Vue, Svelte, and others) or a built-in component syntax which is similar to HTML + JSX. Hugo does not support using modern UI components for HTML templating. - -### Comparing Hugo vs. Astro Performance - -Conceptually, Hugo is aligned with Astro's "minimal client-side JavaScript" approach to web development. Hugo and Astro both offer similar, zero-JavaScript-by-default performance baselines. - -Both Hugo and Astro offer built-in support for building, bundling and minifying JavaScript. Astro automatically strips unnecessary JavaScript from the page, hydrating only the individual components that need it. This feature is called [partial hydration](/en/core-concepts/component-hydration). While it is possible to achieve this yourself in Hugo, Astro offers it built in by default. - -## Jekyll vs. Astro - -[Jekyll](https://jekyllrb.com/) is a popular static site generator, powered by Ruby. - -Jekyll uses an older [templating language](https://jekyllrb.com/docs/liquid/) to render your website called Liquid. Astro lets you create pages using your favorite UI component libraries (React, Preact, Vue, Svelte, and others) or a built-in component syntax which is similar to HTML + JSX. Jekyll does not support using modern UI components for HTML templating. - -### Comparing Jekyll vs. Astro Performance - -Conceptually, Jekyll is aligned with Astro's "minimal client-side JavaScript" approach to web development. Jekyll and Astro both offer similar, zero-JavaScript-by-default performance baselines. - -Jekyll achieves this by pushing you to avoid JavaScript entirely. Jekyll sites are often written with little to no JavaScript at all, and instead promote server-side HTML rendering. This becomes an issue when you do need client-side JavaScript. It is up to you to create your own build pipeline for Jekyll. This can be time-consuming and forces you to set up bundling, minification, and other optimizations yourself. - -By contrast, Astro automatically builds your client-side JavaScript for you. Astro only sends the bare minimum amount of JavaScript to the browser, minified, bundled and optimized for production. While it is possible to achieve this yourself in Jekyll, with Astro this is built in by default. - -## SvelteKit vs. Astro - -[SvelteKit](https://kit.svelte.dev/) is a popular website & application framework for Svelte. - -SvelteKit uses Svelte to render your website. Astro is more flexible: you are free to build UI with any popular component library (React, Preact, Vue, Svelte, Solid and others) or Astro's HTML-like component syntax which is similar to HTML + JSX. - -Both SvelteKit and Astro are frameworks for building websites. SvelteKit does best with highly dynamic websites (like dashboards and inboxes) while Astro does best with highly static websites (like content and eCommerce websites). - -SvelteKit supports both Static Site Generation (SSG) and Server-Side Rendering (SSR). Today, Astro only supports Static Site Generation (SSG). - -### Comparing SvelteKit vs. Astro Performance - -In most cases, Astro websites will load faster than SvelteKit websites. This is because Astro automatically strips unnecessary JavaScript from the page, hydrating only the individual components that need it. This feature is called [partial hydration](/en/core-concepts/component-hydration). - -SvelteKit doesn't support partial hydration, and instead makes the user load and rehydrate the entire page in the browser, even if most of the page content is static. This creates a slower page load and worse performance for your website. SvelteKit does offer support for [page-level static, zero-JavaScript pages](https://kit.svelte.dev/docs#ssr-and-javascript-hydrate). However, there is no planned support for hydrating individual components on the page. This leaves you with an all-or-nothing decision for interactivity on each page. - -### Case Study: Building a Documentation Website - -[kit.svelte.dev](https://kit.svelte.dev/docs#ssr-and-javascript-hydrate) is the official SvelteKit documentation website, built with SvelteKit. The website offers a similar enough design and featureset to compare against the official Astro documentation website. This gives us a **_rough, real-world_** comparison between the two site builders for this common use-case. - -One notable difference between the two sites being tested: SvelteKit's documentation is served as a single page while Astro's is broken up into multiple pages. This larger content payload should have a slight negative impact on performance that is not related to the tool itself. - -- **SvelteKit performance score**: 92 out of 100 [(full audit)](https://lighthouse-dot-webdotdevsite.appspot.com//lh/html?url=https%3A%2F%2Fkit.svelte.dev%2Fdocs) -- **Astro performance score**: 99 out of 100 [(full audit)](https://lighthouse-dot-webdotdevsite.appspot.com//lh/html?url=https%3A%2F%2Fdocs.astro.build%2Fgetting-started) - -SvelteKit performed comparably to Astro in this test. - -## Next.js vs. Astro - -[Next.js](https://nextjs.org/) is a popular website & application framework for React. - -Next.js uses React to render your website. Astro is more flexible: you are free to build UI with any popular component library (React, Preact, Vue, Svelte, Solid and others) or Astro's HTML-like component syntax which is similar to HTML + JSX. - -Both Next.js and Astro are frameworks for building websites. Next.js does best with highly dynamic websites (like dashboards and inboxes) while Astro does best with highly static websites (like content and eCommerce websites). - -Next.js supports both Static Site Generation (SSG) and Server-Side Rendering (SSR). Today, Astro only supports Static Site Generation (SSG). - -### Comparing Next.js vs. Astro Performance - -In most cases, Astro websites will load significantly faster than Next.js websites. This is because Astro automatically strips unnecessary JavaScript from the page, hydrating only the individual components that need it. This feature is called [partial hydration](/en/core-concepts/component-hydration). - -Next.js doesn't support partial hydration, and instead makes the user load and rehydrate the entire page in the browser, even if most of the page content is static. This creates a slower page load and worse performance for your website. Next.js has [experimental support](https://piccalil.li/blog/new-year-new-website/#heading-no-client-side-react-code) for fully-static, zero-JavaScript pages. However, there is no planned support for hydrating individual components on the page. This leaves you with an all-or-nothing decision for interactivity on each page. - -Next.js has great built-in image optimizations, which could make Next.js a better choice for some image-heavy websites. - -### Case Study: Building a Documentation Website - -[nextjs.org/docs](https://nextjs.org/docs/getting-started) is the official Next.js documentation website, built with Next.js. The website offers a similar enough design and featureset to compare against the official Astro documentation website. This gives us a **_rough, real-world_** comparison between the two site builders for this common use-case. - -- **Next.js performance score**: 59 out of 100 [(full audit)](https://lighthouse-dot-webdotdevsite.appspot.com//lh/html?url=https%3A%2F%2Fnextjs.org%2Fdocs%2Fgetting-started) -- **Astro performance score**: 99 out of 100 [(full audit)](https://lighthouse-dot-webdotdevsite.appspot.com//lh/html?url=https%3A%2F%2Fdocs.astro.build%2Fgetting-started) - -One big reason behind this performance difference is Astro's smaller JavaScript payload: [nextjs.org/docs](https://nextjs.org/docs/getting-started) loads **463kb** of JavaScript on first page load while [docs.astro.build](https://docs.astro.build) loads **78.7kb** (83% less JavaScript, overall) _after_ first load. - -## Nuxt vs. Astro - -[Nuxt](https://nuxtjs.org/) is a popular website & application framework for Vue. It is similar to Next.js. - -Nuxt uses Vue to render your website. Astro is more flexible: you are free to build UI with any popular component library (React, Preact, Vue, Svelte, Solid and others) or Astro's HTML-like component syntax which is similar to HTML + JSX. - -Both Nuxt and Astro are frameworks for building websites. Nuxt does best with highly dynamic websites (like dashboards and inboxes) while Astro does best with highly static websites (like content and eCommerce websites). - -Nuxt supports both Static Site Generation (SSG) and Server-Side Rendering (SSR). Today, Astro only supports Static Site Generation (SSG). - -### Comparing Nuxt vs. Astro Performance - -In most cases, Astro websites will load significantly faster than Nuxt websites. This is because Astro automatically strips unnecessary JavaScript from the page, hydrating only the individual components that need it. This feature is called [partial hydration](/en/core-concepts/component-hydration). - -Nuxt doesn't support partial hydration, and instead makes the user load and rehydrate the entire page in the browser, even if most of the page content is static. This creates a slower page load and worse performance for your website. There is no way to disable this behavior in Nuxt. - -Nuxt has great built-in image optimizations, which could make Nuxt a better choice for some image-heavy websites. - -### Case Study: Building a Documentation Website - -[nuxtjs.org/docs](https://nuxtjs.org/docs/2.x/get-started/installation) is the official Nuxt documentation website, built with Nuxt. The website offers a similar enough design and featureset to compare against the official Astro documentation website. This gives us a **_rough, real-world_** comparison between the two site builders for this common use-case. - -- **Nuxt performance score**: 48 out of 100 [(full audit)](https://lighthouse-dot-webdotdevsite.appspot.com//lh/html?url=https%3A%2F%2Fnuxtjs.org%2Fdocs%2F2.x%2Fget-started%2Finstallation) -- **Astro performance score**: 99 out of 100 [(full audit)](https://lighthouse-dot-webdotdevsite.appspot.com//lh/html?url=https%3A%2F%2Fdocs.astro.build%2Fgetting-started) - -One big reason behind this performance difference is Astro's smaller JavaScript payload: [nuxtjs.org/docs](https://nuxtjs.org/docs/2.x/get-started/installation) loads **469kb** of JavaScript on first page load while [docs.astro.build](https://docs.astro.build) loads **78.7kb** (83% less JavaScript), _after_ first load. - -## VuePress vs. Astro - -[VuePress](https://vuepress.vuejs.org/guide/) is a popular documentation website builder from the creators of Vue.js. VuePress uses Vue.js to generate your website UI while Astro supports React, Vue.js, Svelte, and raw HTML templating. - -VuePress was designed for documentation websites and has some built-in, documentation-specific website features that Astro does not support out of the box. Instead, Astro offers documentation-specific features through an official [`docs`](https://github.com/withastro/astro/tree/main/examples/docs) theme that you can use for your site. This website was built using that template! - -Evan You (creator of Vue.js) is currently working on a new version of Vuepress called [VitePress.](https://vitepress.vuejs.org/). If you want a modern alternative to VuePress, [check out Evan's post](https://github.com/withastro/astro/issues/1159#issue-974035962) on why VitePress may be a better option. - -### Comparing VuePress vs. Astro Performance - -In most cases, Astro websites will load significantly faster than VuePress websites. This is because Astro automatically strips unnecessary JavaScript from the page, hydrating only the individual components that need it. This feature is called [partial hydration](/en/core-concepts/component-hydration). - -VuePress doesn't support partial hydration, and instead makes the user load and rehydrate the entire page in the browser, even if most of the page content is static. This creates a slower page load and worse performance for your website. There is no way to disable this behavior in VuePress. - -### Case Study: Building a Documentation Website - -[vuepress.vuejs.org](https://vuepress.vuejs.org/guide/) is the official VuePress documentation website, built with VuePress. The website offers a similar enough design and featureset to compare against the official Astro documentation website. This gives us a **_rough, real-world_** comparison between the two site builders for this common use-case. - -- **Vuepress performance score**: 63 out of 100 [(full audit)](https://lighthouse-dot-webdotdevsite.appspot.com//lh/html?url=https%3A%2F%2Fvuepress.vuejs.org%2Fguide%2F) -- **Astro performance score**: 99 out of 100 [(full audit)](https://lighthouse-dot-webdotdevsite.appspot.com//lh/html?url=https%3A%2F%2Fdocs.astro.build%2Fgetting-started) - -One big reason behind this performance difference is Astro's smaller JavaScript payload: [vuepress.vuejs.org](https://vuepress.vuejs.org/guide/) loads **166kb** of JavaScript on first page load while [docs.astro.build](https://docs.astro.build) loads **78.7kb** (53% less JavaScript, overall) _after_ first load. - -## Zola vs. Astro - -[Zola](https://www.getzola.org/) is a popular and fast static site generator, powered by Rust. - -Zola uses [Tera](https://tera.netlify.app/) to render your website. Astro lets you create pages using your favorite UI component libraries (React, Preact, Vue, Svelte, and others) or a built-in component syntax which is similar to HTML + JSX. Zola does not support using modern UI components for HTML templating. - -### Comparing Zola vs. Astro Performance - -Conceptually, Zola is aligned with Astro's "minimal client-side JavaScript" approach to web development. Zola and Astro both offer similar, zero-JavaScript-by-default performance baselines. - -Astro offer built-in support for building, bundling and minifying JavaScript. Zola requires using another build tool like Webpack to bundle and process JavaScript. Astro automatically strips unnecessary JavaScript from the page, hydrating only the individual components that need it. This feature is called [partial hydration](/en/core-concepts/component-hydration). While it is possible to achieve this yourself in Zola, Astro offers it built in by default. diff --git a/docs/src/pages/en/core-concepts/astro-components.md b/docs/src/pages/en/core-concepts/astro-components.md deleted file mode 100644 index 629ae74e6..000000000 --- a/docs/src/pages/en/core-concepts/astro-components.md +++ /dev/null @@ -1,382 +0,0 @@ ---- -layout: ~/layouts/MainLayout.astro -title: Astro Components -description: An intro to the .astro component syntax. ---- - -**Astro Components** (files ending with `.astro`) are the foundation of server-side templating in Astro. Think of the Astro component syntax as HTML enhanced with JavaScript. - -Learning a new syntax can feel intimidating, so we carefully designed the Astro component syntax to feel as familiar to web developers as possible. It borrows heavily from patterns you likely already know: components, frontmatter, props, and JSX expressions. We're confident that this guide will have you writing Astro components in no time, especially if you are already familiar with HTML & JavaScript. - -## Syntax Overview - -A single `.astro` file represents a single Astro component in your project. This pattern is known as a **Single-File Component (SFC)**. Both Svelte (`.svelte`) and Vue (`.vue`) also follow this pattern. - -Below is a walk-through of the different pieces and features of the Astro component syntax. You can read it start-to-finish, or jump between sections. - -### HTML Template - -Astro component syntax is a superset of HTML. **If you know HTML, you already know enough to write your first Astro component.** - -For example, this three-line file is a valid Astro component: - -```html -<!-- Example1.astro - Static HTML is a valid Astro component! --> -<div class="example-1"> - <h1>Hello world!</h1> -</div> -``` - -An Astro component represents some snippet of HTML in your project. This can be a reusable component, or an entire page of HTML including `<html>`, `<head>` and `<body>` elements. See our guide on [Astro Pages](/en/core-concepts/astro-pages) to learn how to build your first full HTML page with Astro. - -**Every Astro component must include an HTML template.** While you can enhance your component in several ways (see below), at the end of the day it's the HTML template that dictates what your rendered Astro component will look like. - -### CSS Styles - -CSS rules inside of a `<style>` tag are automatically scoped to that component. That means that you can reuse class names across multiple components, without worrying about conflicts. Styles are automatically extracted and optimized in the final build so that you don't need to worry about style loading. - -For best results, you should only have one `<style>` tag per-Astro component. This isn't necessarily a limitation, but it will often result in better-optimized CSS in your final build. When you're working with pages, the `<style>` tag can go nested inside of your page `<head>`. For standalone components, the `<style>` tag can go at the top-level of your template. - -```html -<!-- Astro Component CSS example --> -<style> - .circle { - background-color: red; - border-radius: 999px; - height: 50px; - width: 50px; - } -</style> -<div class="circle"></div> -``` - -```html -<!-- Astro Page CSS example --> -<html> - <head> - <style> - ...; - </style> - </head> - <body> - ... - </body> -</html> -``` - -Using `<style global>` will skip automatic scoping for every CSS rule in the `<style>` block. This escape hatch should be avoided if possible but can be useful if, for example, you need to modify styling for HTML elements added by an external library. - -Sass (an alternative to CSS) is also available via `<style lang="scss">`. - -📚 Read our full guide on [Component Styling](/en/guides/styling) to learn more. - -### Frontmatter Script - -To build dynamic components, we introduce the idea of a frontmatter component script. [Frontmatter](https://jekyllrb.com/docs/front-matter/) is a common pattern in Markdown, where some config/metadata is contained inside a code fence (`---`) at the top of the file. Astro does something similar, but with full support for JavaScript & TypeScript in your components. - -Remember that Astro is a server-side templating language, so your component script will run during the build but only the HTML is rendered to the browser. To send JavaScript to the browser, you can use a `<script>` tag in your HTML template or [convert your component to use a frontend framework](/en/core-concepts/component-hydration) like React, Svelte, Vue, etc. - -```astro ---- -// Anything inside the `---` code fence is your component script. -// This JavaScript code runs at build-time. -// See below to learn more about what you can do. -// Tip: TypeScript is also supported out-of-the-box! -const thisWorks: number = 42; -console.log('This runs at build-time, is visible in the CLI output', thisWorks); ---- -<div class="example-1"> - <h1>Hello world!</h1> -</div> -``` - -### Component Imports - -An Astro component can reuse other Astro components inside of its HTML template. This becomes the foundation of our component system: build new components and then reuse them across your project. - -To use an Astro component in your template, you first need to import it in the frontmatter component script. An Astro component is always the file's default import. - -Once imported, you can use it like any other HTML element in your template. Note that an Astro component **MUST** begin with an uppercase letter. Astro will use this to distinguish between native HTML elements (`form`, `input`, etc.) and your custom Astro components. - -```astro ---- -// Import your components in your component script... -import SomeComponent from './SomeComponent.astro'; ---- -<!-- ... then use them in your HTML! --> -<div> - <SomeComponent /> -</div> -``` - -📚 You can also import and use components from other frontend frameworks like React, Svelte, and Vue. Read our guide on [Component Hydration](/en/core-concepts/component-hydration) to learn more. - -### Dynamic JSX Expressions - -Instead of inventing our own custom syntax for dynamic templating, we give you direct access to JavaScript values inside of your HTML, using something that feels just like [JSX](https://reactjs.org/docs/introducing-jsx.html). - -Astro components can define local variables inside of the Frontmatter script. Any script variables are then automatically available in the HTML template below. - -#### Dynamic Values - -```astro ---- -const name = "Your name here"; ---- -<div> - <h1>Hello {name}!</h1> -</div> -``` - -#### Dynamic Attributes - -```astro ---- -const name = "Your name here"; ---- -<div> - <div data-name={name}>Attribute expressions supported</div> - <div data-hint={`Use JS template strings to mix ${"variables"}.`}>So good!</div> -</div> -``` - -#### Dynamic HTML - -```astro ---- -const items = ["Dog", "Cat", "Platipus"]; ---- -<ul> - {items.map((item) => ( - <li>{item}</li> - ))} -</ul> -``` - -### Component Props - -An Astro component can define and accept props. Props are available on the `Astro.props` global in your frontmatter script. - -```astro ---- -// Example: <SomeComponent greeting="(Optional) Hello" name="Required Name" /> -const { greeting = 'Hello', name } = Astro.props; ---- -<div> - <h1>{greeting}, {name}!</h1> -</div> -``` - -You can define your props with TypeScript by exporting a `Props` type interface. Astro will automatically pick up any exported `Props` interface and give type warnings/errors for your project. - -Make sure to keep all `import` and `export` statements at the top of the component, before any other JavaScript or TypeScript logic! - -```astro ---- -// include any `import` and `export` statements first -// Example: <SomeComponent /> (WARNING: "name" prop is required) -export interface Props { - name: string; - greeting?: string; -} - -// with `import`s and `export`s out of the way, include the rest of the component logic here -const { greeting = 'Hello', name } = Astro.props; ---- -<div> - <h1>{greeting}, {name}!</h1> -</div> -``` - -You can then pass the component props like this: - -```astro ---- -// SomeOtherComponent.astro -import SomeComponent from "./SomeComponent.astro"; -let firstName = "world!"; ---- -<SomeComponent name={firstName}/> -``` - -### Slots - -`.astro` files use the [`<slot>`](https://developer.mozilla.org/en-US/docs/Web/HTML/Element/slot) tag to enable component composition. Coming from React or Preact, this is the same concept as `children`. You can think of the `<slot>` element as a placeholder for markup which will be passed in from outside of the component. - -```astro -<!-- Example: MyComponent.astro --> -<div id="my-component"> - <slot /> <!-- children will go here --> -</div> - -<!-- Usage --> -<MyComponent> - <h1>Hello world!</h1> -</MyComponent> -``` - -Note that if the `<slot>` tag is not used in the HTML template, any children passed to the component will not be rendered. - -Slots become even more powerful when using **named slots**. Rather than a single `<slot>` element which renders _all_ children, named slots allow you to specify multiple places where children should be placed. - -> **Note:** The `slot` attribute is not restricted to plain HTML, components can use `slot` as well! - -```astro -<!-- Example: MyComponent.astro --> -<div id="my-component"> - <header> - <!-- children with the `slot="header"` attribute will go here --> - <slot name="header" /> - </header> - <main> - <!-- children without a `slot` (or with the `slot="default"`) attribute will go here --> - <slot /> - </main> - <footer> - <!-- children with the `slot="footer"` attribute will go here --> - <slot name="footer" /> - </footer> -</div> - -<!-- Usage --> -<MyComponent> - <h1 slot="header">Hello world!</h1> - <p>Lorem ipsum ...</p> - <FooterComponent slot="footer" /> -</MyComponent> -``` - -Slots can also render **fallback content**. When there are no matching children passed to a `<slot>`, a `<slot>` element will render its own placeholder children. - -```astro -<!-- MyComponent.astro --> -<div id="my-component"> - <slot> - <h1>I will render when this slot does not have any children!</h1> - </slot> -</div> - -<!-- Usage --> -<MyComponent /> -``` - -### Fragments & Multiple Elements - -An Astro component template can render as many top-level elements as you'd like. Unlike other UI component frameworks, you don't need to wrap everything in a single `<div>` if you'd prefer not to. - -```html -<!-- An Astro component can contain multiple top-level HTML elements: --> -<div id="a" /> -<div id="b" /> -<div id="c" /> -``` - -When working inside a JSX expression, however, you must wrap multiple elements inside of a **Fragment**. Fragments let you render a set of elements without adding extra nodes to the DOM. This is required in JSX expressions because of a limitation of JavaScript: You can never `return` more than one thing in a JavaScript function or expression. Using a Fragment solves this problem. - -A Fragment must open with `<>` and close with `</>`. Don't worry if you forget this, Astro's compiler will warn you that you need to add one. - -> **Note:** Astro also supports opening a fragment with `<Fragment>` and closing it with `</Fragment>` if you prefer to use that syntax. - -```astro ---- -const items = ["Dog", "Cat", "Platipus"]; ---- -<ul> - {items.map((item) => ( - <> - <li>Red {item}</li> - <li>Blue {item}</li> - <li>Green {item}</li> - </> - ))} -</ul> -``` - -### Hoisted scripts - -By default Astro does not make any assumptions on how you want scripts to be served, so if you add a `<script>` tag in a page or a component it will be left alone. - -However if you'd like all of your scripts to be hoisted out of components and moved to the top of the page, and then later bundled together in production, you can achieve this with hoisted scripts. - -A **hoisted script** looks like this: - -```astro -<script hoist> - // An inline script -</script> -``` - -Or it can link to an external JavaScript file: - -```astro -<script src={Astro.resolve('./my-component.js')} hoist></script> -``` - -A hoisted script can be within a page or a component, and no matter how many times the component is used, the script will only be added once: - -```astro ---- -import TwitterTimeline from '../components/TwitterTimeline.astro'; ---- - -<-- The script will only be injected into the head once. --> -<TwitterTimeline /> -<TwitterTimeline /> -<TwitterTimeline /> -``` - -## Comparing `.astro` versus `.jsx` - -`.astro` files can end up looking very similar to `.jsx` files, but there are a few key differences. Here's a comparison between the two formats. - -| Feature | Astro | JSX | -| ---------------------------- | ---------------------------------------------------------- | -------------------------------------------------- | -| File extension | `.astro` | `.jsx` or `.tsx` | -| User-Defined Components | `<Capitalized>` | `<Capitalized>` | -| Expression Syntax | `{}` | `{}` | -| Spread Attributes | `{...props}` | `{...props}` | -| Boolean Attributes | `autocomplete` === `autocomplete={true}` | `autocomplete` === `autocomplete={true}` | -| Inline Functions | `{items.map(item => <li>{item}</li>)}` | `{items.map(item => <li>{item}</li>)}` | -| IDE Support | WIP - [VS Code][code-ext] | Phenomenal | -| Requires JS import | No | Yes, `jsxPragma` (`React` or `h`) must be in scope | -| Fragments | Automatic top-level, `<Fragment>` or `<>` inside functions | Wrap with `<Fragment>` or `<>` | -| Multiple frameworks per-file | Yes | No | -| Modifying `<head>` | Just use `<head>` | Per-framework (`<Head>`, `<svelte:head>`, etc) | -| Comment Style | `<!-- HTML -->` | `{/_ JavaScript _/} | -| Special Characters | ` ` | ` ` | -| Attributes | `dash-case` | `camelCase` | - -## URL resolution - -It's important to note that Astro **won't** transform HTML references for you. For example, consider an `<img>` tag with a relative `src` attribute inside `src/pages/about.astro`: - -```html -<!-- ❌ Incorrect: will try and load `/about/thumbnail.png` --> -<img src="./thumbnail.png" /> -``` - -Since `src/pages/about.astro` will build to `/about/index.html`, you may not have expected that image to live at `/about/thumbnail.png`. So to fix this, choose either of two options: - -#### Option 1: Absolute URLs - -```html -<!-- ✅ Correct: references public/thumbnail.png --> -<img src="/thumbnail.png" /> -``` - -The recommended approach is to place files within `public/*`. This references a file at `public/thumbnail.png`, which will resolve to `/thumbnail.png` at the final build (since `public/` ends up at `/`). - -#### Option 2: Asset import references - -```astro ---- -// ✅ Correct: references src/thumbnail.png -import thumbnailSrc from './thumbnail.png'; ---- - -<img src={thumbnailSrc} /> -``` - -If you'd prefer to organize assets alongside Astro components, you may import the file in JavaScript inside the component script. This works as intended but this makes `thumbnail.png` harder to reference in other parts of your app, as its final URL isn't easily-predictable (unlike assets in `public/*`, where the final URL is guaranteed to never change). - -[code-ext]: https://marketplace.visualstudio.com/items?itemName=astro-build.astro-vscode diff --git a/docs/src/pages/en/core-concepts/astro-pages.md b/docs/src/pages/en/core-concepts/astro-pages.md deleted file mode 100644 index 45b8fb22d..000000000 --- a/docs/src/pages/en/core-concepts/astro-pages.md +++ /dev/null @@ -1,66 +0,0 @@ ---- -layout: ~/layouts/MainLayout.astro -title: Pages -description: An intro to Astro pages, components that function as full pages. ---- - -**Pages** are a special type of [Astro Component](/en/core-concepts/astro-components) that handle routing, data loading, and templating for each page of your website. You can think of them like any other Astro component, just with extra responsibilities. - -Astro also supports Markdown for content-heavy pages, like blog posts and documentation. See [Markdown Content](/en/guides/markdown-content) for more information on writing pages with Markdown. - -## File-based Routing - -Astro uses Pages to do something called **file-based routing.** Every file in your `src/pages` directory becomes a page on your site, using the file name to decide the final route. - -Astro Components (`.astro`) and Markdown Files (`.md`) are the only supported formats for pages. Other page types (like a `.jsx` React component) are not supported, but you can use anything as a UI component inside of an `.astro` page to achieve a similar result. - -``` -src/pages/index.astro -> mysite.com/ -src/pages/about.astro -> mysite.com/about -src/pages/about/index.astro -> mysite.com/about -src/pages/about/me.astro -> mysite.com/about/me -src/pages/posts/1.md -> mysite.com/posts/1 -``` - -## Page Templating - -All Astro components are responsible for returning HTML. Astro Pages return HTML as well, but have the unique responsibility of returning a full `<html>...</html>` page response, including `<head>` ([MDN<span class="sr-only">- head</span>](https://developer.mozilla.org/en-US/docs/Web/HTML/Element/head)) and `<body>` ([MDN<span class="sr-only">- body</span>](https://developer.mozilla.org/en-US/docs/Web/HTML/Element/body)). - -`<!doctype html>` is optional, and will be added automatically. - -```astro ---- -// Example: HTML page skeleton ---- -<!doctype html> -<html> - <head> - <title>Document title</title> - </head> - <body> - <h1>Hello, world!</h1> - </body> -</html> -``` - -## Data Loading - -Astro pages can fetch data to help generate your pages. Astro provides two different tools to pages to help you do this: **fetch()** and **top-level await.** - -📚 Read our [full guide](/en/guides/data-fetching) on data-fetching to learn more. - -```astro ---- -// Example: Astro component scripts run at build time -const response = await fetch('http://example.com/movies.json'); -const data = await response.json(); -console.log(data); ---- -<!-- Output the result to the page --> -<div>{JSON.stringify(data)}</div> -``` - -## Custom 404 Error Page - -For a custom 404 error page create a `404.astro` file in `/src/pages`. That builds to a `404.html` page. Most [deploy services](/en/guides/deploy) will find and use it. -This is special and different to the default behavior building `page.astro` (or `page/index.astro`) to `page/index.html`. diff --git a/docs/src/pages/en/core-concepts/component-hydration.md b/docs/src/pages/en/core-concepts/component-hydration.md deleted file mode 100644 index b319ecda5..000000000 --- a/docs/src/pages/en/core-concepts/component-hydration.md +++ /dev/null @@ -1,116 +0,0 @@ ---- -layout: ~/layouts/MainLayout.astro -title: Partial Hydration in Astro -description: Learn how partial hydration works using the "Islands Architecture" in Astro. ---- - -**Astro generates every website with zero client-side JavaScript, by default.** Use any frontend UI component that you'd like (React, Svelte, Vue, etc.) and Astro will automatically render it to HTML at build-time and strip away all JavaScript. This keeps every site fast by default. - -But sometimes, client-side JavaScript is required. This guide shows how interactive components work in Astro using a technique called partial hydration. - -```astro ---- -// Example: Importing and then using a React component. -// By default, Astro renders this to HTML and CSS during -// your build, with no client-side JavaScript. -// (Need client-side JavaScript? Read on...) -import MyReactComponent from '../components/MyReactComponent.jsx'; ---- -<!-- 100% HTML, Zero JavaScript! --> -<MyReactComponent /> -``` - -## Concept: Partial Hydration - -There are plenty of cases where you need an interactive UI component to run in the browser: - -- An image carousel -- An auto-complete search bar -- A mobile sidebar open/close button -- A "Buy Now" button - -In Astro, it's up to you as the developer to explicitly "opt-in" any components on the page that need to run in the browser. Astro can then use this info to know exactly what JavaScript is needed, and only hydrate exactly what's needed on the page. This technique is known as partial hydration. - -**Partial hydration** -- the act of only hydrating the individual components that require JavaScript and leaving the rest of your site as static HTML -- may sound relatively straightforward. It should! Websites have been built this way for decades. It was only recently that Single-Page Applications (SPAs) introduced the idea that your entire website is written in JavaScript and compiled/rendered by every user in the browser. - -_Note: Partial hydration is sometimes called "progressive enhancement" or "progressive hydration." While there are slight nuances between the terms, for our purposes you can think of these all as synonyms of the same concept._ - -**Partial hydration is the secret to Astro's fast-by-default performance story.** Next.js, Gatsby, and other JavaScript frameworks cannot support partial hydration because they imagine your entire website/page as a single JavaScript application. - -## Concept: Island Architecture - -**Island architecture** is the idea of using partial hydration to build entire websites. Island architecture is an alternative to the popular idea of building your website into a client-side JavaScript bundle that must be shipped to the user. - -> In an "islands" model, server rendering is not a bolt-on optimization aimed at improving SEO or UX. Instead, it is a fundamental part of how pages are delivered to the browser. The HTML returned in response to navigation contains a meaningful and immediately renderable representation of the content the user requested. -> <br/> -- [Jason Miller](https://jasonformat.com/islands-architecture/) - -Besides the obvious performance benefits of sending less JavaScript down to the browser, there are two key benefits to island architecture: - -- **Components load individually.** A lightweight component (like a sidebar toggle) will load and render quickly without being blocked by the heavier components on the page. -- **Components render in isolation.** Each part of the page is an isolated unit, and a performance issue in one unit won't directly affect the others. - -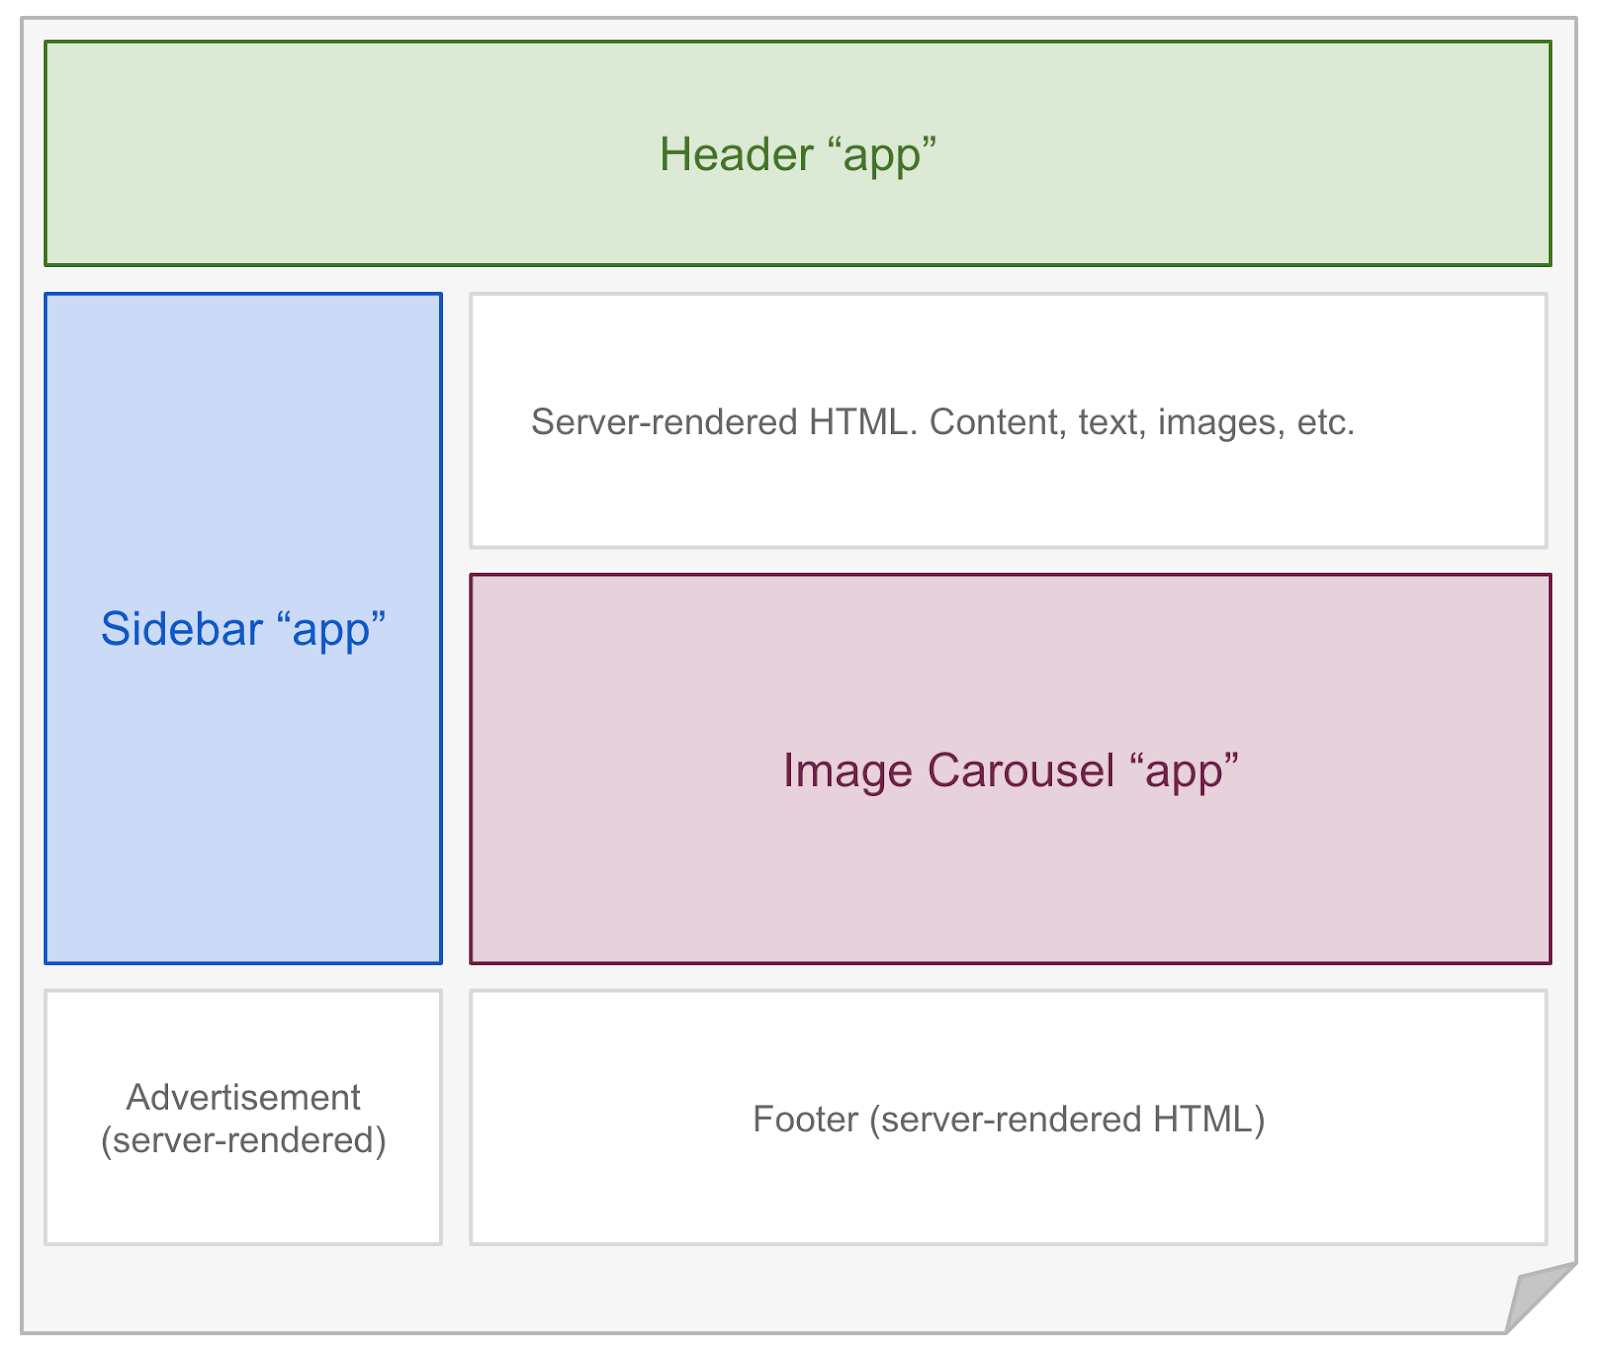 - -## Hydrate Interactive Components - -Astro renders every component on the server **at build time**, unless [client:only](#mycomponent-clientonly-) is used. To hydrate components on the client **at runtime**, you may use any of the following `client:*` directives. A directive is a component attribute (always with a `:`) which tells Astro how your component should be rendered. - -```astro ---- -// Example: hydrating a React component in the browser. -import MyReactComponent from '../components/MyReactComponent.jsx'; ---- -<!-- "client:visible" means the component won't load any client-side - JavaScript for the component until it becomes visible in the - user's browser. --> -<MyReactComponent client:visible /> -``` - -Note that the renderer JS (e.g. React) and the component's CSS are downloaded with the page. The `client:*` directives only dictate when the component JS is imported and when the component is hydrated. - -### `<MyComponent client:load />` - -Start importing the component JS at page load. Hydrate the component when import completes. - -### `<MyComponent client:idle />` - -Start importing the component JS as soon as main thread is free (uses [requestIdleCallback()][mdn-ric]). Hydrate the component when import completes. - -### `<MyComponent client:visible />` - -Start importing the component JS as soon as the element enters the viewport (uses [IntersectionObserver][mdn-io]). Hydrate the component when import completes. Useful for content lower down on the page. - -### `<MyComponent client:media={QUERY} />` - -Start importing the component JS as soon as the browser matches the given media query (uses [matchMedia][mdn-mm]). Hydrate the component when import completes. Useful for sidebar toggles, or other elements that should only display on mobile or desktop devices. - -### `<MyComponent client:only />` - -Start importing the component JS at page load and hydrate when the import completes, similar to `client:load`. The component will be **skipped** at build time, useful for components that are entirely dependent on client-side APIs. This is best avoided unless absolutely needed, in most cases it is best to render placeholder content on the server and delay any browser API calls until the component hydrates in the browser. - -If more than one renderer is included in the Astro [config](/en/reference/configuration-reference), `client:only` needs a hint to know which renderer to use for the component. For example, `client:only="react"` would make sure that the component is hydrated in the browser with the React renderer. For custom renderers not provided by `@astrojs`, use the full name of the renderer provided in your Astro config, i.e. `<client:only="my-custom-renderer" />`. - -## Can I Hydrate Astro Components? - -[Astro components](/en/core-concepts/astro-components) (`.astro` files) are HTML-only templating components with no client-side runtime. If you try to hydrate an Astro component with a `client:` modifier, you will get an error. - -To make your Astro component interactive, you will need to convert it to the frontend framework of your choice: React, Svelte, Vue, etc. If you have no preference, we recommend React or Preact as they are most similar to Astro's syntax. - -Alternatively, you could add a `<script>` tag to your Astro component HTML template and send JavaScript to the browser that way. While this is fine for the simple stuff, we recommend a frontend framework for more complex interactive components. - -```astro ---- -// Example: Using Astro with script tags ---- -<h1>Not clicked</h1> -<button>Click to change heading</button> -<script> -document.querySelector("button").addEventListener("click",() => { - document.querySelector("h1").innerText = "clicked" -}) -</script> -``` - -[mdn-io]: https://developer.mozilla.org/en-US/docs/Web/API/Intersection_Observer_API -[mdn-ric]: https://developer.mozilla.org/en-US/docs/Web/API/Window/requestIdleCallback -[mdn-mm]: https://developer.mozilla.org/en-US/docs/Web/API/Window/matchMedia diff --git a/docs/src/pages/en/core-concepts/layouts.md b/docs/src/pages/en/core-concepts/layouts.md deleted file mode 100644 index bf149778d..000000000 --- a/docs/src/pages/en/core-concepts/layouts.md +++ /dev/null @@ -1,155 +0,0 @@ ---- -layout: ~/layouts/MainLayout.astro -title: Layouts -description: An intro to layouts, a type of Astro component that is shared between pages for common layouts. ---- - -**Layouts** are a special type of [Component](/en/core-concepts/astro-components) that help you share and reuse common page layouts within your project. - -Layouts are just like any other reusable Astro component. There's no new syntax or APIs to learn. However, reusable page layouts are such a common pattern in web development that we created this guide to help you use them. - -## Usage - -Astro layouts support props, slots, and all of the other features of Astro components. Layouts are just normal components, after all! - -Unlike other components, layouts will often contain the full page `<html>`, `<head>` and `<body>` (often referred to as the **page shell**). - -It's a common pattern to put all of your layout components in a single `src/layouts` directory. - -## Example - -```astro ---- -// src/layouts/BaseLayout.astro -const {title} = Astro.props; ---- -<html> - <head> - <title>Example Layout: {title}</title> - </head> - <body> - <!-- Adds a navigation bar to every page. --> - <nav> - <a href="#">Home</a> - <a href="#">Posts</a> - <a href="#">Contact</a> - </nav> - <!-- slot: your page content will be injected here. --> - <slot /> - </body> -</html> -``` - -📚 The `<slot />` element lets Astro components define where any children elements (passed to the layout) should go. Learn more about how `<slot/>` works in our [Astro Component guide.](/en/core-concepts/astro-components) - -Once you have your first layout, you can use it like you would any other component on your page. Remember that your layout contains your page `<html>`, `<head>`, and `<body>`. You only need to provide the custom page content. - -```astro ---- -// src/pages/index.astro -import BaseLayout from '../layouts/BaseLayout.astro' ---- -<BaseLayout title="Homepage"> - <h1>Hello, world!</h1> - <p>This is my page content. It will be nested inside a layout.</p> -</BaseLayout> -``` - -## Nesting Layouts - -You can nest layouts when you want to create more specific page types without copy-pasting. It is common in Astro to have one generic `BaseLayout` and then many more specific layouts (`PostLayout`, `ProductLayout`, etc.) that reuse and build on top of it. - -```astro ---- -// src/layouts/PostLayout.astro -import BaseLayout from '../layouts/BaseLayout.astro' -const {title, author} = Astro.props; ---- - <!-- This layout reuses BaseLayout (see example above): --> -<BaseLayout title={title}> - <!-- Adds new post-specific content to every page. --> - <div>Post author: {author}</div> - <!-- slot: your page content will be injected here. --> - <slot /> -</BaseLayout> -``` - -## Composing Layouts - -Sometimes, you need more granular control over your page. For instance, you may want to add SEO or social `meta` tags on some pages, but not others. You could implement this with a prop on your layout (`<BaseLayout addMeta={true} ...`) but at some point it may be easier to compose your layouts without nesting. - -Instead of defining your entire `<html>` page as one big layout, you can define the `head` and `body` contents as smaller, separate components. This lets you compose multiple layouts together in unique ways on every page. - -```astro ---- -// src/layouts/BaseHead.astro -const {title, description} = Astro.props; ---- -<meta charset="UTF-8"> -<title>{title}</title> -<meta name="description" content={description}> -<link rel="preconnect" href="https://fonts.gstatic.com"> -<link href="https://fonts.googleapis.com/css2?family=Spectral:ital,wght@0,400;0,700;1,400;1,700&display=swap" rel="stylesheet"> -``` - -Notice how this layout doesn't include your page shell, and only includes some generic elements that should go in your `<head>`. This lets you combine multiple layout components together with more control over the overall page structure. - -```astro ---- -// src/pages/index.astro -import BaseHead from '../layouts/BaseHead.astro'; -import OpenGraphMeta from '../layouts/OpenGraphMeta.astro'; ---- -<html> - <head> - <!-- Now, you have complete control over the head, per-page. --> - <BaseHead title="Page Title" description="Page Description" /> - <OpenGraphMeta /> - <!-- You can even add custom, one-off elements as needed. --> - <link rel="alternate" type="application/rss+xml" href="/feed/posts.xml"> - </head> - <body> - <!-- ... --> - </body> -</html> -``` - -The one downside to this approach is that you'll need to define the `<html>`, `<head>`, and `<body>` elements on every page yourself. This is needed to construct the page because the layout components no longer contain the full page shell. - -## Markdown Layouts - -Layouts are essential for Markdown files. Markdown files can declare a layout in the file frontmatter. Each Markdown file will be rendered to HTML and then injected into the layout's `<slot />` location. - -```markdown ---- -title: Blog Post -layout: ../layouts/PostLayout.astro ---- - -This blog post will be **rendered** inside of the `<PostLayout />` layout. -``` - -Markdown pages always pass a `content` prop to their layout, which is useful to grab information about the page, title, metadata, table of contents headers, and more. - -```astro ---- -// src/layouts/PostLayout.astro -const { content } = Astro.props; ---- -<html> - <head> - <title>{content.title}</title> - </head> - <body> - <h1>{content.title}</h1> - <h2>{content.description}</h2> - <img src={content.image} alt=""> - <article> - <!-- slot: Markdown content goes here! --> - <slot /> - </article> - </body> -</html> -``` - -📚 Learn more about Astro's markdown support in our [Markdown guide](/en/guides/markdown-content). diff --git a/docs/src/pages/en/core-concepts/project-structure.md b/docs/src/pages/en/core-concepts/project-structure.md deleted file mode 100644 index be093b9cf..000000000 --- a/docs/src/pages/en/core-concepts/project-structure.md +++ /dev/null @@ -1,58 +0,0 @@ ---- -layout: ~/layouts/MainLayout.astro -title: Project Structure -description: Learn how to structure a project with Astro. ---- - -Astro includes an opinionated folder layout for your project. Every Astro project must include these directories and files: - -- `src/*` - Your project source code (components, pages, etc.) -- `public/*` - Your non-code assets (fonts, icons, etc.) -- `package.json` - A project manifest. - -The easiest way to set up your new project is with `npm init astro`. Check out our [Installation Guide](/en/quick-start) for a walkthrough of how to set up your project automatically (with `npm init astro`) or manually. - -## Project Structure - -``` -├── src/ -│ ├── components/ -│ ├── layouts/ -│ └── pages/ -│ └── index.astro -├── public/ -└── package.json -``` - -### `src/` - -The src folder is where most of your project source code lives. This includes: - -- [Astro Components](/en/core-concepts/astro-components) -- [Pages](/en/core-concepts/astro-pages) -- [Layouts](/en/core-concepts/layouts) -- [Frontend JS Components](/en/core-concepts/component-hydration) -- [Styling (CSS, Sass)](/en/guides/styling) -- [Markdown](/en/guides/markdown-content) - -Astro has complete control over how these files get processed, optimized, and bundled in your final site build. Some files (like Astro components) never make it to the browser directly and are instead rendered to HTML. Other files (like CSS) are sent to the browser but may be bundled with other CSS files depending on how your site uses them. - -### `src/components` - -[Components](/en/core-concepts/astro-components) are reusable units of UI for your HTML pages. It is recommended (but not required) that you put your components in this directory. How you organize them within this directory is up to you. - -Your non-Astro UI components (React, Preact, Svelte, Vue, etc.) can also live in the `src/components` directory. Astro will automatically render all components to HTML unless you've enabled a frontend component via partial hydration. - -### `src/layouts` - -[Layouts](/en/core-concepts/layouts) are reusable components for HTML page layouts. It is recommended (but not required) that you put your layout components in this directory. How you organize them within this directory is up to you. - -### `src/pages` - -[Pages](/en/core-concepts/astro-pages) contain all pages (`.astro` and `.md` supported) for your website. It is **required** that you put your pages in this directory. - -### `public/` - -For most users, the majority of your files will live inside of the `src/` directory so that Astro can properly handle and optimize them in your final build. By contrast, the `public/` directory is the place for any files to live outside of the Astro build process. - -If you put a file into the public folder, it will not be processed by Astro. Instead it will be copied into the build folder untouched. This can be useful for assets like images and fonts, or when you need to include a specific file like `robots.txt` or `manifest.webmanifest`. diff --git a/docs/src/pages/en/core-concepts/routing.md b/docs/src/pages/en/core-concepts/routing.md deleted file mode 100644 index 54a282aa9..000000000 --- a/docs/src/pages/en/core-concepts/routing.md +++ /dev/null @@ -1,102 +0,0 @@ ---- -layout: ~/layouts/MainLayout.astro -title: Routing -description: An intro to routing with Astro. ---- - -Astro uses **file-based routing** to generate your build URLs based on the file layout of your project `src/pages` directory. When a file is added to the `src/pages` directory of your project, it is automatically available as a route based on its filename. - -## Static routes - -Astro Components (`.astro`) and Markdown Files (`.md`) in the `src/pages` directory become pages on your website. Each page's route is decided based on its filename and path within the `src/pages` directory. This means that there is no separate "routing config" to maintain in an Astro project. - -```bash -# Example: Static routes -src/pages/index.astro -> mysite.com/ -src/pages/about.astro -> mysite.com/about -src/pages/about/index.astro -> mysite.com/about -src/pages/about/me.astro -> mysite.com/about/me -src/pages/posts/1.md -> mysite.com/posts/1 -``` - -## Dynamic routes - -Sometimes, you need to generate many URLs from a single page component. Astro uses file-based routing to support **dynamic route parameters** in the filename, so that one page can match many dynamic routes based on some pattern. - -An important thing to keep in mind: Astro is a static site builder. There is no Astro server to run in production, which means that every page must be built ahead of time. Pages that use dynamic routes must export a `getStaticPaths()` function which will tell Astro exactly what pages to generate. Learn more by viewing the complete [API Reference](/en/reference/api-reference#getstaticpaths). - -### Named parameters - -Dynamic parameters are encoded into the filename using `[bracket]` notation: - -- `pages/blog/[slug].astro` → `/blog/:slug` (`/blog/hello-world`, `/blog/post-2`, etc.) -- `pages/[username]/settings.astro` → (`/fred/settings`, `/drew/settings`, etc.) -- `pages/[lang]-[version]/info.astro` → (`/en-v1/info`, `/fr-v2/info`, etc.) - -#### Example: Named parameters - -Consider the following page `pages/post/[pid].astro`: - -```astro ---- -// Example: src/pages/post/[pid].astro -const {pid} = Astro.request.params; ---- -<p>Post: {pid}</p> -``` - -Any route like `/post/1`, `/post/abc`, etc. will be matched by `pages/post/[pid].astro`. The matched path parameter will be passed to the page component at `Astro.request.params`. - -For example, the route `/post/abc` will have the following `Astro.request.params` object available: - -```json -{ "pid": "abc" } -``` - -Multiple dynamic route segments can be combined to work the same way. The page `pages/post/[pid]/[comment].astro` will match the route `/post/abc/a-comment` and its `query` object will be: - -```json -{ "pid": "abc", "comment": "a-comment" } -``` - -### Rest parameters - -If you need more flexibility in your URL routing, you can use a rest parameter as a universal catch-all. You do this by adding three dots (`...`) inside your brackets. For example: - -- `pages/post/[...slug].astro` → (`/post/a`, `/post/a/b`, `/post/a/b/c`, etc.) - -Matched parameters will be sent as a query parameter (`slug` in the example) to the page. In the example above, the path `/post/a/b/c` will have the following `query` object: - -```json -{ "slug": "a/b/c" } -``` - -You can use names other than `slug`, such as: `[...param]` or `[...name]`. - -Rest parameters are optional by default, so `pages/post/[...slug].astro` could match `/post/` as well. - -#### Example: Rest parameters - -For a real-world example, you might implement GitHub's file viewer like so: - -``` -/[org]/[repo]/tree/[branch]/[...file] -``` - -In this example, a request for `/withastro/astro/tree/main/docs/public/favicon.svg` would result in the following parameters being available to the page: - -```js -{ - org: 'withastro', - repo: 'astro', - branch: 'main', - file: 'docs/public/favicon.svg' -} -``` - -## Caveats - -- Static routes without path params will take precedence over all other routes, and named path params over catch all path params. Take a look at the following examples: - - `pages/post/create.astro` - Will match `/post/create` - - `pages/post/[pid].astro` - Will match `/post/1`, `/post/abc`, etc. But not `/post/create` - - `pages/post/[...slug].astro` - Will match `/post/1/2`, `/post/a/b/c`, etc. But not `/post/create`, `/post/abc` diff --git a/docs/src/pages/en/getting-started.md b/docs/src/pages/en/getting-started.md deleted file mode 100644 index f8e22ed03..000000000 --- a/docs/src/pages/en/getting-started.md +++ /dev/null @@ -1,74 +0,0 @@ ---- -layout: ~/layouts/MainLayout.astro -title: Getting Started -description: A basic intro to Astro. ---- - -Astro is a modern static site builder. Learn what Astro is all about from [our homepage](https://astro.build/) or [our release post](https://astro.build/blog/introducing-astro). This page is an overview of the Astro documentation and all related resources. - -## Try Astro - -The easiest way to try Astro is to run `npm init astro` in a new directory on your machine. Our CLI wizard will assist you in starting a new Astro project. - -To get started with Astro in 5 quick and easy steps, visit our [Quick-Start guide](/en/quick-start). - -Alternatively, read our [Installation Guide](/en/installation) for a full walk-through on getting set up with Astro. - -### Example Projects - -If you prefer to learn Astro by example, check out our [complete library of examples](https://github.com/withastro/astro/tree/main/examples) on GitHub. - -You can check out any of these examples on your local machine by running `npm init astro` with the `--template` CLI flag. The `--template` flag also supports third-party, community templates. - -```bash -# Run the init wizard and use this official template -npm init astro -- --template [OFFICIAL_EXAMPLE_NAME] -# Run the init wizard and use this community template -npm init astro -- --template [GITHUB_USER]/[REPO_NAME] -npm init astro -- --template [GITHUB_USER]/[REPO_NAME]/path/to/example -``` - -### Online Playgrounds - -If you're interested in playing around with Astro in the browser, you can instantly spin up a new Astro project with our UI at [astro.new](https://astro.new/). - -You can try Astro in online code editors like Stackblitz, CodeSandbox, Gitpod, and GitHub Codespaces. Click the "Open in Stackblitz" link in any of the examples in our [examples library](https://github.com/withastro/astro/tree/main/examples). Or, [click here](https://stackblitz.com/fork/astro) to start a new project in [Stackblitz](https://stackblitz.com/fork/astro). - -## Learn Astro - -All manner of people come to Astro from different backgrounds bringing with them different learning styles. Whether you prefer a more theoretical or a practical approach, we hope you'll find this section helpful. - -- If you prefer to **learn by doing**, start with our [examples library](https://github.com/withastro/astro/tree/main/examples). -- If you prefer to **learn concepts step by step**, start with our [basic concepts and guides](/en/core-concepts/project-structure). - -Like any unfamiliar technology, Astro comes with a slight learning curve. However, with practice and some patience, we know, you _will_ get the hang of it, in no time. - -### Learn `.astro` Syntax - -When you begin to learn Astro, you'll see many files using the `.astro` file extension. This is **Astro's Component Syntax**: a special HTML-like file format which Astro uses for templating. It was designed to feel familiar to anyone with HTML or JSX experience. - -Our helpful guide on [Astro components](/en/core-concepts/astro-components) introduces you to the Astro syntax, and is the best way to learn. - -### API Reference - -This documentation section is useful when you want to learn more details about a particular Astro API. For example, [Configuration Reference](/en/reference/configuration-reference) lists all possible configuration options available to you. [Built-in Components Reference](/en/reference/builtin-components) lists all available core components, like `<Markdown />` and `<Code />`. - -### Versioned Documentation - -This documentation always reflects the latest stable version of Astro. Once we hit the v1.0 milestone, we will add the ability to view versioned documentation. - -## Staying Informed - -The [@astrodotbuild](https://twitter.com/astrodotbuild) Twitter account is the official source for the updates from the Astro team. - -We also post release announcements to our [Discord community](https://astro.build/chat) in the #announcements channel. - -Not every Astro release deserves its own blog post, but you can find a detailed changelog for every release in the [`CHANGELOG.md` file in the Astro repository](https://github.com/withastro/astro/blob/main/packages/astro/CHANGELOG.md). - -## Something Missing? - -If something is missing in the documentation or if you found some part confusing, please [file an issue for the documentation](https://github.com/withastro/astro/issues/new/choose) with your suggestions for improvement, or tweet at the [@astrodotbuild](https://twitter.com/astrodotbuild) Twitter account. We love hearing from you! - -## Credit - -This getting started guide was originally based off of [React's](https://reactjs.org/) getting started guide. diff --git a/docs/src/pages/en/guides/aliases.md b/docs/src/pages/en/guides/aliases.md deleted file mode 100644 index 6c226a5a6..000000000 --- a/docs/src/pages/en/guides/aliases.md +++ /dev/null @@ -1,47 +0,0 @@ ---- -layout: ~/layouts/MainLayout.astro -title: Aliases -description: An intro to aliases with Astro. ---- - -An **alias** is a way to create shortcuts for your imports. - -Aliases can help improve the development experience in codebases with many directories or relative imports. - -```astro ---- -// my-project/src/pages/about/company.astro - -import Button from '../../components/controls/Button.astro'; -import logoUrl from '../../assets/logo.png?url'; ---- -``` - -In this example, a developer would need to understand the tree relationship between `src/pages/about/company.astro`, `src/components/controls/Button.astro`, and `src/assets/logo.png`. And then, if the `company.astro` file were to be moved, these imports would also need to be updated. - -You can add import aliases from either `tsconfig.json` or `jsconfig.json`. - -```json -{ - "compilerOptions": { - "baseUrl": ".", - "paths": { - "asset:*": ["src/assets/*?url"], - "component:*": ["src/components/*.astro"] - } - } -} -``` - -With this change, you can now import using the aliases anywhere in your project: - -```astro ---- -// my-project/src/pages/about/company.astro - -import Button from 'component:Button'; -import logoUrl from 'asset:logo.png'; ---- -``` - -These aliases are also integrated automatically into [VSCode](https://code.visualstudio.com/docs/languages/jsconfig) and other editors. diff --git a/docs/src/pages/en/guides/data-fetching.md b/docs/src/pages/en/guides/data-fetching.md deleted file mode 100644 index a0481f059..000000000 --- a/docs/src/pages/en/guides/data-fetching.md +++ /dev/null @@ -1,56 +0,0 @@ ---- -layout: ~/layouts/MainLayout.astro -title: Data Fetching -description: Learn how to fetch remote data with Astro using the fetch API. ---- - -Astro components and pages can fetch remote data to help generate your pages. Astro provides two different tools to pages to help you do this: **fetch()** and **top-level await.** - -## `fetch()` - -Astro pages have access to the global `fetch()` function in their setup script. `fetch()` is a native JavaScript API ([MDN<span class="sr-only">- fetch</span>](https://developer.mozilla.org/en-US/docs/Web/API/Fetch_API/Using_Fetch)) that lets you make HTTP requests for things like APIs and resources. - -Even though Astro component scripts run inside of Node.js (and not in the browser) Astro provides this native API so that you can fetch data at page build time. - -```astro ---- -// Movies.astro -const response = await fetch('https://example.com/movies.json'); -const data = await response.json(); -// Remember: Astro component scripts log to the CLI -console.log(data); ---- -<!-- Output the result to the page --> -<div>{JSON.stringify(data)}</div> -``` - -## Top-level await - -`await` is another native JavaScript feature that lets you await the response of some asynchronous promise ([MDN<span class="sr-only">- await</span>](https://developer.mozilla.org/en-US/docs/Web/JavaScript/Reference/Operators/await)). Astro supports `await` in the top-level of your component script. - -**Important:** These are not yet available inside of non-page Astro components. Instead, do all of your data loading inside of your pages, and then pass them to your components as props. - -## Using `fetch()` outside of Astro Components - -If you want to use `fetch()` in a non-astro component, it is also globally available: - -```tsx -// Movies.tsx -import type { FunctionalComponent } from 'preact'; -import { h } from 'preact'; - -const data = fetch('https://example.com/movies.json').then((response) => - response.json() -); - -// Components that are build-time rendered also log to the CLI. -// If you loaded this component with a directive, it would log to the browser console. -console.log(data); - -const Movies: FunctionalComponent = () => { - // Output the result to the page - return <div>{JSON.stringify(data)}</div>; -}; - -export default Movies; -``` diff --git a/docs/src/pages/en/guides/debugging.md b/docs/src/pages/en/guides/debugging.md deleted file mode 100644 index 7e3211656..000000000 --- a/docs/src/pages/en/guides/debugging.md +++ /dev/null @@ -1,7 +0,0 @@ ---- -layout: ~/layouts/MainLayout.astro -title: Debugging -description: Debug in Astro using the Debug component ---- - -Astro runs on the server and logs directly to your terminal, so it can be difficult to debug values from Astro. Astro's built-in `<Debug>` component can help you inspect values inside your files on the clientside. Read more about the [built-in Debug Component](/en/reference/builtin-components#debug-). diff --git a/docs/src/pages/en/guides/deploy.md b/docs/src/pages/en/guides/deploy.md deleted file mode 100644 index d5b6797db..000000000 --- a/docs/src/pages/en/guides/deploy.md +++ /dev/null @@ -1,528 +0,0 @@ ---- -layout: ~/layouts/MainLayout.astro -title: Deploy a Website -description: Multiple different methods to deploy a website with Astro. ---- - -The following guides are based on some shared assumptions: - -- You are using the default build output location (`dist/`). This location [can be changed using the `dist` configuration option](/en/reference/configuration-reference). -- You are using npm. You can use equivalent commands to run the scripts if you are using Yarn or other package managers. -- Astro is installed as a local dev dependency in your project, and you have set up the following npm scripts: - -```json -{ - "scripts": { - "start": "astro dev", - "build": "astro build", - "preview": "astro preview" - } -} -``` - -## Building The App - -You may run `npm run build` command to build the app. - -```bash -$ npm run build -``` - -By default, the build output will be placed at `dist/`. You may deploy this `dist/` folder to any of your preferred platforms. - -## GitHub Pages - -> **Warning:** By default, Github Pages will break the `_astro/` directory of your deployed website. To disable this behavior and fix this issue, make sure that you use the `deploy.sh` script below or manually add an empty `.nojekyll` file to your `public/` site directory. - -1. Set the correct `buildOptions.site` in `astro.config.mjs`. -1. Inside your project, create `deploy.sh` with the following content (uncommenting the appropriate lines), and run it to deploy: - - ```bash - #!/usr/bin/env sh - - # abort on errors - set -e - - # build - npm run build - - # navigate into the build output directory - cd dist - - # add .nojekyll to bypass GitHub Page's default behavior - touch .nojekyll - - # if you are deploying to a custom domain - # echo 'www.example.com' > CNAME - - git init - git add -A - git commit -m 'deploy' - - # if you are deploying to https://<USERNAME>.github.io - # git push -f git@github.com:<USERNAME>/<USERNAME>.github.io.git main - - # if you are deploying to https://<USERNAME>.github.io/<REPO> - # git push -f git@github.com:<USERNAME>/<REPO>.git main:gh-pages - - cd - - ``` - - > You can also run the above script in your CI setup to enable automatic deployment on each push. - -### GitHub Actions - -1. In the astro project repo, create `gh-pages` branch then go to Settings > Pages and set to `gh-pages` branch for GitHub Pages and set directory to `/` (root). -2. Set the correct `buildOptions.site` in `astro.config.mjs`. -3. Create the file `.github/workflows/main.yml` and add in the yaml below. Make sure to edit in your own details. -4. In GitHub go to Settings > Developer settings > Personal Access tokens. Generate a new token with repo permissions. -5. In the astro project repo (not \<YOUR USERNAME\>.github.io) go to Settings > Secrets and add your new personal access token with the name `API_TOKEN_GITHUB`. -6. When you push changes to the astro project repo CI will deploy them to \<YOUR USERNAME\>.github.io for you. - -```yaml -# Workflow to build and deploy to your GitHub Pages repo. - -# Edit your project details here. -# Remember to add API_TOKEN_GITHUB in repo Settings > Secrets as well! -env: - githubEmail: <YOUR GITHUB EMAIL ADDRESS> - deployToRepo: <NAME OF REPO TO DEPLOY TO (E.G. <YOUR USERNAME>.github.io)> - -name: Github Pages Astro CI - -on: - # Triggers the workflow on push and pull request events but only for the main branch - push: - branches: [main] - pull_request: - branches: [main] - - # Allows you to run this workflow manually from the Actions tab. - workflow_dispatch: - -jobs: - deploy: - runs-on: ubuntu-latest - - steps: - # Checks-out your repository under $GITHUB_WORKSPACE, so your job can access it - - uses: actions/checkout@v2 - - # Install dependencies with npm - - name: Install dependencies - run: npm ci - - # Build the project and add .nojekyll file to supress default behaviour - - name: Build - run: | - npm run build - touch ./dist/.nojekyll - - # Push to your pages repo - - name: Push to pages repo - uses: cpina/github-action-push-to-another-repository@main - env: - API_TOKEN_GITHUB: ${{ secrets.API_TOKEN_GITHUB }} - with: - source-directory: 'dist' - destination-github-username: ${{ github.actor }} - destination-repository-name: ${{ env.deployToRepo }} - user-email: ${{ env.githubEmail }} - commit-message: Deploy ORIGIN_COMMIT - target-branch: gh-pages -``` - -### Travis CI - -1. Set the correct `buildOptions.site` in `astro.config.mjs`. -2. Create a file named `.travis.yml` in the root of your project. -3. Run `npm install` locally and commit the generated lockfile (`package-lock.json`). -4. Use the GitHub Pages deploy provider template, and follow the [Travis CI documentation](https://docs.travis-ci.com/user/deployment/pages/). - - ```yaml - language: node_js - node_js: - - lts/* - install: - - npm ci - script: - - npm run build - deploy: - provider: pages - skip_cleanup: true - local_dir: dist - # A token generated on GitHub allowing Travis to push code on you repository. - # Set in the Travis settings page of your repository, as a secure variable. - github_token: $GITHUB_TOKEN - keep_history: true - on: - branch: master - ``` - -## GitLab Pages - -1. Set the correct `buildOptions.site` in `astro.config.mjs`. -2. Set `dist` in `astro.config.mjs` to `public` and `public` in `astro.config.mjs` to a newly named folder that is holding everything currently in `public`. The reasoning is because `public` is a second source folder in astro, so if you would like to output to `public` you'll need to pull public assets from a different folder. Your `astro.config.mjs` might end up looking like this: - - ```js - export default /** @type {import('astro').AstroUserConfig} */ ({ - // Enable the Preact renderer to support Preact JSX components. - renderers: ['@astrojs/renderer-preact'], - // files in `static/` will be blindly copied to `public/` - public: 'static', - // `public/` is where the built website will be output to - dist: 'public', - buildOptions: { - sitemap: true, - site: 'https://astro.build/', - }, - }); - ``` - -3. Create a file called `.gitlab-ci.yml` in the root of your project with the content below. This will build and deploy your site whenever you make changes to your content: - - ```yaml - image: node:14 - pages: - cache: - paths: - - node_modules/ - script: - - npm install - - npm run build - artifacts: - paths: - - public - only: - - main - ``` - -## Netlify - -**Note:** If you are using an older [build image](https://docs.netlify.com/configure-builds/get-started/#build-image-selection) on Netlify, make sure that you set your Node.js version in either a [`.nvmrc`](https://github.com/nvm-sh/nvm#nvmrc) file (example: `node v14.17.6`) or a `NODE_VERSION` environment variable. This step is no longer required by default. - -You can configure your deployment in two ways, via the Netlify website or with a local project `netlify.toml` file. - -### `netlify.toml` file - -Create a new `netlify.toml` file at the top level of your project repository with the following settings: - -```toml -[build] - command = "npm run build" - publish = "dist" -``` - -Push the new `netlify.toml` file up to your hosted git repository. Then, set up a new project on [Netlify](https://netlify.com) for your git repository. Netlify will read this file and automatically configure your deployment. - -### Netlify Website UI - -You can skip the `netlify.toml` file and go directly to [Netlify](https://netlify.com) to configure your project. Netlify should now detect Astro projects automatically and pre-fill the configuration for you. Make sure that the following settings are entered before hitting the "Deploy" button: - -- **Build Command:** `astro build` or `npm run build` -- **Publish directory:** `dist` - -## Google Cloud - -Different from most available deploy options here, [Google Cloud](https://cloud.google.com) requires some UI clicks to deploy projects. (Most of these actions can also be done using the gcloud CLI). - -### Cloud Run - -1. Create a new GCP project, or select one you already have. - -2. Make sure the Cloud Run API is enabled. - -3. Create a new service. - -4. Use a container from Docker Hub or build your own using [Cloud Build](https://cloud.google.com/build). - -5. Configure a port from which the files are served. - -6. Enable public access by adding a new permission to `allUsers` called `Cloud Run Invoker`. - -### Cloud Storage - -1. Create a new GCP project, or select one you already have. - -2. Create a new bucket under [Cloud Storage](https://cloud.google.com/storage). - -3. Give it a name and other required settings. - -4. Upload your `dist` folder into it or upload using [Cloud Build](https://cloud.google.com/build). - -5. Enable public access by adding a new permission to `allUsers` called `Storage Object Viewer`. - -6. Edit the website configuration and add `ìndex.html` as entrypoint and `404.html` as errorpage. - -## Google Firebase - -1. Make sure you have [firebase-tools](https://www.npmjs.com/package/firebase-tools) installed. - -2. Create `firebase.json` and `.firebaserc` at the root of your project with the following content: - - `firebase.json`: - - ```json - { - "hosting": { - "public": "dist", - "ignore": [] - } - } - ``` - - `.firebaserc`: - - ```json - { - "projects": { - "default": "<YOUR_FIREBASE_ID>" - } - } - ``` - -3. After running `npm run build`, deploy using the command `firebase deploy`. - -## Surge - -1. First install [surge](https://www.npmjs.com/package/surge), if you haven't already. - -2. Run `npm run build`. - -3. Deploy to surge by typing `surge dist`. - -You can also deploy to a [custom domain](http://surge.sh/help/adding-a-custom-domain) by adding `surge dist yourdomain.com`. - -## Heroku - -1. Install [Heroku CLI](https://devcenter.heroku.com/articles/heroku-cli). - -2. Create a Heroku account by [signing up](https://signup.heroku.com). - -3. Run `heroku login` and fill in your Heroku credentials: - - ```bash - $ heroku login - ``` - -4. Create a file called `static.json` in the root of your project with the below content: - - `static.json`: - - ```json - { - "root": "./dist" - } - ``` - - This is the configuration of your site; read more at [heroku-buildpack-static](https://github.com/heroku/heroku-buildpack-static). - -5. Set up your Heroku git remote: - - ```bash - # version change - $ git init - $ git add . - $ git commit -m "My site ready for deployment." - - # creates a new app with a specified name - $ heroku apps:create example - - # set buildpack for static sites - $ heroku buildpacks:set https://github.com/heroku/heroku-buildpack-static.git - ``` - -6. Deploy your site: - - ```bash - # publish site - $ git push heroku master - - # opens a browser to view the Dashboard version of Heroku CI - $ heroku open - ``` - -## Vercel - -You can deploy Astro to [Vercel](http://vercel.com) through the CLI or the Vercel git integrations. - -### CLI - -1. Install the [Vercel CLI](https://vercel.com/cli) and run `vercel` to deploy. -2. When asked `Want to override the settings? [y/N]`, choose `Y`. -3. Update `Output Directory` to `./dist`. -4. Your application is deployed! (e.g. [astro.vercel.app](https://astro.vercel.app/)) - -```bash -$ npm i -g vercel -$ vercel -``` - -### Git - -1. Push your code to your git repository (GitHub, GitLab, BitBucket). -2. [Import your project](https://vercel.com/new) into Vercel. -3. Update `Output Directory` to `./dist`. -4. Your application is deployed! (e.g. [astro.vercel.app](https://astro.vercel.app/)) - -After your project has been imported and deployed, all subsequent pushes to branches will generate [Preview Deployments](https://vercel.com/docs/concepts/deployments/environments#preview), and all changes made to the Production Branch (commonly “main”) will result in a [Production Deployment](https://vercel.com/docs/concepts/deployments/environments#production). - -Learn more about Vercel’s [Git Integration](https://vercel.com/docs/concepts/git). - -## Azure Static Web Apps - -You can deploy your Astro project with Microsoft Azure [Static Web Apps](https://aka.ms/staticwebapps) service. You need: - -- An Azure account and a subscription key. You can create a [free Azure account here](https://azure.microsoft.com/free). -- Your app code pushed to [GitHub](https://github.com). -- The [SWA Extension](https://marketplace.visualstudio.com/items?itemName=ms-azuretools.vscode-azurestaticwebapps) in [Visual Studio Code](https://code.visualstudio.com). - -Install the extension in VS Code and navigate to your app root. Open the Static Web Apps extension, sign in to Azure, and click the '+' sign to create a new Static Web App. You will be prompted to designate which subscription key to use. - -Follow the wizard started by the extension to give your app a name, choose a framework preset, and designate the app root (usually `/`) and built file location `/dist`. The wizard will run and will create a GitHub action in your repo in a `.github` folder. - -The action will work to deploy your app (watch its progress in your repo's Actions tab) and, when successfully completed, you can view your app in the address provided in the extension's progress window by clicking the 'Browse Website' button that appears when the GitHub action has run. - -## Cloudflare Pages - -You can deploy your Astro project on [Cloudflare Pages](https://pages.cloudflare.com). You need: - -- A Cloudflare account. If you don’t already have one, you can create a free Cloudflare account during the process. -- Your app code pushed to a [GitHub](https://github.com) or a [GitLab](https://about.gitlab.com/) repository. - -Then, set up a new project on Cloudflare Pages. - -Use the following build settings: - -- **Framework preset**: `Astro` -- **Build command:** `npm run build` -- **Build output directory:** `dist` -- **Environment variables (advanced)**: Currently, Cloudflare Pages supports `NODE_VERSION = 12.18.0` in the Pages build environment by default. Astro requires `14.15.0`, `v16.0.0`, or higher. You can add an environment variable with the **Variable name** of `NODE_VERSION` and a **Value** of a [Node version that’s compatible with Astro](https://docs.astro.build/installation#prerequisites) or by specifying the node version of your project in a `.nvmrc` or `.node-version` file. - -Then click the **Save and Deploy** button. - -## Render - -You can deploy your Astro project on [Render](https://render.com/) following these steps: - -1. Create a [render.com account](https://dashboard.render.com/) and sign in -2. Click the **New +** button from your dashboard and select **Static Site** -3. Connect your [GitHub](https://github.com/) or [GitLab](https://about.gitlab.com/) repository or alternatively enter the public URL of a public repository -4. Give your website a name, select the branch and specify the build command and publish directory - - **build command:** `npm run build` - - **publish directory:** `dist` -5. Click the **Create Static Site** button - -## Buddy - -You can deploy your Astro project using [Buddy](https://buddy.works). To do so you'll need to: - -1. Create a **Buddy** account [here](https://buddy.works/sign-up). -2. Create a new project and connect it with a git repository (GitHub, GitLab, BitBucket, any private Git Repository or you can use Buddy Git Hosting). -3. Add a new pipeline. -4. In the newly created pipeline add a **[Node.js](https://buddy.works/actions/node-js)** action. -5. In this action add: - - ```bash - npm install - npm run build - ``` - -6. Add a deployment action - there are many to choose from, you can browse them [here](https://buddy.works/actions). Although their can settings differ, remember to set the **Source path** to `dist`. -7. Press the **Run** button. - -## Layer0 - -You can deploy your Astro project using the steps in the following sections. - -### Create the Astro Site - -If you don't have an existing Astro site, you can create one by running: - -```bash -# Make a new project directory, and navigate directly into it -$ mkdir my-astro-project && cd $_ - -# prepare for liftoff... -$ npm init astro - -# install dependencies -$ npm install - -# start developing! -$ npm run dev - -# when you're ready: build your static site to `dist/` -$ npm run build -``` - -### Add Layer0 - -```bash -# First, globally install the Layer0 CLI: -$ npm i -g @layer0/cli - -# Then, add Layer0 to your Astro site: -$ 0 init -``` - -### Update your Layer0 Router - -Paste the following into routes.ts: - -```js -// routes.ts -import { Router } from '@layer0/core'; - -export default new Router() - .get( - '/:path*/:file.:ext(js|css|png|ico|jpg|gif|svg)', - ({ cache, serveStatic }) => { - cache({ - browser: { - // cache js, css, and images in the browser for one hour... - maxAgeSeconds: 60 * 60, - }, - edge: { - // ... and at the edge for one year - maxAgeSeconds: 60 * 60 * 24 * 365, - }, - }); - serveStatic('dist/:path*/:file.:ext'); - } - ) - .match('/:path*', ({ cache, serveStatic, setResponseHeader }) => { - cache({ - // prevent the browser from caching html... - browser: false, - edge: { - // ...cache html at the edge for one year - maxAgeSeconds: 60 * 60 * 24 * 365, - }, - }); - setResponseHeader('content-type', 'text/html; charset=UTF-8'); - serveStatic('dist/:path*'); - }); -``` - -You can remove the origin backend from `layer0.config.js`: - -```js -module.exports = {}; -``` - -### Deploy to Layer0 - -To deploy your site to Layer0, run: - -```bash -# Create a production build of your astro site -$ npm run build - -# Deploy it to Layer0 -$ 0 deploy -``` - -## Credits - -This guide was originally based off [Vite](https://vitejs.dev/)’s well-documented static deploy guide. diff --git a/docs/src/pages/en/guides/environment-variables.md b/docs/src/pages/en/guides/environment-variables.md deleted file mode 100644 index c8546c8d7..000000000 --- a/docs/src/pages/en/guides/environment-variables.md +++ /dev/null @@ -1,48 +0,0 @@ ---- -layout: ~/layouts/MainLayout.astro -title: Using environment variables -description: Learn how to use environment variables in an Astro project. ---- - -Astro uses Vite for environment variables, and allows you to use any of its methods to get and set environment variables. Note that all environment variables must be prefixed with `PUBLIC_` to be accessible by client side code. - -The ability to access private variables on the server side is [still being discussed](https://github.com/withastro/astro/issues/1765). - -## Setting environment variables - -Vite includes `dotenv` by default, allowing you to easily set environment variables without any extra configuration in Astro projects. You can also attach a mode (either `production` or `development`) to the filename, like `.env.production` or `.env.development`, which makes the environment variables only take effect in that mode. - -Just create a `.env` file in the project directory and add some variables to it. - -```bash -# .env -PUBLIC_POKEAPI="https://pokeapi.co/api/v2" -``` - -## Getting environment variables - -Instead of using `process.env`, with Vite you use `import.meta.env`, which uses the `import.meta` feature added in ES2020 (don't worry about browser support though, Vite replaces all `import.meta.env` mentions with static values). For example, to get the `PUBLIC_POKEAPI` environment variable, you could use `import.meta.env.PUBLIC_POKEAPI`. - -```js -fetch(`${import.meta.env.PUBLIC_POKEAPI}/pokemon/squirtle`); -``` - -> ⚠️WARNING⚠️: -> Because Vite statically replaces `import.meta.env`, you cannot access it with dynamic keys like `import.meta.env[key]`. - -## IntelliSense for TypeScript - -By default, Vite provides type definition for `import.meta.env` in `vite/client.d.ts`. While you can define more custom env variables in `.env.[mode]` files, you may want to get TypeScript IntelliSense for user-defined env variables which prefixed with `PUBLIC_`. - -To achieve, you can create an `env.d.ts` in `src` directory, then augment `ImportMetaEnv` like this: - -```ts -interface ImportMetaEnv { - readonly PUBLIC_POKEAPI: string; - // more env variables... -} - -interface ImportMeta { - readonly env: ImportMetaEnv; -} -``` diff --git a/docs/src/pages/en/guides/imports.md b/docs/src/pages/en/guides/imports.md deleted file mode 100644 index fffcfe925..000000000 --- a/docs/src/pages/en/guides/imports.md +++ /dev/null @@ -1,142 +0,0 @@ ---- -layout: ~/layouts/MainLayout.astro -title: Supported Imports -description: Learn how to import different content types with Astro. ---- - -Astro uses Vite as its internal build system. Vite provides Astro with built-in support for the following file types, with no configuration required: - -- JavaScript (`.js`, `.mjs`) -- TypeScript (`.ts`, `.tsx`) -- JSON (`.json`) -- JSX (`.jsx`, `.tsx`) -- CSS (`.css`) -- CSS Modules (`.module.css`) -- Images & Assets (`.svg`, `.jpg`, `.png`, etc.) -- Astro Components (`.astro`) -- Markdown (`.md`) -- WASM (`.wasm`) - -Any files in your `public/` directory are copied into the final build, untouched by Vite or Astro. The following applies to files in your `src/` directory, which Astro is ultimately responsible for. - -## JavaScript & ESM - -Astro was designed for JavaScript's native ES Module (ESM) syntax. ESM lets you define explicit imports & exports that browsers and build tools can better understand and optimize for. If you're familiar with the `import` and `export` keywords in JavaScript, then you already know ESM! - -```js -// ESM Example - src/user.js -export function getUser() { - /* ... */ -} - -// src/index.js -import { getUser } from './user.js'; -``` - -All browsers now support ESM, so Astro is able to ship this code directly to the browser during development. - -## TypeScript - -Astro includes built-in support to build TypeScript files (`*.ts`) to JavaScript. Astro components also support TypeScript in the frontmatter script section. - -Note that this built-in support is build only. By default, Astro does not type-check your TypeScript code. - -<!-- To integrate type checking into your development/build workflow, add the [@snowpack/plugin-typescript](https://www.npmjs.com/package/@snowpack/plugin-typescript) plugin. --> - -## JSX - -Astro includes built-in support to build JSX files (`*.jsx` & `*.tsx`) to JavaScript. - -If you are using Preact, Astro will detect your Preact import and switch to use the Preact-style JSX `h()` function. This is all done automatically for you. - -**Note: Astro does not support JSX in `.js`/`.ts` files.** - -## JSON - -```js -// Load the JSON object via the default export -import json from './data.json'; -``` - -Astro supports importing JSON files directly into your application. Imported files return the full JSON object in the default import. - -## CSS - -```js -// Load and inject 'style.css' onto the page -import './style.css'; -``` - -Astro supports importing CSS files directly into your application. Imported styles expose no exports, but importing one will automatically add those styles to the page. This works for all CSS files by default, and can support compile-to-CSS languages like Sass & Less via plugins. - -If you prefer not to write CSS, Astro also supports all popular CSS-in-JS libraries (ex: styled-components) for styling. - -## CSS Modules - -```jsx -// 1. Converts './style.module.css' classnames to unique, scoped values. -// 2. Returns an object mapping the original classnames to their final, scoped value. -import styles from './style.module.css'; - -// This example uses JSX, but you can use CSS Modules with any framework. -return <div className={styles.error}>Your Error Message</div>; -``` - -Astro supports CSS Modules using the `[name].module.css` naming convention. Like any CSS file, importing one will automatically apply that CSS to the page. However, CSS Modules export a special default `styles` object that maps your original classnames to unique identifiers. - -CSS Modules help you enforce component scoping & isolation on the frontend with unique-generated class names for your stylesheets. - -## Other Assets - -```jsx -import imgReference from './image.png'; // img === '/src/image.png' -import svgReference from './image.svg'; // svg === '/src/image.svg' -import txtReference from './words.txt'; // txt === '/src/words.txt' - -// This example uses JSX, but you can use import references with any framework. -<img src={imgReference} />; -``` - -All other assets not explicitly mentioned above can be imported via ESM `import` and will return a URL reference to the final built asset. This can be useful for referencing non-JS assets by URL, like creating an image element with a `src` attribute pointing to that image. - -It can also be useful to place images in the `public/`-folder as explained on the [project-structure page](/en/core-concepts/project-structure/#public). - -## WASM - -```js -// Loads and intializes the requested WASM file -const wasm = await WebAssembly.instantiateStreaming(fetch('/example.wasm')); -``` - -Astro supports loading WASM files directly into your application using the browser's [`WebAssembly`](https://developer.mozilla.org/en-US/docs/Web/JavaScript/Reference/Global_Objects/WebAssembly) API. - -## NPM Packages - -```js -// Returns the React & React-DOM npm packages -import React from 'react'; -import ReactDOM from 'react-dom'; -``` - -Astro lets you import npm packages directly in the browser. Even if a package was published using a legacy format, Astro will up-convert the package to ESM before serving it to the browser. - -When you start up your dev server or run a new build, you may see a message that Vite is "installing dependencies". This means that Vite is converting your dependencies to run in the browser. This needs to run only once, or until you next change your dependency tree by adding or removing dependencies. - -## Node Builtins - -We encourage Astro users to avoid Node.js builtins (`fs`, `path`, etc) whenever possible. Astro aims to be compatible with multiple JavaScript runtimes in the future. This includes [Deno](https://deno.land/) and [Cloudflare Workers](https://workers.cloudflare.com/) which do not support Node builtin modules such as `fs`. - -Our aim is to provide Astro alternatives to common Node.js builtins. However, no such alternatives exist today. So, if you _really_ need to use these builtin modules we don't want to stop you. Astro supports Node.js builtins using Node's newer `node:` prefix. If you want to read a file, for example, you can do so like this: - -```astro ---- -// Example: import the "fs/promises" builtin from Node.js -import fs from 'node:fs/promises'; - -const url = new URL('../../package.json', import.meta.url); -const json = await fs.readFile(url, 'utf-8'); -const data = JSON.parse(json); ---- - -<span>Version: {data.version}</span> -``` diff --git a/docs/src/pages/en/guides/markdown-content.md b/docs/src/pages/en/guides/markdown-content.md deleted file mode 100644 index 487856171..000000000 --- a/docs/src/pages/en/guides/markdown-content.md +++ /dev/null @@ -1,332 +0,0 @@ ---- -layout: ~/layouts/MainLayout.astro -title: Markdown -description: An intro to Markdown with Astro. ---- - -Astro comes with out-of-the-box Markdown support powered by the expansive [remark](https://remark.js.org/) ecosystem. - -## Parsers - -Astro lets you use any Markdown parser you want. It just needs to be a function that follows the `MarkdownParser` type declared inside [this file](https://github.com/withastro/astro/blob/main/packages/astro/src/@types/astro.ts). You can declare it inside `astro.config.mjs`: - -```js -// astro.config.mjs -export default { - markdownOptions: { - render: [ - 'parser-name', // or import('parser-name') or (contents) => {...} - { - // options - }, - ], - }, -}; -``` - -Astro comes with the `@astrojs/markdown-remark` package - the default parser. - -### Remark and Rehype Plugins - -In addition to custom components inside the [`<Markdown>` component](/en/guides/markdown-content#astros-markdown-component), the default parser comes with these plugins pre-enabled: - -- [GitHub-flavored Markdown](https://github.com/remarkjs/remark-gfm) -- [remark-smartypants](https://github.com/silvenon/remark-smartypants) -- [rehype-slug](https://github.com/rehypejs/rehype-slug) - -Also, Astro supports third-party plugins for Markdown. You can provide your plugins in `astro.config.mjs`. - -> **Note:** Enabling custom `remarkPlugins` or `rehypePlugins` removes Astro's built-in support for the plugins previously mentioned. You must explicitly add these plugins to your `astro.config.mjs` file, if desired. - -### Add a Markdown plugin in Astro - -If you want to add a plugin, you need to install the npm package dependency in your project and then update `remarkPlugins` or `rehypePlugins` inside the `@astrojs/markdown-remark` options depending on what plugin you want to have: - -```js -// astro.config.mjs -export default { - markdownOptions: { - render: [ - '@astrojs/markdown-remark', - { - remarkPlugins: [ - // Add a Remark plugin that you want to enable for your project. - // If you need to provide options for the plugin, you can use an array and put the options as the second item. - // ['remark-autolink-headings', { behavior: 'prepend'}], - ], - rehypePlugins: [ - // Add a Rehype plugin that you want to enable for your project. - // If you need to provide options for the plugin, you can use an array and put the options as the second item. - // 'rehype-slug', - // ['rehype-autolink-headings', { behavior: 'prepend'}], - ], - }, - ], - }, -}; -``` - -You can provide names of the plugins as well as import them: - -```js -import autolinkHeadings from 'remark-autolink-headings'; - -// astro.config.mjs -export default { - markdownOptions: { - render: [ - '@astrojs/markdown-remark', - { - remarkPlugins: [[autolinkHeadings, { behavior: 'prepend' }]], - }, - ], - }, -}; -``` - -### Syntax Highlighting - -Astro comes with built-in support for [Prism](https://prismjs.com/) and [Shiki](https://shiki.matsu.io/). By default, Prism is enabled. You can modify this behavior by updating the `@astrojs/markdown-remark` options: - -```js -// astro.config.mjs -export default { - markdownOptions: { - render: [ - '@astrojs/markdown-remark', - { - // Pick a syntax highlighter. Can be 'prism' (default), 'shiki' or false to disable any highlighting. - syntaxHighlight: 'prism', - // If you are using shiki, here you can define a global theme and - // add custom languages. - shikiConfig: { - theme: 'github-dark', - langs: [], - wrap: false, - }, - }, - ], - }, -}; -``` - -You can read more about custom Shiki [themes](https://github.com/shikijs/shiki/blob/main/docs/themes.md#loading-theme) and [languages](https://github.com/shikijs/shiki/blob/main/docs/languages.md#supporting-your-own-languages-with-shiki). - -## Markdown Pages - -Astro treats any `.md` files inside of the `/src/pages` directory as pages. These files can contain frontmatter, but are otherwise processed as plain markdown files and do not support components. If you're looking to embed rich components in your markdown, take a look at the [Markdown Component](#astros-markdown-component) section. - -### Layouts - -Markdown pages have a special frontmatter property for `layout`. This defines the relative path to an `.astro` component which should wrap your Markdown content, for example a [Layout](/en/core-concepts/layouts) component. All other frontmatter properties defined in your `.md` page will be exposed to the component as properties of the `content` prop. The rendered Markdown content is placed into the default `<slot />` element. - -```markdown ---- -# src/pages/index.md -layout: ../layouts/BaseLayout.astro -title: My cool page -draft: false ---- - -# Hello World! -``` - -```astro ---- -// src/layouts/BaseLayout.astro -const { content } = Astro.props; ---- -<html> - <head> - <title>{content.title}</title> - </head> - - <body> - <slot /> - </body> -</html> -``` - -For Markdown files, the `content` prop also has an `astro` property which holds special metadata about the page such as the complete Markdown `source` and a `headers` object. An example of what a blog post `content` object might look like is as follows: - -```json -{ - /** Frontmatter from a blog post - "title": "Astro 0.18 Release", - "date": "Tuesday, July 27 2021", - "author": "Matthew Phillips", - "description": "Astro 0.18 is our biggest release since Astro launch.", - "draft": false, - **/ - "astro": { - "headers": [ - { - "depth": 1, - "text": "Astro 0.18 Release", - "slug": "astro-018-release" - }, - { - "depth": 2, - "text": "Responsive partial hydration", - "slug": "responsive-partial-hydration" - } - /* ... */ - ], - "source": "# Astro 0.18 Release\\nA little over a month ago, the first public beta [...]" - }, - "url": "" -} -``` - -> Keep in mind that the only guaranteed properties coming from the `content` prop are `astro` and `url`. - -### Images and videos - -Using images or videos follows Astro's normal import rules: - -- Place them in the `public/` as explained on the [project-structure page](/en/core-concepts/project-structure/#public) - - Example: Image is located at `/public/assets/img/astonaut.png` → Markdown: `` -- Or use `import` as explained on the [imports page](/en/guides/imports#other-assets) (when using Astro's Markdown Component) - -### Markdown draft pages - -Markdown pages which have the property `draft` set in their frontmatter are referred to as "draft pages". By default, Astro excludes these pages from the build when building the static version of your page (i.e `astro build`), which means that you can exclude draft/incomplete pages from the production build by setting `draft` to `true`. To enable building of draft pages, you can set `buildOptions.drafts` to `true` in the configuration file, or pass the `--drafts` flag when running `astro build`. Markdown pages which do not have the `draft` property set are not affected. An example of a markdown draft page can be: - -```markdown ---- -# src/pages/blog-post.md -title: My Blog Post -draft: true ---- - -This is my blog post which is currently incomplete. -``` - -An example of a markdown post which is not a draft: - -```markdown ---- -# src/pages/blog-post.md -title: My Blog Post -draft: false ---- - -This is my blog post... -``` - -> This feature only applies to local markdown pages, not the `<Markdown />` component, or remote markdown. - -## Astro's Markdown Component - -Astro has a dedicated component used to let you render your markdown as HTML components. This is a special component that is only exposed to `.astro` files. To use the `<Markdown>` component, within your frontmatter block use the following import statement: - -```astro ---- -import { Markdown } from 'astro/components'; ---- -``` - -You can utilize this within your `.astro` file by doing the following: - -```astro ---- -import { Markdown } from 'astro/components'; ---- - -<Layout> - <Markdown> - # Hello world! - - The contents inside here is all in markdown. - </Markdown> -</Layout> -``` - -`<Markdown>` components provide more flexibility and allow you to use plain HTML or custom components. For example: - -````astro ---- -// For now, this import _must_ be named "Markdown" and _must not_ be wrapped with a custom component -// We're working on easing these restrictions! -import { Markdown } from 'astro/components'; -import Layout from '../layouts/main.astro'; -import MyFancyCodePreview from '../components/MyFancyCodePreview.tsx'; - -const expressions = 'Lorem ipsum'; ---- - -<Layout> - <Markdown> - # Hello world! - - **Everything** supported in a `.md` file is also supported here! - - There is _zero_ runtime overhead. - - In addition, Astro supports: - - Astro {expressions} - - Automatic indentation normalization - - Automatic escaping of expressions inside code blocks - - ```js - // This content is not transformed! - const object = { someOtherValue }; - ``` - - - Rich component support like any `.astro` file! - - Recursive Markdown support (Component children are also processed as Markdown) - - <MyFancyCodePreview client:visible> - ```js - const object = { someOtherValue }; - ``` - </MyFancyCodePreview client:visible> - </Markdown> -</Layout> -```` - -## Remote Markdown - -If you have Markdown in a remote source, you may pass it directly to the Markdown component through the `content` attribute. For example, the example below fetches the README from Snowpack's GitHub repository and renders it as HTML. - -```astro ---- -import { Markdown } from 'astro/components'; - -const content = await fetch('https://raw.githubusercontent.com/snowpackjs/snowpack/main/README.md').then(res => res.text()); ---- - -<Layout> - <Markdown content={content} /> -</Layout> -``` - -There might be times when you want to combine both dynamic, and static markdown. If that is the case, you can nest `<Markdown>` components with each other to get the best of both worlds. - -```astro ---- -import { Markdown } from 'astro/components'; - -const content = await fetch('https://raw.githubusercontent.com/snowpackjs/snowpack/main/README.md').then(res => res.text()); ---- - -<Layout> - <Markdown> - ## Markdown example - - Here we have some __Markdown__ code. We can also dynamically render content from remote places. - - <Markdown content={content} /> - </Markdown> -</Layout> -``` - -## Security FAQs - -**Aren't there security concerns to rendering remote markdown directly to HTML?** - -Yes! Just like with regular HTML, improper use of the `Markdown` component can open you up to a [cross-site scripting (XSS)](https://en.wikipedia.org/wiki/Cross-site_scripting) attack. If you are rendering untrusted content, be sure to _sanitize your content **before** rendering it_. - -**Why not use a prop like React's `dangerouslySetInnerHTML={{ __html: content }}`?** - -Rendering a string of HTML (or Markdown) is an extremely common use case when rendering a static site and you probably don't need the extra hoops to jump through. Rendering untrusted content is always dangerous! Be sure to _sanitize your content **before** rendering it_. diff --git a/docs/src/pages/en/guides/pagination.md b/docs/src/pages/en/guides/pagination.md deleted file mode 100644 index 73fc2ef96..000000000 --- a/docs/src/pages/en/guides/pagination.md +++ /dev/null @@ -1,108 +0,0 @@ ---- -layout: ~/layouts/MainLayout.astro -title: Pagination -description: An intro to Astro pagination to split large amounts of data into different pages. ---- - -Astro supports built-in, automatic pagination for large collections of data that need to be split into multiple pages. Astro also automatically includes pagination metadata for things like previous/next page URL, total number of pages, and more. - -## When to use pagination - -Pagination is only useful when you need to generate multiple, numbered pages from a larger data set. - -If all of your data can fit on a single page then you should consider using a static [page component](/en/core-concepts/astro-pages) instead. - -If you need to split your data into multiple pages but do not want those page URLs to be numbered, then you should use a [dynamic page](/en/core-concepts/routing) instead without pagination (Example: `/tag/[tag].astro`). - -## How to use pagination - -### Create your page component - -To automatically paginate some data, you'll first need to create your page component. This is the component `.astro` file that every page in the paginated collection will inherit from. - -Pagination is built on top of dynamic page routing, with the page number in the URL represented as a dynamic route param: `[page].astro` or `[...page].astro`. If you aren't familiar with routing in Astro, quickly familiarize yourself with our [Routing documentation](/en/core-concepts/routing) before continuing. - -Your first page URL will be different depending on which type of query param you use: - -- `/posts/[page].astro` will generate the URLs `/posts/1`, `/posts/2`, `/posts/3`, etc. -- `/posts/[...page].astro` will generate the URLs `/posts`, `/posts/2`, `/posts/3`, etc. - -### calling the `paginate()` function - -Once you have decided on the file name/path for your page component, you'll need to export a [`getStaticPaths()`](/en/reference/api-reference#getstaticpaths) function from the component. `getStaticPaths()` is where you tell Astro what pages to generate. - -`getStaticPaths()` provides the `paginate()` function that we'll use to paginate your data. In the example below, we'll use `paginate()` to split a list of 150 Pokemon into 15 pages of 10 Pokemon each. - -```js -export async function getStaticPaths({ paginate }) { - // Load your data with fetch(), Astro.fetchContent(), etc. - const response = await fetch(`https://pokeapi.co/api/v2/pokemon?limit=150`); - const result = await response.json(); - const allPokemon = result.results; - // Return a paginated collection of paths for all posts - return paginate(allPokemon, { pageSize: 10 }); -} -// If set up correctly, The page prop now has everything that -// you need to render a single page (see next section). -const { page } = Astro.props; -``` - -`paginate()` generates the correct array of path objects for `getStaticPaths()`. This automatically tells Astro to create a new URL for every page of the collection. The page data will then be passed as a `page` prop to the `.astro` page component. - -### using the `page` prop - -Once you've set up your page component and defined your `getStaticPaths()` function, you're ready to design your page template. Each page in the paginated collection will be passed its data in the `page` prop. - -```astro ---- -export async function getStaticPaths { /* ... */ } -const { page } = Astro.props; ---- -<h1>Page {page.currentPage}</h1> -<ul> - {page.data.map(item => <li>{item.title}</li>)} -</ul> -``` - -The `page` prop has several useful properties, but the most important one is `page.data`. This is the array containing the page's slice of data that you passed to the `paginate()` function. For example, if you called `paginate()` on an array of 150 Pokemon: - -- `/1`: `page.data` would be an array of the first 10 Pokemon -- `/2`: `page.data` would be an array of Pokemon 11-20 -- `/3`: `page.data` would be an array of Pokemon 21-30 -- etc. etc. - -The `page` prop includes other helpful metadata, like `page.url.next`, `page.url.prev`, `page.total`, and more. See our [API reference](/en/reference/api-reference#the-pagination-page-prop) for the full `page` interface. - -## Nested pagination - -A more advanced use-case for pagination is **nested pagination.** This is when pagination is combined with other dynamic route params. You can use nested pagination to group your paginated collection by some property or tag. - -For example, if you want to group your paginated markdown posts by some tag, you would use nested pagination by creating a `/src/pages/[tag]/[page].astro` page that would match the following URLS: - -- `/red/1` (tag=red) -- `/red/2` (tag=red) -- `/blue/1` (tag=blue) -- `/green/1` (tag=green) - -Nested pagination works by returning an array of `paginate()` results from `getStaticPaths()`, one for each grouping. In the following example, we will implement nested pagination to build the URLs listed above: - -```astro ---- -// Example: /src/pages/[tag]/[page].astro -export function getStaticPaths({paginate}) { - const allTags = ['red', 'blue', 'green']; - const allPosts = Astro.fetchContent('../../posts/*.md'); - // For every tag, return a paginate() result. - // Make sure that you pass `{params: {tag}}` to `paginate()` - // so that Astro knows which tag grouping the result is for. - return allTags.map((tag) => { - const filteredPosts = allPosts.filter((post) => post.tag === tag); - return paginate(filteredPosts, { - params: { tag }, - pageSize: 10 - }); - }); -} -const { page } = Astro.props; -const { params } = Astro.request; -``` diff --git a/docs/src/pages/en/guides/publish-to-npm.md b/docs/src/pages/en/guides/publish-to-npm.md deleted file mode 100644 index 2b3d88932..000000000 --- a/docs/src/pages/en/guides/publish-to-npm.md +++ /dev/null @@ -1,216 +0,0 @@ ---- -layout: ~/layouts/MainLayout.astro -title: Publish to NPM -description: Learn how to publish Astro components to NPM ---- - -Building a new Astro component? **Publish it to [npm!](https://npmjs.com/)** - -Publishing a component is a great way to reuse work across your team, your company, or the entire world. Astro components can be published to and installed from npm, just like any other JavaScript package. - -**Astro's ability to publish and reuse popular components is one of it's most powerful features!** - -Even if you don't plan on publishing your components online, the patterns outlined below can help any developer design reusable components in isolation from their custom website or business logic. - -Looking for inspiration? Check out some of [our favorite themes & components][/themes] from the Astro community. You can also [search npm](https://www.npmjs.com/search?q=keywords:astro-component) to see the entire public catalog. - -## Creating a package - -> Before diving in, it will help have a basic understanding of: -> -> - [Node Modules](https://docs.npmjs.com/creating-node-js-modules) -> - [JSON Manifest (`package.json`)](https://docs.npmjs.com/creating-a-package-json-file) -> - [Workspaces](https://docs.npmjs.com/cli/v7/configuring-npm/package-json#workspaces) - -To create a new package, we recommend developing with **workspaces**. This will allow you to develop your component alongside a working copy of Astro. - -``` -my-project/ - ├─ demo/ - └─ ... for testing and demonstration - ├─ package.json - └─ packages/ - └─ my-component/ - ├─ index.js - ├─ package.json - └─ ... additional files used by the package -``` - -In this example, named `my-project`, we create a project with a single package, named `my-component`, and a `demo` directory for testing and demonstrating the component. - -This is configured in the project root’s `package.json` file. - -```json -{ - "name": "my-project", - "workspaces": ["demo", "packages/*"] -} -``` - -In this example, multiple packages can be developed together from the `packages` directory. These packages can also be referenced from `demo`, where you can install a working copy of Astro. - -```shell -npm init astro demo --template minimal -``` - -Now let’s explore the files that will make up your individual package: - -### `package.json` - -The `package.json` in the package directory includes all of the information related to your package, including its description, dependencies, and any other package metadata. - -```json -{ - "name": "my-component", - "description": "... description", - "version": "1.0.0", - "type": "module", - "exports": { - ".": "./index.js", - "./astro": "./MyAstroComponent.astro", - "./react": "./MyReactComponent.jsx" - }, - "files": ["index.js", "MyAstroComponent.astro", "MyReactComponent.jsx"], - "keywords": ["astro-component", "... etc", "... etc"] -} -``` - -#### `package.json#description` - -The short description of your component used to help others know what it does. - -```json -{ - "description": "An Astro Element Generator" -} -``` - -#### `package.json#type` - -The module format used by Node.js and Astro to interpret your `index.js` files. - -```json -{ - "type": "module" -} -``` - -We recommend using `"type": "module"` so that your `index.js` can be used as an entrypoint with `import` and `export`. - -#### `package.json#exports` - -The entry points allowed by Astro to import your component or any of its [files](#packagejsonfiles). - -```json -{ - "exports": { - ".": "./index.js", - "./astro": "./MyAstroComponent.astro", - "./react": "./MyReactComponent.jsx" - } -} -``` - -In this example, importing `my-component` would use `index.js`, while importing `my-component/astro` or `my-component/react` would use `MyAstroComponent.astro` or `MyReactComponent.jsx`. - -#### `package.json#files` - -```json -{ - "files": ["index.js", "MyAstroComponent.astro", "MyReactComponent.jsx"] -} -``` - -#### `package.json#keywords` - -An array of keywords relevant to your component that are used to help others [find your component on npm](https://www.npmjs.com/search?q=keywords:astro-component) and any other search catalogs. - -We recommend adding the `astro-component` as a special keyword to maximize its discoverability in the Astro ecosystem. - -```json -{ - "keywords": ["astro-component", "... etc", "... etc"] -} -``` - ---- - -### `index.js` - -The main **package entrypoint** used whenever your package is imported. - -```js -export { default as MyAstroComponent } from './MyAstroComponent.astro'; - -export { default as MyReactComponent } from './MyReactComponent.jsx'; -``` - -This allows you to package multiple components together into a single interface. - -#### Example: Using Named Imports - -```astro ---- -import { MyAstroComponent } from 'my-component'; -import { MyReactComponent } from 'my-component'; ---- -<MyAstroComponent /> -<MyReactComponent /> -``` - -#### Example: Using Namespace Imports - -```astro ---- -import * as Example from 'example-astro-component'; ---- -<Example.MyAstroComponent /> -<Example.MyReactComponent /> -``` - -#### Example: Using Individual Imports - -```astro ---- -import MyAstroComponent from 'example-astro-component/astro'; -import MyReactComponent from 'example-astro-component/react'; ---- -<MyAstroComponent /> -<MyReactComponent /> -``` - ---- - -## Developing your package - -Astro does not have a dedicated "package mode" for development. Instead, you should use a demo project to develop and test your package inside of your project. This can be a private website only used for development, or a public demo/documentation website for your package. - -If you are extracting components from an existing project, you can even continue to use that project to develop your now-extracted components. - -## Testing your component - -Astro does not currently ship a test runner. This is something that we would like to tackle before our v1.0 release. _(If you are interested in helping out, [join us on Discord!](https://astro.build/chat))_ - -In the meantime, our current recommendation for testing is: - -1. Add a test `fixtures` directory to your `demo/src/pages` directory. -2. Add a new page for every test that you'd like to run. -3. Each page should include some different component usage that you'd like to test. -4. Run `astro build` to build your fixtures, then compare the output of the `dist/__fixtures__/` directory to what you expected. - -```bash -my-project/demo/src/pages/__fixtures__/ - ├─ test-name-01.astro - ├─ test-name-02.astro - └─ test-name-03.astro -``` - -## Publishing your component - -Once you have your package ready, you can publish it to npm! - -To publish a package to npm, use the `npm publish` command. If that fails, make sure that you've logged in via `npm login` and that your package.json is correct. If it succeeds, you're done! - -Notice that there was no `build` step for Astro packages. Any file type that Astro supports can be published directly without a build step, because we know that Astro already supports them natively. This includes all files with extensions like `.astro`, `.ts`, `.jsx`, and `.css`. - -If you need some other file type that isn't natively supported by Astro, you are welcome to add a build step to your package. This advanced exercise is left up to you. diff --git a/docs/src/pages/en/guides/rss.md b/docs/src/pages/en/guides/rss.md deleted file mode 100644 index 52c80ea2d..000000000 --- a/docs/src/pages/en/guides/rss.md +++ /dev/null @@ -1,53 +0,0 @@ ---- -layout: ~/layouts/MainLayout.astro -title: RSS -description: An intro to RSS in Astro ---- - -Astro supports fast, automatic RSS feed generation for blogs and other content websites. For more information about RSS feeds in general, see [aboutfeeds.com](https://aboutfeeds.com/). - -You can create an RSS feed from any Astro page that uses a `getStaticPaths()` function for routing. Only dynamic routes can use `getStaticPaths()` today (see [Routing](/en/core-concepts/routing)). - -> We hope to make this feature available to all other pages before v1.0. As a workaround, you can convert a static route to a dynamic route that only generates a single page. See [Routing](/en/core-concepts/routing) for more information about dynamic routes. - -Create an RSS Feed by calling the `rss()` function that is passed as an argument to `getStaticPaths()`. This will create an `rss.xml` file in your final build based on the data that you provide using the `items` array. - -```js -// Example: /src/pages/posts/[...page].astro -// Place this function inside your Astro component script. -export async function getStaticPaths({rss}) { - const allPosts = Astro.fetchContent('../post/*.md'); - const sortedPosts = allPosts.sort((a, b) => new Date(b.date) - new Date(a.date)); - // Generate an RSS feed from this collection - rss({ - // The RSS Feed title, description, and custom metadata. - title: 'Don\'s Blog', - // See "Styling" section below - stylesheet: true, - description: 'An example blog on Astro', - customData: `<language>en-us</language>`, - // The list of items for your RSS feed, sorted. - items: sortedPosts.map(item => ({ - title: item.title, - description: item.description, - link: item.url, - pubDate: item.date, - })), - // Optional: Customize where the file is written to. - // Otherwise, defaults to "/rss.xml" - dest: "/my/custom/feed.xml", - }); - // Return your paths - return [...]; -} -``` - -Note: RSS feeds will **not** be built during development. Currently, RSS feeds are only generated during your final build. - -### Styling - -RSS Feeds can be styled with an XSL stylesheet for a more pleasant user experience when they are opened directly in a browser. By default, Astro does not set a stylesheet for RSS feeds, but it can be enabled by setting the `stylesheet` option. - -Astro can automatically use [Pretty Feed](https://github.com/genmon/aboutfeeds/blob/main/tools/pretty-feed-v3.xsl), a popular open-source XSL stylesheet. To enable this behavior, pass `stylesheet: true`. - -If you'd like to use a custom XSL stylesheet, you can pass a string value like `stylesheet: '/my-custom-stylesheet.xsl'`. This file should be in your `public/` directory (in this case, `public/my-custom-stylesheet.xsl`). diff --git a/docs/src/pages/en/guides/styling.md b/docs/src/pages/en/guides/styling.md deleted file mode 100644 index 5687ff7b8..000000000 --- a/docs/src/pages/en/guides/styling.md +++ /dev/null @@ -1,640 +0,0 @@ ---- -layout: ~/layouts/MainLayout.astro -title: Styling & CSS -description: Learn how to style components with Astro. ---- - -Astro includes special handling to make writing CSS as easy as possible. Styling inside of Astro components is done by adding a `<style>` tag anywhere. - -## Astro component styles - -By default, all Astro component styles are **scoped**, meaning they only apply to the current component. This can be very easy to work with, as you only have to worry about what’s in your current document at any given time. - -```html -<!-- src/components/MyComponent.astro --> -<style> - /* Scoped class selector within the component */ - .text { - font-family: cursive; - } - /* Scoped element selector within the component */ - h1 { - color: red; - } -</style> - -<h1>I’m a scoped style and I’m red!</h1> -<p class="text">I'm a scoped style and I’m cursive!</p> -``` - -Note that the `h1` selector won’t bleed out of the current component! These styles won’t apply any other `h1` tags outside this document. Not even child components. - -_Tip: even though you can use element selectors, using classnames is preferred. This is not only slightly more performant, but is also easier to read, especially in a large document._ - -### Global styles - -Of course, the real power of CSS is being able to reuse as much as possible! The preferred method of loading global styles is by using a standard `<link>` tag like you’re used to. It can even be used in conjunction with Astro’s scoped `<style>` tag: - -```html -<!-- src/pages/index.astro --> -<head> - <!-- load styles from src/styles/utils.css using Astro.resolve() --> - <link rel="stylesheet" type="text/css" - href={Astro.resolve('../styles/utils.css')} /> -</head> -<body> - <!-- scoped Astro styles that apply only to the current page (not to children or other components) --> - <style> - .title { - font-size: 32px; - font-weight: bold; - } - </style> - - <!-- the ".title" class is scoped, but we can also use our global "align-center" and "margin top: 4" utility classes from utils.css --> - <h1 class="title align-center mt4">Scoped Page Title</h1> -</body> -``` - -_Note: `Astro.resolve()` is a handy utility that helps resolve files from anywhere ([docs][astro-resolve])_ - -#### Styling children - -If you’d like scoped styles to apply to children, you can use the special `:global()` function borrowed from [CSS Modules][css-modules]: - -```astro -<!-- src/components/MyComponent.astro --> ---- -import PostContent from './Post.astro'; ---- -<style> - /* Scoped to current component only */ - h1 { - color: red; - } - - /* Scoped to all descendents of the scoped .blog-post class */ - .blog-post :global(h1) { - color: blue; - } -</style> - -<h1>Title</h1> -<article class="blog-post"> - <PostContent /> -</article> -``` - -This is a great way to style things like blog posts, or documents with CMS-powered content where the contents live outside of Astro. But be careful when styling children unconditionally, as it breaks component encapsulation. Components that appear different based on whether or not they have a certain parent component can become unwieldy quickly. - -#### Global styles within style tag - -If you’d like to use global styles but you don’t want to use a normal `<link>` tag (recommended), there is a `<style global>` escape hatch: - -```html -<style global> - /* Applies to all h1 tags in your entire site */ - h1 { - font-size: 32px; - } -</style> - -<h1>Globally-styled</h1> -``` - -You can achieve the same by using the `:global()` function at the root of a selector: - -```html -<style> - /* Applies to all h1 tags in your entire site */ - :global(h1) { - font-size: 32px; - } - - /* normal scoped h1 that applies to this file only */ - h1 { - color: blue; - } -</style> -``` - -It’s recommended to only use this in scenarios where a `<link>` tag won’t work. It’s harder to track down errant global styles when they’re scattered around and not in a central CSS file. - -📚 Read our full guide on [Astro component syntax][astro-component] to learn more about using the `<style>` tag. - -## Autoprefixer - -[Autoprefixer][autoprefixer] takes care of cross-browser CSS compatibility for you. Use it in astro by installing it (`npm install --save-dev autoprefixer`) and adding a `postcss.config.cjs` file to the root of your project: - -```js -// postcss.config.cjs -module.exports = { - plugins: [require('autoprefixer')], -}; -``` - -_Note: Astro v0.21 and later requires this manual setup for autoprefixer. Previous versions ran this automatically._ - -## PostCSS - -You can use any PostCSS plugin by adding a `postcss.config.cjs` file to the root of your project. Follow the documentation for the plugin you’re trying to install for configuration and setup. - ---- - -## Supported Styling Options - -Styling in Astro is meant to be as flexible as you'd like it to be! The following options are all supported: - -| Framework | Global CSS | Scoped CSS | CSS Modules | -| :--------------- | :--------: | :--------: | :---------: | -| `.astro` | ✅ | ✅ | N/A¹ | -| `.jsx` \| `.tsx` | ✅ | ❌ | ✅ | -| `.vue` | ✅ | ✅ | ✅ | -| `.svelte` | ✅ | ✅ | ❌ | - -¹ _`.astro` files have no runtime, therefore Scoped CSS takes the place of CSS Modules (styles are still scoped to components, but don't need dynamic values)_ - -All styles in Astro are automatically minified and bundled, so you can just write CSS and we'll handle the rest ✨. - ---- - -## Frameworks and Libraries - -### 📘 React / Preact - -`.jsx` files support both global CSS and CSS Modules. To enable the latter, use the `.module.css` extension (or `.module.scss`/`.module.sass` if using Sass). - -```js -import './global.css'; // include global CSS -import Styles from './styles.module.css'; // Use CSS Modules (must end in `.module.css`, `.module.scss`, or `.module.sass`!) -``` - -### 📗 Vue - -Vue in Astro supports the same methods as `vue-loader` does: - -- [vue-loader - Scoped CSS][vue-scoped] -- [vue-loader - CSS Modules][vue-css-modules] - -### 📕 Svelte - -Svelte in Astro also works exactly as expected: [Svelte Styling Docs][svelte-style]. - -### 🎨 CSS Preprocessors (Sass, Stylus, etc.) - -Astro supports CSS preprocessors such as [Sass][sass], [Stylus][stylus], and [Less][less] through [Vite][vite-preprocessors]. It can be enabled via the following: - -- **Sass**: Run `npm install -D sass` and use `<style lang="scss">` or `<style lang="sass">` (indented) in `.astro` files -- **Stylus**: Run `npm install -D stylus` and use `<style lang="styl">` or `<style lang="stylus">` in `.astro` files -- **Less**: Run `npm install -D less` and use `<style lang="less">` in `.astro` files. - -You can also use all of the above within JS frameworks as well! Simply follow the patterns each framework recommends: - -- **React** / **Preact**: `import Styles from './styles.module.scss'`; -- **Vue**: `<style lang="scss">` -- **Svelte**: `<style lang="scss">` - -Additionally, [PostCSS](#-postcss) is supported, but the setup is [slightly different](#-postcss). - -_Note: CSS inside `public/` will **not** be transformed! Place it within `src/` instead._ - -### 🍃 Tailwind - -Astro can be configured to use [Tailwind][tailwind] easily! Install the dependencies: - -``` -npm install --save-dev tailwindcss -``` - -And create 2 files in your project root: `tailwind.config.cjs` and `postcss.config.cjs`: - -```js -// tailwind.config.cjs -module.exports = { - content: [ - './public/**/*.html', - './src/**/*.{astro,js,jsx,svelte,ts,tsx,vue}', - ], - // more options here -}; -``` - -```js -// postcss.config.cjs -module.exports = { - plugins: [require('tailwindcss')], -}; -``` - -Now you're ready to write Tailwind! Our recommended approach is to create a `src/styles/global.css` file (or whatever you‘d like to name your global stylesheet) with [Tailwind utilities][tailwind-utilities] like so: - -```css -/* src/styles/global.css */ -@tailwind base; -@tailwind components; -@tailwind utilities; -``` - -Lastly, add it to your Astro page (or layout template): - -```astro -<head> - <style global> - @import "../styles/global.css"; - </style> -</head> -``` - -As an alternative to `src/styles/global.css`, You may also add Tailwind utilities to individual `pages/*.astro` components in `<style>` tags, but be mindful of duplication! If you end up creating multiple Tailwind-managed stylesheets for your site, make sure you're not sending the same CSS to users over and over again in separate CSS files. - -#### Migrating from v0.19 - -As of [version 0.20.0](https://github.com/withastro/astro/releases/tag/astro%400.20.0), Astro will no longer bundle, build and process `public/` files. Previously, we'd recommended putting your tailwind files in the `public/` directory. If you started a project with this pattern, you should move any Tailwind styles into the `src` directory and import them in your template using [Astro.resolve()][astro-resolve]: - -```astro - <link - rel="stylesheet" - href={Astro.resolve("../styles/global.css")} - > -``` - -### 🎭 PostCSS - -Using PostCSS is as simple as placing a [`postcss.config.cjs`](https://github.com/postcss/postcss#usage) file in the root of your project. - -Be aware that this plugin will run on all CSS in your project, including any files that compiled to CSS (like `.scss` Sass files, for example). - -_Note: CSS in `public/` **will not be transformed!** Instead, place it within `src/` if you’d like PostCSS to run over your styles._ - -## Bundling - -All CSS is minified and bundled automatically for you in running `astro build`. Without getting too in the weeds, the general rules are: - -- If a style only appears on one route, it's only loaded for that route (`/_astro/[page]-[hash].css`) -- If a style appears on multiple routes, it's deduplicated into a `/_astro/common-[hash].css` bundle -- All styles are hashed according to their contents (the hashes only change if the contents do!) - -We'll be expanding our styling optimization story over time, and would love your feedback! If `astro build` generates unexpected styles, or if you can think of improvements, [please open an issue][issues]. - -_Note: be mindful when some page styles get extracted to the "common" bundle, and some page styles stay on-page. For most people this may not pose an issue, but when part of your styles are bundled they technically may load in a different order and your cascade may be different. While this problem isn't unique to Astro and is present in almost any CSS bundling process, it can be unexpected if you're not anticipating it. Be sure to inspect your final production build, and please [report any issues][issues] you may come across._ - -## Advanced Styling Architecture - -Too many development setups take a hands-off approach to CSS, or at most leave you with only contrived examples that don't get you very far. Telling developers "Use whatever styling solution you want!" is a nice thought that rarely works out in practice. Few styling approaches lend themselves to every setup. Astro is no different—certain styling approaches _will_ work better than others. - -An example to illustrate this: Astro removes runtime JS (even the core framework if possible). Thus, depending on Styled Components for all your styles would be bad, as that would require React to load on pages where it's not needed. Or at best, you'd get a "[FOUC][fouc]" as your static HTML is served but the user waits for JavaScript to download and execute. Or consider a second example at the opposite end of the spectrum: _BEM_. You _can_ use a completely-decoupled [BEM][bem] or [SMACSS][smacss] approach in Astro. But that's a lot of manual maintenance you can avoid, and it leaves out a lot of convenience of [Astro components](/en/core-concepts/astro-components). - -We think there's a great middle ground between intuitive-but-slow CSS-in-JS and fast-but-cumbersome global CSS: **Hybrid Scoped + Utility CSS**. This approach works well in Astro, is performant for users, and will be the best styling solution in Astro _for most people_ (provided you're willing to learn a little). So as a quick recap: - -**This approach is good for…** - -- Developers wanting to try out something new in regard to styling -- Developers that would appreciate some strong opinions in CSS architecture - -**This approach is **NOT** good for…** - -- Developers that already have strong opinions on styling, and want to control everything themselves - -Read on if you're looking for some strong opinions 🙂. We'll describe the approach by enforcing a few key rules that should govern how you set your styles: - -### Hybrid Scoped + Utility CSS - -#### Scoped styles - -You don't need an explanation on component-based design. You already know that reusing components is a good idea. And it's this idea that got people used to concepts like [Styled Components][styled-components] and [Styled JSX][styled-jsx]. But rather than burden your users with slow load times of CSS-in-JS, Astro has something better: **built-in scoped styles.** - -```astro ---- -// src/components/Button.astro --> ---- -<style lang="scss"> - /* ✅ Locally scoped! */ - .btn { - padding: 0.5em 1em; - border-radius: 3px; - font-weight: 700; - } -</style> -<button type="button" class="btn"> - <slot></slot> -</button> -``` - -_Note: all the examples here use `lang="scss"` which is a great convenience for nesting, and sharing [colors and variables][sass-use], but it's entirely optional and you may use normal CSS if you wish._ - -That `.btn` class is scoped within that component, and won't leak out. It means that you can **focus on styling and not naming.** Local-first approach fits in very well with Astro's ESM-powered design, favoring encapsulation and reusability over global scope. While this is a simple example, it should be noted that **this scales incredibly well.** And if you need to share common values between components, [Sass' module system][sass-use] also gets our recommendation for being easy to use, and a great fit with component-first design. - -By contrast, Astro does allow global styles via the `:global()` and `<style global>` escape hatches. However, this should be avoided if possible. To illustrate this: say you used your button in a `<Nav />` component, and you wanted to style it differently there. You might be tempted to have something like: - -```astro ---- -// src/components/Nav.astro -import Button from './Button.astro'; ---- - -<style lang="scss"> - .nav :global(.btn) { - /* ❌ This will fight with <Button>'s styles */ - } -</style> - -<nav class="nav"> - <Button>Menu</Button> -</nav> -``` - -This is undesirable because now `<Nav>` and `<Button>` fight over what the final button looks like. Now, whenever you edit one, you'll always have to edit the other, and they are no longer truly isolated as they once were (now coupled by a bidirectional styling dependency). It's easy to see how this pattern only has to be repeated a couple times before being afraid that touching any styles _anywhere_ may break styling in a completely different part of the app (queue `peter-griffin-css-blinds.gif`). - -Instead, let `<Button>` control its own styles, and try a prop: - -```astro ---- -// src/components/Button.astro -const { theme } = Astro.props; ---- -<style lang="scss"> - .btn { - /* ✅ <Button> is now back in control of its own styling again! */ - &[data-theme='nav'] { - // nav-friendly styles here… - } - } -</style> - -<button type="button" data-theme={theme}> - <slot></slot> -</button> -``` - -Elsewhere, you can use `<Button theme="nav">` to set the type of button it is. This preserves the contract of _Button is in charge of its styles, and Nav is in charge of its styles_, and now you can edit one without affecting the other. The worst case scenario of using global styles is that the component is broken and unusable (it's missing part of its core styles). But the worst case scenario of using props (e.g. typo) is that a component will only fall back to its default, but still usable, state. - -💁 **Why this works well in Astro**: Astro is inspired most by JavaScript modules: you only need to know about what's in one file at a time, and you never have to worry about something in a remote file affecting how this code runs. But we're not alone in this; Vue and Svelte have both capitalized on and popularized the idea that styles and markup are natural fits in the same component file. [You can still have separation of concerns][peace-on-css] even with markup, styling, and logic contained in one file. In fact, that's what makes component design so powerful! So write CSS without fear that you picked a name that's used by some other component across your app. - -#### Utility CSS - -Recently there has been a debate of all-scoped component styles vs utility-only CSS. But we agree with people like Sarah Dayan who ask [why can't we have both][utility-css]? Truth is that while having scoped component styles are great, there are still hundreds of times when the website's coming together when two components just don't line up _quite_ right, and one needs a nudge. Or different text treatment is needed in one component instance. - -While the thought of having perfect, pristine components is nice, it's unrealistic. No design system is absolutely perfect, and every design system has inconsistencies. And it's in reconciling these inconsistencies where components can become a mess without utility CSS. Utility CSS is great for adding minor tweaks necessary to get the website out the door. But they also are incomplete on their own—if you've ever tried to manage responsive styles or accessible focus states with utility CSS it can quickly become a mess! **Utility CSS works best in partnership with component (scoped) CSS**. And in order to be as easy as possible to use, Utility CSS should be global (arguably should be your only global CSS, besides maybe reset.css) so you don't have to deal with imports all willy-nilly. - -Some great problems best handled with Utility CSS are: - -- [margin](https://github.com/drwpow/sass-utils#-margin--padding) -- [padding](https://github.com/drwpow/sass-utils#-margin--padding) -- [text/background color](https://github.com/drwpow/sass-utils#-color) -- [font size and family](https://github.com/drwpow/sass-utils#%F0%9F%85%B0%EF%B8%8F-font--text) -- [default element styling](https://github.com/kognise/water.css) - -In Astro, we recommend the following setup for this: - -```html -<head> - <link rel="stylesheet" href="/styles/global.css" /> -</head> -``` - -And in your local filesystem, you can even use Sass' [@use][sass-use] to combine files together effortlessly: - -``` -├── src/ -│ └── styles/ -│ ├── _base.scss -│ ├── _tokens.scss -│ ├── _typography.scss -│ ├── _utils.scss -│ └── global.scss -``` - -What's in each file is up to you to determine, but start small, add utilities as you need them, and you'll keep your CSS weight incredibly low. And utilities you wrote to meet your real needs will always be better than anything off the shelf. - -So to recap, think of scoped styles as the backbone of your styles that get you 80% of the way there, and utility CSS filling in the remaining 20%. They both work well in tandem, with each compensating for the other's weakness. - -💁 **Why this works well in Astro**: Astro was built around the idea of **Scoped CSS and Global Utility CSS living together in harmony** ♥️! Take full advantage of it. - -### More suggestions - -"But wait!" you may ask, having read the previous section. "That doesn't take care of [my usecase]!" If you‘re looking for more pointers on some common styling problems, you may be interested in the following suggestions. These all are cohesive, and fit with the **Hybrid Scoped + Utility** philosophy: - -1. Split your app into Layout Components and Base Components -1. Avoid Flexbox and Grid libraries (write your own!) -1. Avoid `margin` on a component wrapper -1. Avoid global media queries - -#### Suggestion #1: Split your app into Layout Components and Base Components - -While this guide will never be long enough to answer the question _"How should a page be laid out?"_ (that's a [design problem!][cassie-evans-css]) there is a more specific question hiding within that we _can_ answer: _"Given a layout, how should components/styles be organized?"_ The answer is **don't bake layout into components.** Have layout components that control layout, and base components (buttons, cards, etc.) that don't control layout. _What does that mean?_ Let's walk through an example so it's more clear. Pretend we have a page that looks like this (numbers for different components): - -``` -|---------------| -| 1 | -|-------+-------| -| 2 | 2 | -|---+---|---+---| -| 3 | 3 | 3 | 3 | -|---+---+---+---| -| 3 | 3 | 3 | 3 | -|---+---+---+---| -``` - -The layout consists of a big, giant, full-width post at top, followed by two half-width posts below it. And below that, we want a bunch of smaller posts to fill out the rest of the page. For simplicity, we'll just call these `<BigPost>` (1), `<MediumPost>` (2), and `<SmallPost>` (3). We add them to our page like so: - -```astro ---- -// src/pages/index.astro - -import Nav from '../components/Nav.astro'; -import BigPost from '../components/BigPost.astro'; -import Grid from '../components/Grid.astro'; -import MediumPosts from '../components/MediumPosts.astro'; -import SmallPosts from '../components/SmallPosts.astro'; -import Footer from '../components/Footer.astro'; ---- -<html> - <body> - <Nav /> - - <Grid> - <BigPost /> - <MediumPosts /> - <SmallPosts /> - </Grid> - - <Footer /> - </body> -</html> -``` - -This _looks_ clean, but looks can be deceiving. At first glance, we may think that `<Grid>` is controlling the layout, but that's an illusion. We actually have `<BigPost>` handling its own width, `<MediumPosts>` loading 2 components and controlling its width, and `<SmallPosts>` loading 4+ components and controlling its width. In total, including `<Grid>`, that means **4 components** are all fighting over the same layout. Remove one post from `<MediumPosts>`, the layout breaks. Edit `<BigPost>`, the layout breaks. Edit `<Grid>`, the layout breaks. If you think about it, none of these components are truly reusable—they might as well just be one big file. - -This is actually the **Global CSS Problem** in disguise—multiple components fight over how they all lay out together, without layout being one, central responsibility (kinda like global CSS)! Now that we identified the problem, one way to fix this is to hoist the entire layout to the top level, and load all components there, too: - -```astro ---- -// src/pages/index.astro - -import Nav from '../components/Nav.astro'; -import BigPost from '../components/BigPost.astro'; -import MediumPost from '../components/MediumPost.astro'; -import SmallPost from '../components/SmallPost.astro'; -import Footer from '../components/Footer.astro'; ---- - -<html> - <head> - <style lang="scss"> - .wrapper { - max-width: 60rem; - margin-right: auto; - margin-left: auto; - padding-right: 2rem; - padding-left: 2rem; - } - - .grid { - display: grid; - grid-gap: 1.5rem; - grid-template columns: 1fr 1fr 1fr 1fr; - } - - .big-post { - grid-column: span 4; - } - - .medium-post { - grid-column: span 2; - } - - .small-post { - grid-column: span 1; - } - </style> - </head> - <body> - <Nav /> - - <div class="wrapper"> - <div class="grid"> - <div class="big-post"><BigPost postId={12345} /></div> - - <div class="medium-post"><MediumPost postId={12345} /></div> - <div class="medium-post"><MediumPost postId={12345} /></div> - - <div class="small-post"><SmallPost postId={12345} /></div> - <div class="small-post"><SmallPost postId={12345} /></div> - <div class="small-post"><SmallPost postId={12345} /></div> - <div class="small-post"><SmallPost postId={12345} /></div> - <div class="small-post"><SmallPost postId={12345} /></div> - <div class="small-post"><SmallPost postId={12345} /></div> - <div class="small-post"><SmallPost postId={12345} /></div> - <div class="small-post"><SmallPost postId={12345} /></div> - </div> - </div> - - <Footer /> - </body> -</html> -``` - -Getting over that this is more code, it's actually a much cleaner separation. What was a four-component layout is now managed 100% within the top-level `index.astro` (which we can now consider a **Layout Component**, and if we wanted to reuse this we could extract this into its own file). Your layout is centralized, and now these components truly are reusable because they don't care one bit about whether they're in the same grid or not. You can edit styles in any of these files now without fear of styles breaking in another. - -The basic rule is that when orchestrating multiple components, **that's a unique responsibility** that should live in one central place, rather than split between 4 components as we were doing. In fact, top-level pages are great at this, and should always be the starting point of your layout components. See how far you can take it, and only extract layout components when you absolutely have to. - -To recap: **if you have to touch multiple files to manage one layout, you probably need to reorganize everything into a Layout Component.** - -💁 **Why this works well in Astro**: In Astro, anything can be a `.astro` component, and you never incur performance problems no matter how many components you add. But the main benefit to [Layout isolation][layout-isolated] is how much it cuts down on the amount of CSS you need. - -#### Suggestion #2: Avoid Flexbox and Grid libraries (write your own!) - -This may feel like a complete overreach to tell you not to use your favorite layout framework you're familiar with. After all, it's gotten you this far! But the days of [float madness](https://zellwk.com/blog/responsive-grid-system/) are gone, replaced by Flexbox and Grid. And the latter don't need libraries to manage them (often they can make it harder). - -Many front-end developers experience the following train of thought: - -1. I should reuse as much CSS as possible (_good!_) -2. Many pages reuse the same layout, … (_hold up—_) -3. … therefore I can find an existing solution to manage all my duplicate layouts (_wait a minute—_) - -While the logic is sound, the reality is that #2 isn't truth for many projects. Probably, many parts of the website weren't designed to fit into these nice, neat, 12 column grids. Even modest web apps can contain _hundreds_ of unique layouts when you factor in all the breakpoints. Ask yourself: _If the website I'm building really contains so many unique layouts, why am I using a heavy grid library that only gives me generic layouts?_ - -A few well-written lines of CSS Grid here and there will not only be perfect in every occasion; it's likely lighter and easier to manage than that heavy library you've fought with for so long. Another way to look at it: if you have to spend a couple hours learning a proprietary styling framework, wrestling with it, filing issues, etc., why not just spend that time on Flexbox and Grid instead? For many people, learning the basics only takes an hour, and that can get you pretty far! There are great, free, learning resources that are worth your time: - -- [Flexbox Froggy](https://flexboxfroggy.com/) -- [CSS Grid Garden](https://cssgridgarden.com/) - -So in short: stop trying to deduplicate layouts when there's nothing to deduplicate! You'll find your styles not only easier to manage, but your CSS payloads much lighter, and load times faster. - -💁 **Why this works well in Astro**: grid libraries are a quick path to stylesheet bloat, and a major contributor to people attempting to [treeshake their styles][css-treeshaking]. Astro does **not** treeshake unused CSS for you, because [that can cause problems][css-treeshaking]. We're not saying you have to be library free; we're big fans of libraries like [Material UI][material-ui]. But if you can at least shed the thousands upon thousands of layouts you're not using from your styling library, you probably don't need automatic treeshaking. - -#### Suggestion #3: Avoid `margin` on a component wrapper - -In other words, don't do this: - -```astro -<!-- src/components/MyComponent.astro --> -<style lang="scss"> - .wrapper { - /* ❌ Don't do this! */ - margin-top: 3rem; - } -</style> - -<div class="wrapper"></div> -``` - -If you remember the [CSS box model][box-model], `margin` extends beyond the boundaries of the box. This means that when you place `margin` on the outermost element, now that will push other components next to it. Even though the styles are scoped, it's _technically_ affecting elements around it, so it [breaks the concept of style containment][layout-isolated]. - -When you have components that rearrange, or appear different when they're next to other components, that's a hard battle to win. **Components should look and act the same no matter where they are placed.** That's what makes them components! - -💁 **Why this works well in Astro**: margins pushing other components around creeps into your styling architecture in sneaky ways, and can result in the creation of some wonky or brittle layout components. Avoiding it altogether will keep your layout components simpler, and you'll spend less time styling in general. - -#### Suggestion #4: Avoid global media queries - -The final point is a natural boundary of **Scoped Styles**. That extends to breakpoints, too! You know that one, weird breakpoint where your `<Card />` component wraps awkwardly at a certain size? You should handle that within `<Card />`, and not anywhere else. - -Even if you end up with some random value like `@media (min-width: 732px) {`, that'll probably work better than trying to create a global [magic number][magic-number] somewhere that only applies to one context (an arbitrary value may be "magic" to the rest of an app, but it does still have meaning within the context of a component that needs that specific value). - -Granted, this has been near-impossible to achieve until Container Queries; fortunately [they are finally landing!][container-queries] - -Also, a common complaint of this approach is when someone asks _"What if I have 2 components that need to do the same thing at the same breakpoint?"_ to which my answer is: you'll always have one or two of those; just handle those as edge cases. But if your entire app is made up of dozens of these cases, perhaps your component lines could be redrawn so that they're more [layout-isolated][layout-isolated] in general. - -💁 **Why this works well in Astro**: this is probably the least important point, which is why it's saved for last. In fact, you could probably skip this if it doesn't work for you. But it's something that people try to architect for at scale, and having a global system to manage this can often be unnecessary. Give _not_ architecting for global media queries a try, and see how far it takes you! - -### 👓 Further Reading - -This guide wouldn't be possible without the following blog posts, which expand on these topics and explain them in more detail. Please give them a read! - -- [**Layout-isolated Components**][layout-isolated] by Emil Sjölander -- [**In defense of utility-first CSS**][utility-css] by Sarah Dayan - -Also please check out the [Stylelint][stylelint] project to whip your styles into shape. You lint your JS, why not your CSS? - -[autoprefixer]: https://github.com/postcss/autoprefixer -[astro-component]: /en/core-concepts/astro-components#css-styles -[astro-resolve]: /en/reference/api-reference#astroresolve -[bem]: http://getbem.com/introduction/ -[box-model]: https://developer.mozilla.org/en-US/docs/Learn/CSS/Building_blocks/The_box_model -[browserslist]: https://github.com/browserslist/browserslist -[browserslist-defaults]: https://github.com/browserslist/browserslist#queries -[cassie-evans-css]: https://twitter.com/cassiecodes/status/1392756828786790400?s=20 -[container-queries]: https://ishadeed.com/article/say-hello-to-css-container-queries/ -[css-modules]: https://github.com/css-modules/css-modules -[css-treeshaking]: https://css-tricks.com/how-do-you-remove-unused-css-from-a-site/ -[fouc]: https://en.wikipedia.org/wiki/Flash_of_unstyled_content -[layout-isolated]: https://web.archive.org/web/20210227162315/https://visly.app/blogposts/layout-isolated-components -[less]: https://lesscss.org/ -[issues]: https://github.com/withastro/astro/issues -[magic-number]: https://css-tricks.com/magic-numbers-in-css/ -[material-ui]: https://material.io/components -[peace-on-css]: https://didoo.medium.com/let-there-be-peace-on-css-8b26829f1be0 -[sass]: https://sass-lang.com/ -[sass-use]: https://sass-lang.com/documentation/at-rules/use -[smacss]: http://smacss.com/ -[styled-components]: https://styled-components.com/ -[stylus]: https://stylus-lang.com/ -[styled-jsx]: https://github.com/vercel/styled-jsx -[stylelint]: https://stylelint.io/ -[svelte-style]: https://svelte.dev/docs#style -[tailwind]: https://tailwindcss.com -[tailwind-utilities]: https://tailwindcss.com/docs/adding-new-utilities#using-css -[utility-css]: https://frontstuff.io/in-defense-of-utility-first-css -[vite-preprocessors]: https://vitejs.dev/guide/features.html#css-pre-processors -[vue-css-modules]: https://vue-loader.vuejs.org/guide/css-modules.html -[vue-scoped]: https://vue-loader.vuejs.org/guide/scoped-css.html diff --git a/docs/src/pages/en/installation.md b/docs/src/pages/en/installation.md deleted file mode 100644 index 087112095..000000000 --- a/docs/src/pages/en/installation.md +++ /dev/null @@ -1,176 +0,0 @@ ---- -layout: ~/layouts/MainLayout.astro -title: Installation -description: How to install Astro with NPM, PNPM, or Yarn. ---- - -There are a few different ways to install Astro in a new project. - -## Prerequisites - -- **Node.js** - `14.15.0`, `v16.0.0`, or higher. -- **Text editor** - We recommend [VS Code](https://code.visualstudio.com/) with our [Official Astro extension](https://marketplace.visualstudio.com/items?itemName=astro-build.astro-vscode). -- **Terminal** - Astro is mainly accessed via the terminal's command-line. - -For demonstration purposes, we will be using [`npm`](https://www.npmjs.com/) in the examples below, but you could also use [`yarn`](https://yarnpkg.com/) or [`pnpm`](https://pnpm.io/) if you prefer an npm alternative. - -## Create Astro - -`npm init astro` is the easiest way to install Astro in a new project. Run this command in your terminal to start our `create-astro` install wizard to assist you with setting up a new project. - -```shell -# With NPM -npm init astro - -# Yarn -yarn create astro - -# Pnpm -pnpm create astro -``` - -[`create-astro`](https://github.com/withastro/astro/tree/main/packages/create-astro) wizard lets you choose from a set of [starter templates](https://github.com/withastro/astro/tree/main/examples) or alternatively, you could import your own Astro project directly from GitHub. - -```bash -# Note: Replace "my-astro-project" with the name of your project. - -# npm 6.x -npm init astro my-astro-project --template starter -# npm 7+ (extra double-dash is needed) -npm init astro my-astro-project -- --template starter -# yarn -yarn create astro my-astro-project --template starter -# pnpm -pnpm create astro my-astro-project -- --template starter -# Using a third-party template -npm init astro my-astro-project -- --template [GITHUB_USER]/[REPO_NAME] -# Using a third-party template, inside a repo -npm init astro my-astro-project -- --template [GITHUB_USER]/[REPO_NAME]/path/to/template -``` - -After `create-astro` scaffolds out your project, remember to install your projects dependencies using npm or your package manager of choice. In this example, we'll use npm: - -```bash -npm install -``` - -You can now [Start](#start-astro) your Astro project. Once you have completed assembling your Astro project you can then [Build](#build-astro) your project. Astro would then package up your application and have the static files ready for you to [Deploy](/en/guides/deploy) to your favourite hosting provider. - -## Manual Install - -You can also set up Astro without the aide of the `create-astro` wizard, below are the few extra steps that are required to get Astro going. - -### Set up your project - -```bash -# Make and enter a new directory -mkdir my-astro-project -cd my-astro-project -``` - -Create an empty directory with the name of your project, and then navigate into it: - -### Create `package.json` - -```bash -# This command will create a basic package.json for you -npm init --yes -``` - -Astro is designed to work with the entirety of the npm package ecosystem. This is managed by a project manifest at the root of your project known as `package.json` . If you're not familiar with the `package.json` file, we highly recommend you to have a quick read over it on [the npm documentation](https://docs.npmjs.com/creating-a-package-json-file). - -### Install Astro - -Following the instructions above, you should have a directory with a single `package.json` file inside of it. You can now set up Astro inside your project. - -```bash -npm install astro -``` - -You can now replace the placeholder "scripts" section of your `package.json` file that `npm init` created for you with the following: - -```diff - "scripts": { -- "test": "echo \"Error: no test specified\" && exit 1" -+ "dev": "astro dev", -+ "build": "astro build", -+ "preview": "astro preview" - }, -} -``` - -The [`dev`](#start-astro) command launches the Astro Dev Server on `http://localhost:3000`. Once your project is ready, the [`build`](#build-astro) command outputs your project to the `dist/` directory. [Read more about deploying Astro in the Deploy guide.](/en/guides/deploy) - -### Create your first page - -Astro Open up your favourite text editor, and create a new file in your project: - -1. Create a new file at `src/pages/index.astro` -2. Copy-and-paste the following snippet (including `---` dashes) into it. - -```astro ---- -// JS/TS Code written in between the (---) code fence, -// is ran solely on the Server! -console.log('See me in the Terminal') ---- - -<html> - <body> - <h1>Hello, World!</h1> - </body> -</html> - -<style lang='css||scss'> - body{ - h1{ - color:orange; - } - } -</style> - -<script> - // JS Code entered here is ran entirely on the Browser - console.log('See me in the devTools') -</script> -``` - -Above is an example of the Astro's Component's Syntax, which comprises of both HTML & JSX. - -You can create more pages in the `src/pages` directory, and Astro will use the filename to create new pages on your site. For example, by creating a new file at `src/pages/about.astro` (reusing the previous snippet), Astro will generate a new page at the URL : `http://localhost/about` - -## [Start Astro](#start-astro) - -```bash -npm run dev -``` - -Astro will now start serving your application on `http://localhost:3000`. By opening this URL in your browser, you should see the Astro's “Hello, World”. - -If you need to share your development progress on the local network or check out the app from a phone, just add the following [snowpack](https://www.snowpack.dev/reference/configuration#devoptionshostname) option to `astro.config.mjs`: - -```js -devOptions: { - hostname: '0.0.0.0', -} -``` - -## [Build Astro](#build-astro) - -```bash -npm run build -``` - -This will instruct Astro to build your site and save it directly to disk. Your application is now ready in the `dist/` directory. - -## Next Steps - -Success! You're now ready to start developing! - -We highly encourage you to get more familiar with the way Astro works. You can do so by further exploring our Docs, we suggest that you consider the following: - -📚 Learn more about Astro's project structure in our [Project Structure guide.](/en/core-concepts/project-structure) - -📚 Learn more about Astro's component syntax in our [Astro Components guide.](/en/core-concepts/astro-components) - -📚 Learn more about Astro's file-based routing in our [Routing guide.](/en/core-concepts/astro-pages) diff --git a/docs/src/pages/en/migration/0.21.0.md b/docs/src/pages/en/migration/0.21.0.md deleted file mode 100644 index 70d127c1f..000000000 --- a/docs/src/pages/en/migration/0.21.0.md +++ /dev/null @@ -1,264 +0,0 @@ ---- -layout: ~/layouts/MainLayout.astro -title: Migrating to v0.21 -description: How to migrate projects from Astro v0.20. ---- - -## Vite - -Starting in v0.21, Astro is built with [Vite]. -As a result, configurations written in `snowpack.config.mjs` should be moved into `astro.config.mjs`. - -```js -// @ts-check - -/** @type {import('astro').AstroUserConfig} */ -export default { - renderers: [], - vite: { - plugins: [], - }, -}; -``` - -To learn more about configuring Vite, please visit their [configuration guide](https://vitejs.dev/config/). - -## Aliasing - -In Astro v0.21, import aliases can be added from `tsconfig.json` or `jsconfig.json`. - -```json -{ - "compilerOptions": { - "baseUrl": ".", - "paths": { - "@/components/*": ["src/components/*"] - } - } -} -``` - -_These aliases are integrated automatically into [VSCode](https://code.visualstudio.com/docs/languages/jsconfig) and other editors._ - -## Variables in Scripts & Styles - -In Astro v0.21, _serializable_ server-side variables can be passed into client-side `<style>` or `<script>`. - -```astro ---- -// tick.astro -const foregroundColor = "rgb(221 243 228)"; -const backgroundColor = "rgb(24 121 78)"; ---- -<style define:vars={{foregroundColor, backgroundColor}}> - h-tick { - background-color: var(--backgroundColor); - border-radius: 50%; - color: var(--foregroundColor); - height: 15px; - width: 15px; - } -</style> -<h-tick>✓</h-tick> -``` - -## Imports on top bug - -In Astro v0.21, a bug has been introduced that requires imports inside components to be at the top of your frontmatter. - -```astro ---- -import Component from '../components/component.astro' -const whereShouldIPutMyImports = "on top!" ---- -``` - -_Note: This is a bug that will be fixed._ - -## Components in Markdown - -In Astro v0.21, Components from any framework can be used within Markdown files. - -```markdown ---- -layout: '...' -setup: | - import MyReactComponent from '../components/MyReactComponent.jsx' ---- - -# Hydrating on visibility - -<MyReactComponent client:visible> - -# Hello world! - -</MyReactComponent> -``` - -## Components in Frontmatter - -Previously, you could create mini Astro Components inside of the Astro Frontmatter, using JSX syntax instead of Astro's component syntax. This was always a bit of a hack, but in the new compiler it became impossible to support. We hope to re-introduce this feature in a future release of Astro using a different, non-JSX API. - -To migrate to v0.21, please convert all JSX Astro components (that is, any Astro components created inside of another component's frontmatter) to standalone components. - -## Environment Variables - -In Astro v0.21, environment variables can be loaded from `.env` files in your project directory. - -```ini -.env # loaded in all cases -.env.local # loaded in all cases, ignored by git -.env.[mode] # only loaded in specified mode -.env.[mode].local # only loaded in specified mode, ignored by git -``` - -For security purposes, only variables prefixed with `PUBLIC_` are accessible to your code. - -```ini -SECRET_PASSWORD=password123 -PUBLIC_ANYBODY=there -``` - -In this example, `PUBLIC_ANYBODY` will be available as `import.meta.env.PUBLIC_ANYBODY` in server or client code, while `SECRET_PASSWORD` will not. - -> In prior releases, these variables were prefixed with `SNOWPACK_PUBLIC_` and required the `@snowpack/plugin-env` plugin. - -## File Extensions - -In Astro v0.21, files need to be referenced by their actual extension, exactly as it is on disk. - -```tsx -// Div.tsx -export default function Div(props) { - return <div />; -} -``` - -In this example, `Div.tsx` would need to be referenced as `Div.tsx`, not `Div.jsx`. - -```diff -- import Div from './Div.jsx' // Astro v0.20 -+ import Div from './Div.tsx' // Astro v0.21 -``` - -This same change applies to styles. - -```scss -// Div.scss -div { - all: unset; -} -``` - -```diff -- <link rel="stylesheet" href={Astro.resolve('./Div.css')}> -+ <link rel="stylesheet" href={Astro.resolve('./Div.scss')}> -``` - -## Plugins - -In Astro v0.21, Vite plugins may be configured within `astro.config.mjs`. - -```js -import { imagetools } from 'vite-imagetools'; - -export default { - vite: { - plugins: [imagetools()], - }, -}; -``` - -To learn more about Vite plugins, please visit their [plugin guide](https://vitejs.dev/guide/using-plugins.html). - -## Custom Renderers - -In Astro v0.21, plugins should now use `viteConfig()`. - -```diff -// renderer-svelte/index.js -+ import { svelte } from '@sveltejs/vite-plugin-svelte'; - -export default { - name: '@astrojs/renderer-svelte', - client: './client.js', - server: './server.js', -- snowpackPlugin: '@snowpack/plugin-svelte', -- snowpackPluginOptions: { compilerOptions: { hydratable: true } }, -+ viteConfig() { -+ return { -+ optimizeDeps: { -+ include: ['@astrojs/renderer-svelte/client.js', 'svelte', 'svelte/internal'], -+ exclude: ['@astrojs/renderer-svelte/server.js'], -+ }, -+ plugins: [ -+ svelte({ -+ emitCss: true, -+ compilerOptions: { hydratable: true }, -+ }), -+ ], -+ }; -+ }, -} -``` - -To learn more about Vite plugins, please visit their [plugin guide](https://vitejs.dev/guide/using-plugins.html). - -> In prior releases, these were configured with `snowpackPlugin` or `snowpackPluginOptions`. - -## Markdown Options - -The configuration of markdown options has changed slightly in Astro v0.21. There's now a `render` property, which should include `@astrojs/markdown-remark`: - -```diff -// astro.config.mjs -export default { - markdownOptions: { -+ render: [ -+ '@astrojs/markdown-remark', -+ { - remarkPlugins: [ - // Add a Remark plugin that you want to enable for your project. - ], - rehypePlugins: [ - // Add a Rehype plugin that you want to enable for your project. - ], -+ }, -+ ], - }, -}; -``` - -## Styling Changes - -### Autoprefixer - -Autoprefixer is no longer run by default. To enable: - -1. Install the latest version (`npm i autoprefixer`) -2. Create a `postcss.config.cjs` file at the root of your project with: - ```js - module.exports = { - plugins: { - autoprefixer: {}, - }, - }; - ``` - -### Tailwind CSS - -Ensure you have PostCSS installed. This was optional in previous releases, but is required now: - -1. Install the latest version of postcss (`npm i -D postcss`) -2. Create a `postcss.config.cjs` file at the root of your project with: - ```js - module.exports = { - plugins: { - tailwindcss: {}, - }, - }; - ``` - For more information, read the [Tailwind CSS documentation](https://tailwindcss.com/docs/installation#add-tailwind-as-a-post-css-plugin) - -[snowpack]: https://www.snowpack.dev -[vite]: https://vitejs.dev diff --git a/docs/src/pages/en/quick-start.md b/docs/src/pages/en/quick-start.md deleted file mode 100644 index 452a4c43a..000000000 --- a/docs/src/pages/en/quick-start.md +++ /dev/null @@ -1,77 +0,0 @@ ---- -layout: ~/layouts/MainLayout.astro -title: Quick Start -description: The easiest way to get started quickly with Astro. ---- - -```shell -# prerequisite: check that Node.js is 14.15.0+, or 16+ -node --version - -# Make a new project directory, and navigate directly into it -mkdir my-astro-project && cd $_ - -# prepare for liftoff... -npm init astro - -# install dependencies -npm install - -# start developing! -npm run dev -``` - -For production sites, - -```shell -# when you're ready: build your static site to `dist/` -npm run build -``` - -To learn more about installing and using Astro for the first time, please [read our installation guide.](/en/installation) - -If you prefer to learn by example, check out our [complete library of examples](https://github.com/withastro/astro/tree/main/examples) on GitHub. You can check out any of these examples locally by running `npm init astro -- --template "EXAMPLE_NAME"`. - -## Start your project - -From inside your project directory, enter the following command into your terminal: - -```bash -npm run dev -``` - -Astro will now start serving your application on [http://localhost:3000](http://localhost:3000). Opening this URL in your browser, you should see the Astro's "Hello, World". - -The server will listen for live file changes in your `src/` directory, so you do not need to restart the application as you make changes during development. - -## Build your project - -To build your project, from inside your directory enter the following build command into your terminal: - -```bash -npm run build -``` - -This will instruct Astro to build your site and save it directly to disk. Your application is now ready in the `dist/` directory. - -## Deploy your project - -Astro sites are static, so they can be deployed to your favourite host: - -- [AWS S3 bucket](https://aws.amazon.com/s3/) -- [Google Firebase](https://firebase.google.com/) -- [Netlify](https://www.netlify.com/) -- [Vercel](https://vercel.com/) -- [Read more about deploying Astro in our Deploy guide.](/en/guides/deploy) - -## Next Steps - -Success! You're now ready to start developing! - -We recommend that you to take some time to get more familiar with the way Astro works. You can do so by further exploring our Docs, we suggest that you consider the following: - -📚 Learn more about Astro's project structure in our [Project Structure guide.](/en/core-concepts/project-structure) - -📚 Learn more about Astro's component syntax in our [Astro Components guide.](/en/core-concepts/astro-components) - -📚 Learn more about Astro's file-based routing in our [Routing guide.](/en/core-concepts/astro-pages) diff --git a/docs/src/pages/en/reference/api-reference.md b/docs/src/pages/en/reference/api-reference.md deleted file mode 100644 index 4722da822..000000000 --- a/docs/src/pages/en/reference/api-reference.md +++ /dev/null @@ -1,293 +0,0 @@ ---- -layout: ~/layouts/MainLayout.astro -title: API Reference ---- - -## `Astro` global - -The `Astro` global is available in all contexts in `.astro` files. It has the following functions: - -### `Astro.fetchContent()` - -`Astro.fetchContent()` is a way to load local `*.md` files into your static site setup. - -```astro ---- -// ./src/components/my-component.astro -const data = Astro.fetchContent('../pages/post/*.md'); // returns an array of posts that live at ./src/pages/post/*.md ---- - -<div> -{data.slice(0, 3).map((post) => ( - <article> - <h1>{post.title}</h1> - <p>{post.description}</p> - <a href={post.url}>Read more</a> - </article> -))} -</div> -``` - -`.fetchContent()` only takes one parameter: a relative URL glob of which local files you'd like to import. Currently only `*.md` files are supported. It's synchronous, and returns an array of items of type: - -```js -{ - /** frontmatter from the post.. example frontmatter: - title: '', - tag: '', - date: '', - image: '', - author: '', - description: '', - **/ - astro: { - headers: [], // an array of h1...h6 elements in the markdown file - source: '', // raw source of the markdown file - html: '' // rendered HTML of the markdown file - }, - url: '' // the rendered path - }[] -``` - -### `Astro.request` - -`Astro.request` returns an object with the following properties: - -| Name | Type | Description | -| :------------- | :---- | :---------------------------------------------- | -| `url` | `URL` | The URL of the request being rendered. | -| `canonicalURL` | `URL` | [Canonical URL][canonical] of the current page. | - -### `Astro.resolve()` - -`Astro.resolve()` helps with creating URLs relative to the current Astro file, allowing you to reference files within your `src/` folder. - -Astro _does not_ resolve relative links within HTML, such as images: - -```html -<img src="../images/penguin.png" /> -``` - -The above will be sent to the browser as-is and the browser will resolve it relative to the current **page**. If you want it to be resolved relative to the .astro file you are working in, use `Astro.resolve`: - -```astro -<img src={Astro.resolve('../images/penguin.png')} /> -``` - -### `Astro.site` - -`Astro.site` returns a `URL` made from `buildOptions.site` in your Astro config. If undefined, this will return a URL generated from `localhost`. - -```astro ---- -const path = Astro.site.pathname; ---- - -<h1>Welcome to {path}</h1> -``` - -### `Astro.slots` - -`Astro.slots` returns an object with any slotted regions passed into the current Astro file. - -```js -const { - heading as headingSlot, // true or undefined, based on whether `<* slot="heading">` was used. - default as defaultSlot, // true or undefined, based on whether `<* slot>` or `<* default>` was used. -} = Astro.slots; -``` - -## `getStaticPaths()` - -If a page uses dynamic params in the filename, that component will need to export a `getStaticPaths()` function. - -This function is required because Astro is a static site builder. That means that your entire site is built ahead of time. If Astro doesn't know to generate a page at build time, your users won't see it when they visit your site. - -```astro ---- -export async function getStaticPaths() { - return [ - { params: { /* required */ }, props: { /* optional */ } }, - { params: { ... } }, - { params: { ... } }, - // ... - ]; -} ---- -<!-- Your HTML template here. --> -``` - -The `getStaticPaths()` function should return an array of objects to determine which paths will be pre-rendered by Astro. - -⚠️ The `getStaticPaths()` function executes in its own isolated scope once, before any page loads. Therefore you can't reference anything from its parent scope, other than file imports. The compiler will warn if you break this requirement. - -### `params` - -The `params` key of every returned object tells Astro what routes to build. The returned params must map back to the dynamic parameters and rest parameters defined in your component filepath. - -`params` are encoded into the URL, so only strings are supported as values. The value for each `params` object must match the parameters used in the page name. - -For example, suppose that you have a page at `src/pages/posts/[id].astro`. If you export `getStaticPaths` from this page and return the following for paths: - -```astro ---- -export async function getStaticPaths() { - return [ - { params: { id: '1' } }, - { params: { id: '2' } } - ]; -} -const {id} = Astro.request.params; ---- -<body><h1>{id}</h1></body> -``` - -Then Astro will statically generate `posts/1` and `posts/2` at build time. - -### Data Passing with `props` - -To pass additional data to each generated page, you can also set a `props` value on every returned path object. Unlike `params`, `props` are not encoded into the URL and so aren't limited to only strings. - -For example, suppose that you generate pages based off of data fetched from a remote API. You can pass the full data object to the page component inside of `getStaticPaths`: - -```astro ---- -export async function getStaticPaths() { - const data = await fetch('...').then(response => response.json()); - return data.map((post) => { - return { - params: { id: post.id }, - props: { post } }; - }); -} -const {id} = Astro.request.params; -const {post} = Astro.props; ---- -<body><h1>{id}: {post.name}</h1></body> -``` - -Then Astro will statically generate `posts/1` and `posts/2` at build time using the page component in `pages/posts/[id].astro`. The page can reference this data using `Astro.props`: - -### `paginate()` - -Pagination is a common use-case for websites that Astro natively supports via the `paginate()` function. `paginate()` will automatically generate the array to return from `getStaticPaths()` that creates one URL for every page of the paginated collection. The page number will be passed as a param, and the page data will be passed as a `page` prop. - -```js -export async function getStaticPaths({ paginate }) { - // Load your data with fetch(), Astro.fetchContent(), etc. - const response = await fetch(`https://pokeapi.co/api/v2/pokemon?limit=150`); - const result = await response.json(); - const allPokemon = result.results; - // Return a paginated collection of paths for all posts - return paginate(allPokemon, { pageSize: 10 }); -} -// If set up correctly, The page prop now has everything that -// you need to render a single page (see next section). -const { page } = Astro.props; -``` - -`paginate()` assumes a file name of `[page].astro` or `[...page].astro`. The `page` param becomes the page number in your URL: - -- `/posts/[page].astro` would generate the URLs `/posts/1`, `/posts/2`, `/posts/3`, etc. -- `/posts/[...page].astro` would generate the URLs `/posts`, `/posts/2`, `/posts/3`, etc. - -#### The pagination `page` prop - -Pagination will pass a `page` prop to every rendered page that represents a single page of data in the paginated collection. This includes the data that you've paginated (`page.data`) as well as metadata for the page (`page.url`, `page.start`, `page.end`, `page.total`, etc). This metadata is useful for things like a "Next Page" button or a "Showing 1-10 of 100" message. - -| Name | Type | Description | -| :----------------- | :-------------------: | :-------------------------------------------------------------------------------------------------------------------------------- | -| `page.data` | `Array` | Array of data returned from `data()` for the current page. | -| `page.start` | `number` | Index of first item on current page, starting at `0` (e.g. if `pageSize: 25`, this would be `0` on page 1, `25` on page 2, etc.). | -| `page.end` | `number` | Index of last item on current page. | -| `page.size` | `number` | How many items per-page. | -| `page.total` | `number` | The total number of items across all pages. | -| `page.currentPage` | `number` | The current page number, starting with `1`. | -| `page.lastPage` | `number` | The total number of pages. | -| `page.url.current` | `string` | Get the URL of the current page (useful for canonical URLs) | -| `page.url.prev` | `string \| undefined` | Get the URL of the previous page (will be `undefined` if on page 1). | -| `page.url.next` | `string \| undefined` | Get the URL of the next page (will be `undefined` if no more pages). | - -### `rss()` - -RSS feeds are another common use-case that Astro supports natively. Call the `rss()` function to generate an `/rss.xml` feed for your project using the same data that you loaded for this page. This file location can be customized (see below). - -```js -// Example: /src/pages/posts/[...page].astro -// Place this function inside your Astro component script. -export async function getStaticPaths({rss}) { - const allPosts = Astro.fetchContent('../post/*.md'); - const sortedPosts = allPosts.sort((a, b) => new Date(b.date) - new Date(a.date)); - // Generate an RSS feed from this collection - rss({ - // The RSS Feed title, description, and custom metadata. - title: 'Don’s Blog', - description: 'An example blog on Astro', - customData: `<language>en-us</language>`, - // The list of items for your RSS feed, sorted. - items: sortedPosts.map(item => ({ - title: item.title, - description: item.description, - link: item.url, - pubDate: item.date, - })), - // Optional: Customize where the file is written to. - // Defaults to "/rss.xml" - dest: "/my/custom/feed.xml", - }); - // Return a paginated collection of paths for all posts - return [...]; -} -``` - -```ts -// The full type definition for the rss() function argument: -interface RSSArgument { - /** (required) Title of the RSS Feed */ - title: string; - /** (required) Description of the RSS Feed */ - description: string; - /** Specify arbitrary metadata on opening <xml> tag */ - xmlns?: Record<string, string>; - /** Specify custom data in opening of file */ - customData?: string; - /** - * Specify where the RSS xml file should be written. - * Relative to final build directory. Example: '/foo/bar.xml' - * Defaults to '/rss.xml'. - */ - dest?: string; - /** Return data about each item */ - items: { - /** (required) Title of item */ - title: string; - /** (required) Link to item */ - link: string; - /** Publication date of item */ - pubDate?: Date; - /** Item description */ - description?: string; - /** Append some other XML-valid data to this item */ - customData?: string; - }[]; -} -``` - -## `import.meta` - -> In this section we use `[dot]` to mean `.`. This is because of a bug in our build engine that is rewriting `import[dot]meta[dot]env` if we use `.` instead of `[dot]`. - -All ESM modules include a `import.meta` property. Astro adds `import[dot]meta[dot]env` through [Vite](https://vitejs.dev/guide/env-and-mode.html). - -**`import[dot]meta[dot]env[dot]SSR`** can be used to know when rendering on the server. Sometimes you might want different logic, for example a component that should only be rendered in the client: - -```jsx -import { h } from 'preact'; - -export default function () { - // Note: rewrite "[dot]" to "." for this to to work in your project. - return import[dot]meta[dot]env[dot]SSR ? <div class="spinner"></div> : <FancyComponent />; -} -``` - -[canonical]: https://en.wikipedia.org/wiki/Canonical_link_element diff --git a/docs/src/pages/en/reference/builtin-components.md b/docs/src/pages/en/reference/builtin-components.md deleted file mode 100644 index 76102bbaf..000000000 --- a/docs/src/pages/en/reference/builtin-components.md +++ /dev/null @@ -1,70 +0,0 @@ ---- -layout: ~/layouts/MainLayout.astro -title: Built-In Components ---- - -Astro includes several builtin components for you to use in your projects. All builtin components are available via `import {} from 'astro/components';`. - -## `<Code />` - -```astro ---- -import { Code } from 'astro/components'; ---- -<!-- Syntax highlight some JavaScript code. --> -<Code code={`const foo = 'bar';`} lang="js" /> -<!-- Optional: customize your theme. --> -<Code code={`const foo = 'bar';`} lang="js" theme="dark-plus" /> -<!-- Optional: Enable word wrapping. --> -<Code code={`const foo = 'bar';`} lang="js" wrap /> -``` - -This component provides syntax highlighting for code blocks at build time (no client-side JavaScript included). The component is powered internally by shiki and it supports all popular [themes](https://github.com/shikijs/shiki/blob/main/docs/themes.md) and [languages](https://github.com/shikijs/shiki/blob/main/docs/languages.md). Plus, you can add your custom themes and languages by passing them to `theme` and `lang` respectively. - -You can also use the `<Prism />` component for syntax highlighting powered by the [Prism](https://prismjs.com/) syntax highlighting library. This is the library that Astro's Markdown uses by default. However, we will be transitioning all usage over to `<Code>` as we move towards our v1.0 release. - -## `<Markdown />` - -```astro ---- -import { Markdown } from 'astro/components'; ---- -<Markdown> - # Markdown syntax is now supported! **Yay!** -</Markdown> -``` - -See our [Markdown Guide](/en/guides/markdown-content) for more info. - -<!-- TODO: We should move some of the specific component info here. --> - -## `<Prism />` - -```astro ---- -import { Prism } from 'astro/components'; ---- -<Prism lang="js" code={`const foo = 'bar';`} /> -``` - -This component provides language-specific syntax highlighting for code blocks. Since this never changes in the client it makes sense to use an Astro component (it's equally reasonable to use a framework component for this kind of thing; Astro is server-only by default for all frameworks!). - -See the [list of languages supported by Prism](https://prismjs.com/#supported-languages) where you can find a language's corresponding alias. And, you can also display your Astro code blocks with lang="astro"! - -## `<Debug />` - -```astro ---- -import Debug from 'astro/debug'; -const serverObject = { - a: 0, - b: "string", - c: { - nested: "object" - } -} ---- -<Debug {serverObject} /> -``` - -This component provides a way to inspect values on the clientside, without any JavaScript. diff --git a/docs/src/pages/en/reference/cli-reference.md b/docs/src/pages/en/reference/cli-reference.md deleted file mode 100644 index 0ada6b8a2..000000000 --- a/docs/src/pages/en/reference/cli-reference.md +++ /dev/null @@ -1,72 +0,0 @@ ---- -layout: ~/layouts/MainLayout.astro -title: CLI Reference ---- - -## Commands - -### `astro dev` - -Runs the Astro development server. This starts an HTTP server that responds to requests for pages stored in `src/pages` (or which folder is specified in your [configuration](/en/reference/configuration-reference)). - -**Flags** - -#### `--port` - -Specifies should port to run on. Defaults to `3000`. - -### `astro build` - -Builds your site for production. - -### `astro preview` - -Start a local static file server to serve your built `dist/` directory. Useful for previewing your static build locally, before deploying it. - -This command is meant for local testing only, and is not designed to be run in production. For help with production hosting, check out our guide on [Deploying an Astro Website](/en/guides/deploy). - -### `astro check` - -Runs diagnostics (such as type-checking) against your project and reports errors to the console. If any errors are found the process will exit with a code of **1**. - -This command is intended to be used in CI workflows. - -## Global Flags - -### `--config path` - -Specify the path to the config file. Defaults to `astro.config.mjs`. Use this if you use a different name for your configuration file or have your config file in another folder. - -```shell -astro --config config/astro.config.mjs dev -``` - -### `--project-root path` - -Specify the path to the project root. If not specified the current working directory is assumed to be the root. - -The root is used for finding the Astro configuration file. - -```shell -astro --project-root examples/snowpack dev -``` - -### `--reload` - -Clears the cache (dependencies are built within Astro apps). - -### `--verbose` - -Enables verbose logging, which is helpful when debugging an issue. - -### `--silent` - -Enables silent logging, which is helpful for when you don't want to see Astro logs. - -### `--version` - -Print the Astro version number and exit. - -### `--help` - -Print the help message and exit. diff --git a/docs/src/pages/en/reference/configuration-reference.md b/docs/src/pages/en/reference/configuration-reference.md deleted file mode 100644 index 9c729ee0b..000000000 --- a/docs/src/pages/en/reference/configuration-reference.md +++ /dev/null @@ -1,80 +0,0 @@ ---- -layout: ~/layouts/MainLayout.astro -title: Configuration Reference ---- - -To configure Astro, add an `astro.config.mjs` file to the root of your project. - -```js -export default /** @type {import('astro').AstroUserConfig} */ ({ - // all options are optional; these values are the defaults - projectRoot: './', - public: './public/', - dist: './dist/', - src: './src/', - pages: './src/pages/', - renderers: [ - '@astrojs/renderer-svelte', - '@astrojs/renderer-vue', - '@astrojs/renderer-react', - '@astrojs/renderer-preact', - ], - vite: {}, -}); -``` - -#### projectRoot - -The `projectRoot` option sets the working directory used by Astro. Astro will resolve all other directory options from this path. - -**Default**: The current working directory. - -#### public - -The `public` option sets the directory used to resolve public assets. Astro does not process any files within this directory. - -**Default**: The `public` directory within the `projectRoot` directory. - -#### dist - -The `dist` option sets the directory used to output the final build of the project. Contents of the `public` directory are also copied into this directory. - -**Default**: The `dist` directory within the `projectRoot` directory. - -#### src - -The `src` option sets the directory used to resolve source files, like `pages`. Astro may process, optimize, and bundle any files in this directory. - -**Default**: The `src` directory within the `projectRoot` directory. - -#### pages - -The `pages` option sets the directory used to resolve pages, relative to the `projectRoot` option. - -**Default**: The `src/pages` directory within the `projectRoot` directory. - -#### renderers - -The `renderers` option defines the framework renderers to be used by Astro. - -**Default**: An array of `@astrojs/renderer-svelte`, `@astrojs/renderer-vue`, `@astrojs/renderer-react`, and `@astrojs/renderer-preact`. To assign no renderers at all, you must provide an empty array (`[]`). - -#### buildOptions - -The `buildOptions` option configures how a site is built, including its base URL (`buildOptions.site`), whether it includes a sitemap (`buildOptions.sitemap`), whether markdown draft pages should be included in the build (`buildOptions.drafts`), and whether its pages should be files (`path.html`) or directories (`path/index.html`) (`buildOptions.pageUrlFormat`). - -#### devOptions - -The `devOptions` option configures features used during development, including the server hostname (`devOptions.hostname`), the server port (`devOptions.port`), and whether urls should include a trailing slash (`devOptions.trailingSlash`). - -#### vite - -The `vite` option configures the internals of Vite. These options can be explored on [ViteJS.dev](https://vitejs.dev/config/). - -#### markdownOptions - -The `markdownOptions` option assigns options to the Markdown parser. These options can be explored on [GitHub](https://github.com/withastro/astro/blob/latest/packages/astro/src/@types/astro.ts). - ---- - -You can view the entire configuration API on [GitHub](https://github.com/withastro/astro/blob/latest/packages/astro/src/@types/astro.ts). diff --git a/docs/src/pages/en/reference/renderer-reference.md b/docs/src/pages/en/reference/renderer-reference.md deleted file mode 100644 index 2b589d8c4..000000000 --- a/docs/src/pages/en/reference/renderer-reference.md +++ /dev/null @@ -1,229 +0,0 @@ ---- -layout: ~/layouts/MainLayout.astro -title: UI Renderer Reference ---- - -Astro is designed to support your favorite UI frameworks. [React](https://npm.im/@astrojs/renderer-react), [Svelte](https://npm.im/@astrojs/renderer-svelte), [Vue](https://npm.im/@astrojs/renderer-vue), and [Preact](https://npm.im/@astrojs/renderer-preact) are all built-in to Astro and supported out of the box. No configuration is needed to enable these. - -Internally, each framework is supported via a framework **renderer.** A renderer is a type of Astro plugin that adds support for a framework. Some are built-in, but you can also provide your own third-party renderers to add Astro support for new frameworks. - -## What is a renderer? - -A renderer is an NPM package that has two responsibilities: - -1. _render a component to a static string of HTML_ at build time. -2. _rehydrate that HTML to create an interactive component_ on the client. - -Take a look at any one of Astro's built-in [`renderers`](https://github.com/withastro/astro/tree/main/packages/renderers) to see this in action. We'll go into more detail in the following sections. - -## Building Your Own Renderer - -> **Building a renderer?** We'd love for you to contribute renderers for popular frameworks back to the Astro repo. Feel free to open an issue or pull request to discuss. - -A simple renderer only needs a few files: - -``` -/my-custom-renderer/ -├── package.json -├── index.js -├── server.js -└── client.js -``` - -### Package Manifest (`package.json`) - -A renderer should include any framework dependencies as package dependencies. For example, `@astrojs/renderer-react` includes `react` & `react-dom` as dependencies in the `package.json` manifest. - -```js -// package.json -"name": "@astrojs/renderer-react", -"dependencies": { - "react": "^17.0.2", - "react-dom": "^17.0.2" -} -``` - -This means that Astro users don't need to install the UI framework packages themselves. The renderer is the only package that your users will need to install. - -### Renderer Entrypoint (`index.js`) - -The main entrypoint of a renderer is a simple JS file which exports a manifest for the renderer. The required values are `name`, `server`, and `client`. - -Additionally, this entrypoint can define a [Vite config object](https://vitejs.dev/config/) that should be used to load non-JavaScript files. - -```js -import myVitePlugin from 'vite-plugin-myplugin'; - -export default { - name: '@astrojs/renderer-xxx', // the renderer name - client: './client.js', // relative path to the client entrypoint - server: './server.js', // (optional) relative path to the server entrypoint - viteConfig(options = { mode: 'development', command: 'serve' }) { - // (optional) return config object for Vite (https://vitejs.dev/config/) - return { - plugins: [myVitePlugin()], // tip: usually this will depend on a Vite plugin - optimizeDeps: { - include: ['my-client-dep'], // tip: it’s always a good idea to specify any client-side hydration deps here - }, - ssr: { - external: ['my-client-dep/node/server.js'], // tip: use ssr.external in case you encounter code meant only for Node - }, - }; - }, - polyfills: ['./shadow-dom-polyfill.js'], // (optional) scripts that should be injected on the page for the component - hydrationPolyfills: ['./hydrate-framework.js'], // (optional) polyfills that need to run before hydration ever occurs - jsxImportSource: 'preact', // (optional) the name of the library from which JSX is imported ("react", "preact", "solid-js", etc.) - jsxTransformOptions: async (options = { mode: 'development', ssr: true }) => { - // (optional) a function to transform JSX files - const { - default: { default: jsx }, - } = await import('@babel/plugin-transform-react-jsx'); - return { - plugins: [jsx({}, { runtime: 'automatic', importSource: 'preact' })], - }; - }, -}; -``` - -### JSX Support - -Astro is unique in that it allows you to mix multiple types of JSX/TSX files in a single project. It does this by reading the `jsxImportSource` and `jsxTransformOptions` from renderers and transforming a file with [Babel](https://babeljs.io/). - -#### `jsxImportSource` - -This is the name of your library (for example `preact` or `react` or `solid-js`) which, if encountered in a file, will signal to Astro that this renderer should be used. - -Users may also manually define `/** @jsxImportSource preact */` in to ensure that the file is processed by this renderer (if, for example, the file has no imports). - -#### `jsxTransformOptions` - -This is an `async` function that returns information about how to transform matching JSX files with [Babel](https://babeljs.io/). It supports [`plugins`](https://babeljs.io/docs/en/plugins) or [`presets`](https://babeljs.io/docs/en/presets) to be passed directly to Babel. - -> Keep in mind that this transform doesn't need to handle TSX separately from JSX, Astro handles that for you! - -`jsxTransformOptions` receives context about whether it’s running in `development` or `production` mode, as well as whether or not it’s running in SSR or client hydration. These allow you to pass separate Babel configurations for various conditions, like if your files should be compiled differently in SSR mode. - -```ts -export interface JSXTransformOptions { - (context: { - /** "development" or "production" */ - mode: string; - /** True if builder is in SSR mode */ - ssr: boolean; - }) => { - plugins?: any[]; - presets?: any[]; - } -} -``` - -### Server Entrypoint (`server.js`) - -The server entrypoint of a renderer is responsible for checking if a component should use this renderer, and if so, how that component should be rendered to a string of static HTML. - -```js -export default { - // should Component use this renderer? - check(Component, props, childHTML) {}, - // Component => string of static HTML - renderToStaticMarkup(Component, props, childHTML) {}, -}; -``` - -#### `check` - -`check` is a function that determines whether a Component should be "claimed" by this renderer. - -In its simplest form, it can check for the existence of a flag on Object-based components. - -```js -function check(Component) { - return Component.isMyFrameworkComponent; -} -``` - -In more complex scenarios, like when a Component is a `Function` without any flags, you may need to use `try/catch` to attempt a full render. This result is cached so that it only runs once per-component. - -```js -function check(Component, props, childHTML) { - try { - const { html } = renderToStaticMarkup(Component, props, childHTML); - return Boolean(html); - } catch (e) {} - return false; -} -``` - -#### `renderToStaticMarkup` - -`renderToStaticMarkup` is a function that renders a Component to a static string of HTML. There's usually a method exported by frameworks named something like `renderToString`. - -```js -import { h, renderToString } from 'xxx'; - -function renderToStaticMarkup(Component, props, childHTML) { - const html = renderToString(h(Component, { ...props, innerHTML: childHTML })); - return { html }; -} -``` - -Note that `childHTML` is an HTML string representing this component's children. If your framework does not support rendering HTML directly, you are welcome to use a wrapper component. By convention, Astro uses the `astro-fragment` custom element to inject `childHTML` into. Your renderer should use that, too. - -```js -import { h, renderToString } from 'xxx'; - -const Wrapper = ({ value }) => - h('astro-fragment', { dangerouslySetInnerHTML: { __html: value } }); - -function renderToStaticMarkup(Component, props, childHTML) { - const html = renderToString( - h(Component, props, h(Wrapper, { value: childHTML })) - ); - return { html }; -} -``` - -The `renderToStaticMarkup` function also supports `async/await` for render functions that return a `Promise`. - -```js -import { h, renderToString } from 'xxx'; - -async function renderToStaticMarkup(Component, props, childHTML) { - const html = await renderToString( - h(Component, { ...props, innerHTML: childHTML }) - ); - return { html }; -} -``` - -### Client Entrypoint (`client.js`) - -The client entrypoint of a renderer is responsible for rehydrating static HTML (the result of `renderToStaticMarkup`) back into a fully interactive component. Its `default` export should be a `function` which accepts the host element of the Component, an `astro-root` custom element. - -> If your framework supports non-destructive component hydration (as opposed to a destructive `render` method), be sure to use that! Following your framework's Server Side Rendering (SSR) guide should point you in the right direction. - -```js -import { h, hydrate } from 'xxx'; - -export default (element) => { - return (Component, props, childHTML) => { - hydrate(h(Component, { ...props, innerHTML: childHTML }), element); - }; -}; -``` - -Note that `childHTML` is an HTML string representing this component's children. If your framework does not support rendering HTML directly, you should use the same wrapper component you used for the server entrypoint. - -```js -import { h, hydrate } from 'xxx'; -import SharedWrapper from './SharedWrapper.js'; - -export default (element) => { - return (Component, props, childHTML) => { - hydrate( - h(Component, props, h(SharedWrapper, { value: childHTML })), - element - ); - }; -}; -``` diff --git a/docs/src/pages/en/themes.astro b/docs/src/pages/en/themes.astro deleted file mode 100644 index 5fa3cb3d6..000000000 --- a/docs/src/pages/en/themes.astro +++ /dev/null @@ -1,53 +0,0 @@ ---- -import Layout from '../../layouts/MainLayout.astro'; -import Card from '../../components/Card.astro'; -import { Markdown } from 'astro/components'; -import themes from '../../data/themes.json'; -import components from '../../data/components.json'; ---- - -<Layout content={{ title: 'Themes' }} hideRightSidebar> - <style> - .card-grid { - display: grid; - grid-column-gap: 15px; - grid-row-gap: 15px; - grid-auto-flow: dense; - grid-template-columns: repeat(auto-fit, minmax(300px, 1fr)); - } - </style> - <Markdown> - ## Featured Theme - </Markdown> - <div class="card-grid"> - {themes.featured.map((item) => <Card data={item} />)} - </div> - <Markdown> - ## Official Themes - - Astro maintains several official themes for documentation sites, portfolios, and more. - </Markdown> - <div class="card-grid"> - {themes.official.map((item) => <Card data={item} />)} - </div> - <Markdown> - ## Community Themes - - Checkout some themes developed by our community! - </Markdown> - <div class="card-grid"> - {themes.community.map((item) => <Card data={item} />)} - </div> - <Markdown> - ## Featured Packages - - Our package ecosystem is growing! Check out these featured community packages. Search the entire collection [on npm.](https://www.npmjs.com/search?q=keywords%3Aastro-component) - </Markdown> - <div class="card-grid"> - {components.community.map((item) => <Card data={item} />)} - </div> - <Markdown> - > Want to see your own work featured? [Share it to Discord!](https://astro.build/chat) - > We'll often take our favorites from the `#showcase` channel and post them here. - </Markdown> -</Layout> |