bun is a new:
- JavaScript runtime with Web APIs like [`fetch`](https://developer.mozilla.org/en-US/docs/Web/API/fetch), [`WebSocket`](https://developer.mozilla.org/en-US/docs/Web/API/WebSocket), and several more built-in. bun embeds JavaScriptCore, which tends to be faster and more memory efficient than more popular engines like V8 (though harder to embed)
- JavaScript/TypeScript/JSX transpiler
- JavaScript & CSS bundler
- Task runner for package.json scripts
- npm-compatible package manager
All in one fast & easy-to-use tool. Instead of 1,000 node_modules for development, you only need bun.
**bun is experimental software**. Join [bun’s Discord](https://bun.sh/discord) for help and have a look at [things that don’t work yet](#not-implemented-yet).
Today, bun's primary focus is bun.js: bun's JavaScript runtime.
## Install
Native: (macOS x64 & Silicon, Linux x64, Windows Subsystem for Linux)
```sh
curl -fsSL https://bun.sh/install | bash
```
Homebrew: (MacOS and Linux)
```sh
brew tap oven-sh/bun
brew install bun
```
Docker: (Linux x64)
```sh
docker pull jarredsumner/bun:edge
docker run --rm --init --ulimit memlock=-1:-1 jarredsumner/bun:edge
```
If using Linux, kernel version 5.6 or higher is strongly recommended, but the minimum is 5.1.
## Upgrade
To upgrade to the latest version of Bun, run:
```sh
bun upgrade
```
Bun automatically releases a canary build on every commit to `main`. To upgrade to the latest canary build, run:
```sh
bun upgrade --canary
```
[View canary build](https://github.com/oven-sh/bun/releases/tag/canary)
Canary builds are released without automated tests
## Table of Contents
- [Install](#install)
- [Using bun.js - a new JavaScript runtime environment](#using-bunjs---a-new-javascript-runtime-environment)
- [Types for bun.js (editor autocomplete)](#types-for-bunjs-editor-autocomplete)
- [Fast paths for Web APIs](#fast-paths-for-web-apis)
- [Using bun as a package manager](#using-bun-as-a-package-manager)
- [Using bun as a task runner](#using-bun-as-a-task-runner)
- [Creating a Discord bot with Bun](#creating-a-discord-bot-with-bun)
- [Application Commands](#application-commands)
- [Using bun with Next.js](#using-bun-with-nextjs)
- [Using bun with single page apps](#using-bun-with-single-page-apps)
- [Using bun with Create React App](#using-bun-with-create-react-app)
- [Using bun with TypeScript](#using-bun-with-typescript)
- [Transpiling TypeScript with Bun](#transpiling-typescript-with-bun)
- [Adding Type Definitions](#adding-type-definitions)
- [Not implemented yet](#not-implemented-yet)
- [Limitations & intended usage](#limitations--intended-usage)
- [Upcoming breaking changes](#upcoming-breaking-changes)
- [Configuration](#configuration)
- [bunfig.toml](#bunfigtoml)
- [Loaders](#loaders)
- [CSS in JS](#css-in-js-bun-dev-only)
- [When `platform` is `browser`](#when-platform-is-browser)
- [When `platform` is `bun`](#when-platform-is-bun)
- [CSS Loader](#css-loader)
- [CSS runtime](#css-runtime)
- [Frameworks](#frameworks)
- [Troubleshooting](#troubleshooting)
- [bun not running on an M1 (or Apple Silicon)](#bun-not-running-on-an-m1-or-apple-silicon)
- [error: Unexpected](#error-unexpected)
- [bun install is stuck](#bun-install-is-stuck)
- [Unzip is required](#unzip-is-required)
- [Debian / Ubuntu / Mint](#debian--ubuntu--mint)
- [RedHat / CentOS / Fedora](#redhat--centos--fedora)
- [Arch / Manjaro](#arch--manjaro)
- [OpenSUSE](#opensuse)
- [Reference](#reference)
- [`bun install`](#bun-install)
- [Configuring bun install with `bunfig.toml`](#configuring-bun-install-with-bunfigtoml)
- [Configuring with environment variables](#configuring-with-environment-variables)
- [Platform-specific dependencies?](#platform-specific-dependencies)
- [Peer dependencies?](#peer-dependencies)
- [Lockfile](#lockfile)
- [Why is it binary?](#why-is-it-binary)
- [How do I inspect it?](#how-do-i-inspect-it)
- [What does the lockfile store?](#what-does-the-lockfile-store)
- [Why is it fast?](#why-is-it-fast)
- [Cache](#cache)
- [npm registry metadata](#npm-registry-metadata)
- [`bun run`](#bun-run)
- [`bun create`](#bun-create)
- [Usage](#usage)
- [Local templates](#local-templates)
- [Flags](#flags)
- [Publishing a new template](#publishing-a-new-template)
- [Testing your new template](#testing-your-new-template)
- [Config](#config)
- [How `bun create` works](#how-bun-create-works)
- [`bun init`](#bun-init)
- [`bun bun`](#bun-bun)
- [Why bundle?](#why-bundle)
- [What is `.bun`?](#what-is-bun)
- [Position-independent code](#position-independent-code)
- [Where is the code?](#where-is-the-code)
- [Advanced](#advanced)
- [What is the module ID hash?](#what-is-the-module-id-hash)
- [`bun upgrade`](#bun-upgrade)
- [`bun completions`](#bun-completions)
- [`Bun.serve` - fast HTTP server](#bunserve---fast-http-server)
- [Usage](#usage-1)
- [HTTPS](#https-with-bunserve)
- [WebSockets](#websockets-with-bunserve)
- [Error handling](#error-handling)
- [`Bun.write` – optimizing I/O](#bunwrite--optimizing-io)
- [`Bun.spawn` - spawn processes](#bunspawn--spawn-a-process)
- [`Bun.which` - find the path to a bin](#bunwhich--find-the-path-to-a-binary)
- [bun:sqlite (SQLite3 module)](#bunsqlite-sqlite3-module)
- [bun:sqlite Benchmark](#bunsqlite-benchmark)
- [Getting started with bun:sqlite](#getting-started-with-bunsqlite)
- [`Database`](#database)
- [Database.prototype.query](#databaseprototypequery)
- [Database.prototype.prepare](#databaseprototypeprepare)
- [Database.prototype.exec & Database.prototype.run](#databaseprototypeexec--databaseprototyperun)
- [Database.prototype.serialize](#databaseprototypeserialize)
- [Database.prototype.loadExtension](#databaseprototypeloadextension)
- [Statement](#statement)
- [Statement.all](#statementall)
- [Statement.values](#statementvalues)
- [Statement.get](#statementget)
- [Statement.run](#statementrun)
- [Statement.finalize](#statementfinalize)
- [Statement.toString()](#statementtostring)
- [Datatypes](#datatypes)
- [`bun:ffi` (Foreign Functions Interface)](#bunffi-foreign-functions-interface)
- [Low-overhead FFI](#low-overhead-ffi)
- [Usage](#usage-2)
- [Supported FFI types (`FFIType`)](#supported-ffi-types-ffitype)
- [Strings (`CString`)](#strings-cstring)
- [Returning a string](#returning-a-string)
- [Function pointers (`CFunction`)](#function-pointers-CFunction)
- [Pointers](#pointers)
- [Passing a pointer](#passing-a-pointer)
- [Reading pointers](#reading-pointers)
- [Not implemented yet](#not-implemented-yet-1)
- [Node-API (napi)](#node-api-napi)
- [`Bun.Transpiler`](#buntranspiler)
- [`Bun.Transpiler.transformSync`](#buntranspilertransformsync)
- [`Bun.Transpiler.transform`](#buntranspilertransform)
- [`Bun.Transpiler.scan`](#buntranspilerscan)
- [`Bun.Transpiler.scanImports`](#buntranspilerscanimports)
- [`Bun.peek` - read a promise same-tick](#bunpeek---read-a-promise-without-resolving-it)
- [Module resolution in Bun](#module-resolution-in-bun)
- [Environment variables](#environment-variables)
- [Credits](#credits)
- [License](#license)
- [Developing bun](#developing-bun)
- [Dev Container (Linux/Windows)](#dev-container-linuxwindows)
- [MacOS](#macos)
- [Build bun (macOS)](#build-bun-macos)
- [Verify it worked (macOS)](#verify-it-worked-macos)
- [Troubleshooting (macOS)](#troubleshooting-macos)
- [Troubleshooting (general)](#troubleshooting-general)
- [vscode-zig](#vscode-zig)
## Using bun.js - a new JavaScript runtime environment
bun.js focuses on performance, developer experience and compatibility with the JavaScript ecosystem.
```ts
// http.ts
export default {
port: 3000,
fetch(request: Request) {
return new Response("Hello World");
},
};
// bun ./http.ts
```
| Requests per second | OS | CPU | bun version |
| ---------------------------------------------------------------------- | ----- | ------------------------------ | ----------- |
| [260,000](https://twitter.com/jarredsumner/status/1512040623200616449) | macOS | Apple Silicon M1 Max | 0.0.76 |
| [160,000](https://twitter.com/jarredsumner/status/1511988933587976192) | Linux | AMD Ryzen 5 3600 6-Core 2.2ghz | 0.0.76 |
Measured with http_load_test by running:
```bash
./http_load_test 20 127.0.0.1 3000
```
bun.js prefers Web API compatibility instead of designing new APIs when possible. bun.js also implements some Node.js APIs.
- TypeScript & JSX support is built-in, powered by Bun's JavaScript transpiler
- ESM & CommonJS modules are supported (internally, bun.js uses ESM)
- Many npm packages "just work" with bun.js (when they use few/no node APIs)
- tsconfig.json `"paths"` is natively supported, along with `"exports"` in package.json
- `fs`, `path`, and `process` from Node are partially implemented
- Web APIs like [`fetch`](https://developer.mozilla.org/en-US/docs/Web/API/fetch), [`Response`](https://developer.mozilla.org/en-US/docs/Web/API/Response), [`URL`](https://developer.mozilla.org/en-US/docs/Web/API/URL) and more are built-in
- [`HTMLRewriter`](https://developers.cloudflare.com/workers/runtime-apis/html-rewriter/) makes it easy to transform HTML in bun.js
- Starts [4x faster than Node](https://twitter.com/jarredsumner/status/1499225725492076544) (try it yourself)
- `.env` files automatically load into `process.env` and `Bun.env`
- top level await
The runtime uses JavaScriptCore, the JavaScript engine powering WebKit and Safari. Some web APIs like [`Headers`](https://developer.mozilla.org/en-US/docs/Web/API/Headers) and [`URL`](https://developer.mozilla.org/en-US/docs/Web/API/URL) directly use [Safari's implementation](https://github.com/oven-sh/bun/blob/HEAD/src/bun.js/bindings/webcore/JSFetchHeaders.cpp).
`cat` clone that runs [2x faster than GNU cat](https://twitter.com/jarredsumner/status/1511707890708586496) for large files on Linux
```js
// cat.js
import { resolve } from "path";
import { write, stdout, file, argv } from "bun";
const path = resolve(argv.at(-1));
await write(
// stdout is a Blob
stdout,
// file(path) returns a Blob - https://developer.mozilla.org/en-US/docs/Web/API/Blob
file(path),
);
// bun ./cat.js ./path-to-file
```
Server-side render React:
```js
// requires Bun v0.1.0 or later
// react-ssr.tsx
import { renderToReadableStream } from "react-dom/server";
const dt = new Intl.DateTimeFormat();
export default {
port: 3000,
async fetch(request: Request) {
return new Response(
await renderToReadableStream(
Hello World
Hello from React!
The date is {dt.format(new Date())}
,
),
);
},
};
// bun react-ssr.tsx
```
There are some more examples in the [examples](./examples) folder.
PRs adding more examples are very welcome!
### Types for bun.js (editor autocomplete)
The best docs right now are the TypeScript types in the [`bun-types`](https://github.com/oven-sh/bun/tree/main/packages/bun-types) npm package. A docs site is coming soon.
To get autocomplete for bun.js types in your editor,
1. Install the `bun-types` npm package:
```bash
# yarn/npm/pnpm work too, "bun-types" is an ordinary npm package
bun add bun-types
```
2. Add this to your `tsconfig.json` or `jsconfig.json`:
```jsonc
{
"compilerOptions": {
"lib": ["ESNext"],
"module": "esnext",
"target": "esnext",
"moduleResolution": "node",
// "bun-types" is the important part
"types": ["bun-types"]
}
}
```
You can also [view the types here](https://github.com/oven-sh/bun-types).
To contribute to the types, head over to [oven-sh/bun-types](https://github.com/oven-sh/bun-types).
### Fast paths for Web APIs
bun.js has fast paths for common use cases that make Web APIs live up to the performance demands of servers and CLIs.
`Bun.file(path)` returns a [`Blob`](https://developer.mozilla.org/en-US/docs/Web/API/Blob) that represents a lazily-loaded file.
When you pass a file blob to `Bun.write`, Bun automatically uses a faster system call:
```js
const blob = Bun.file("input.txt");
await Bun.write("output.txt", blob);
```
On Linux, this uses the [`copy_file_range`](https://man7.org/linux/man-pages/man2/copy_file_range.2.html) syscall and on macOS, this becomes `clonefile` (or [`fcopyfile`](https://developer.apple.com/library/archive/documentation/System/Conceptual/ManPages_iPhoneOS/man3/copyfile.3.html)).
`Bun.write` also supports [`Response`](https://developer.mozilla.org/en-US/docs/Web/API/Response) objects. It automatically converts to a [`Blob`](https://developer.mozilla.org/en-US/docs/Web/API/Blob).
```js
// Eventually, this will stream the response to disk but today it buffers
await Bun.write("index.html", await fetch("https://example.com"));
```
## Using bun as a package manager
On Linux, `bun install` tends to install packages 20x - 100x faster than `npm install`. On macOS, it’s more like 4x - 80x.
To install packages from package.json:
```bash
bun install
```
To add or remove packages from package.json:
```bash
bun remove react
bun add preact
```
For Linux users: bun install needs Linux Kernel 5.6 or higher to work well
The minimum Linux Kernel version is 5.1. If you're on Linux kernel 5.1 - 5.5, `bun install` should still work, but HTTP requests will be slow due to a lack of support for io_uring's `connect()` operation.
If you're using Ubuntu 20.04, here's how to install a [newer kernel](https://wiki.ubuntu.com/Kernel/LTSEnablementStack):
```bash
# If this returns a version >= 5.6, you don't need to do anything
uname -r
# Install the official Ubuntu hardware enablement kernel
sudo apt install --install-recommends linux-generic-hwe-20.04
```
## Using bun as a task runner
Instead of waiting 170ms for your npm client to start for each task, you wait 6ms for bun.
To use bun as a task runner, run `bun run` instead of `npm run`.
```bash
# Instead of "npm run clean"
bun run clean
# This also works
bun clean
```
Assuming a package.json with a `"clean"` command in `"scripts"`:
```json
{
"name": "myapp",
"scripts": {
"clean": "rm -rf dist out node_modules"
}
}
```
## Creating a Discord bot with Bun
### Application Commands
> Application commands are native ways to interact with apps in the Discord client. There are 3 types of commands accessible in different interfaces: the chat input, a message's context menu (top-right menu or right-clicking in a message), and a user's context menu (right-clicking on a user).
To get started you can use the interactions template:
```bash
bun create discord-interactions my-interactions-bot
cd my-interactions-bot
```
If you don't have a Discord bot/application yet, you can create one [here (https://discord.com/developers/applications/me)](https://discord.com/developers/applications/me).
Invite bot to your server by visiting `https://discord.com/api/oauth2/authorize?client_id=&scope=bot%20applications.commands`
Afterwards you will need to get your bot's token, public key, and application id from the application page and put them into `.env.example` file
Then you can run the http server that will handle your interactions:
```bash
bun install
mv .env.example .env
bun run.js # listening on port 1337
```
Discord does not accept an insecure HTTP server, so you will need to provide an SSL certificate or put the interactions server behind a secure reverse proxy. For development, you can use ngrok/cloudflare tunnel to expose local ports as secure URL.
## Using bun with Next.js
To create a new Next.js app with bun:
```bash
bun create next ./app
cd app
bun dev # start dev server
```
To use an existing Next.js app with bun:
```bash
bun add bun-framework-next
echo "framework = 'next'" > bunfig.toml
bun bun # bundle dependencies
bun dev # start dev server
```
Many of Next.js’ features are supported, but not all.
Here’s what doesn’t work yet:
- `getStaticPaths`
- same-origin `fetch` inside of `getStaticProps` or `getServerSideProps`
- locales, zones, `assetPrefix` (workaround: change `--origin \"http://localhost:3000/assetPrefixInhere\"`)
- `next/image` is polyfilled to a regular `` tag.
- `proxy` and anything else in `next.config.js`
- API routes, middleware (middleware is easier to support, though! Similar SSR API)
- styled-jsx (technically not Next.js, but often used with it)
- React Server Components
When using Next.js, bun automatically reads configuration from `.env.local`, `.env.development` and `.env` (in that order). `process.env.NEXT_PUBLIC_` and `process.env.NEXT_` automatically are replaced via `--define`.
Currently, any time you import new dependencies from `node_modules`, you will need to re-run `bun bun --use next`. This will eventually be automatic.
## Using bun with single-page apps
In your project folder root (where `package.json` is):
```bash
bun bun ./entry-point-1.js ./entry-point-2.jsx
bun
```
By default, `bun` will look for any HTML files in the `public` directory and serve that. For browsers navigating to the page, the `.html` file extension is optional in the URL, and `index.html` will automatically rewrite for the directory.
Here are examples of routing from `public/` and how they’re matched:
| Dev Server URL | File Path |
|----------------|-----------|
| /dir | public/dir/index.html |
| / | public/index.html |
| /index | public/index.html |
| /hi | public/hi.html |
| /file | public/file.html |
| /font/Inter.woff2 | public/font/Inter.woff2 |
| /hello | public/index.html |
If `public/index.html` exists, it becomes the default page instead of a 404 page, unless that pathname has a file extension.
### Using bun with Create React App
To create a new React app:
```bash
bun create react ./app
cd app
bun dev # start dev server
```
To use an existing React app:
```bash
# To enable React Fast Refresh, ensure it is installed
bun add -d react-refresh
# Generate a bundle for your entry point(s)
bun bun ./src/index.js # jsx, tsx, ts also work. can be multiple files
# Start the dev server
bun dev
```
From there, bun relies on the filesystem for mapping dev server paths to source files. All URL paths are relative to the project root (where `package.json` is located).
Here are examples of routing source code file paths:
| Dev Server URL | File Path (relative to cwd) |
| -------------------------- | --------------------------- |
| /src/components/Button.tsx | src/components/Button.tsx |
| /src/index.tsx | src/index.tsx |
| /pages/index.js | pages/index.js |
You do not need to include file extensions in `import` paths. CommonJS-style import paths without the file extension work.
You can override the public directory by passing `--public-dir="path-to-folder"`.
If no directory is specified and `./public/` doesn’t exist, bun will try `./static/`. If `./static/` does not exist, but won’t serve from a public directory. If you pass `--public-dir=./` bun will serve from the current directory, but it will check the current directory last instead of first.
## Using bun with TypeScript
### Transpiling TypeScript with Bun
TypeScript just works. There’s nothing to configure and nothing extra to install. If you import a `.ts` or `.tsx` file, bun will transpile it into JavaScript. bun also transpiles `node_modules` containing `.ts` or `.tsx` files. This is powered by bun’s TypeScript transpiler, so it’s fast.
bun also reads `tsconfig.json`, including `baseUrl` and `paths`.
### Adding Type Definitions
To get TypeScript working with the global API, add `bun-types` to your project:
```sh
bun add -d bun-types
```
And to the `types` field in your `tsconfig.json`:
```json
{
"compilerOptions": {
"types": ["bun-types"]
}
}
```
## Not implemented yet
bun is a project with an incredibly large scope and is still in its early days.
You can see [Bun's Roadmap](https://github.com/oven-sh/bun/issues/159), but here are some additional things that are planned:
| Feature | In |
| ------------------------------------------------------------------------------------- | -------------- |
| Web Streams with Fetch API | bun.js |
| Web Streams with HTMLRewriter | bun.js |
| Package hoisting that matches npm behavior | bun install |
| Source Maps (unbundled is supported) | JS Bundler |
| Source Maps | CSS |
| JavaScript Minifier | JS Transpiler |
| CSS Minifier | CSS |
| CSS Parser (it only bundles) | CSS |
| Tree-shaking | JavaScript |
| Tree-shaking | CSS |
| [TypeScript Decorators](https://www.typescriptlang.org/docs/handbook/decorators.html) | TS Transpiler |
| `@jsxPragma` comments | JS Transpiler |
| Sharing `.bun` files | bun |
| Dates & timestamps | TOML parser |
| [Hash components for Fast Refresh](https://github.com/oven-sh/bun/issues/18) | JSX Transpiler |
JS Transpiler == JavaScript Transpiler
TS Transpiler == TypeScript Transpiler
Package manager == bun install
bun.js == bun’s JavaScriptCore integration that executes JavaScript. Similar to how Node.js & Deno embed V8.
### Limitations & intended usage
Today, bun is mostly focused on bun.js: the JavaScript runtime.
While you could use bun's bundler & transpiler separately to build for browsers or node, bun doesn't have a minifier or support tree-shaking yet. For production browser builds, you probably should use a tool like esbuild or swc.
Longer-term, bun intends to replace Node.js, Webpack, Babel, yarn, and PostCSS (in production).
### Upcoming breaking changes
- Bun's CLI flags will change to better support bun as a JavaScript runtime. They were chosen when bun was just a frontend development tool.
- Bun's bundling format will change to accommodate production browser bundles and on-demand production bundling
## Configuration
### bunfig.toml
bunfig.toml is bun's configuration file.
It lets you load configuration from a file instead of passing flags to the CLI each time. The config file is loaded before CLI arguments are parsed, which means CLI arguments can override them.
Here is an example:
```toml
# Set a default framework to use
# By default, bun will look for an npm package like `bun-framework-${framework}`, followed by `${framework}`
framework = "next"
logLevel = "debug"
# publicDir = "public"
# external = ["jquery"]
[macros]
# Remap any import like this:
# import {graphql} from 'react-relay';
# To:
# import {graphql} from 'macro:bun-macro-relay';
react-relay = { "graphql" = "bun-macro-relay" }
[bundle]
saveTo = "node_modules.bun"
# Don't need this if `framework` is set, but showing it here as an example anyway
entryPoints = ["./app/index.ts"]
[bundle.packages]
# If you're bundling packages that do not actually live in a `node_modules` folder or do not have the full package name in the file path, you can pass this to bundle them anyway
"@bigapp/design-system" = true
[dev]
# Change the default port from 3000 to 5000
# Also inherited by Bun.serve
port = 5000
[define]
# Replace any usage of "process.env.bagel" with the string `lox`.
# The values are parsed as JSON, except single-quoted strings are supported and `'undefined'` becomes `undefined` in JS.
# This will probably change in a future release to be just regular TOML instead. It is a holdover from the CLI argument parsing.
"process.env.bagel" = "'lox'"
[loaders]
# When loading a .bagel file, run the JS parser
".bagel" = "js"
[debug]
# When navigating to a blob: or src: link, open the file in your editor
# If not, it tries $EDITOR or $VISUAL
# If that still fails, it will try Visual Studio Code, then Sublime Text, then a few others
# This is used by Bun.openInEditor()
editor = "code"
# List of editors:
# - "subl", "sublime"
# - "vscode", "code"
# - "textmate", "mate"
# - "idea"
# - "webstorm"
# - "nvim", "neovim"
# - "vim","vi"
# - "emacs"
# - "atom"
# If you pass it a file path, it will open with the file path instead
# It will recognize non-GUI editors, but I don't think it will work yet
```
TODO: list each property name
## Loaders
A loader determines how to map imports & file extensions to transforms and output.
Currently, bun implements the following loaders:
| Input | Loader | Output |
| ----- | ----------------------------- | ------ |
| .js | JSX + JavaScript | .js |
| .jsx | JSX + JavaScript | .js |
| .ts | TypeScript + JavaScript | .js |
| .tsx | TypeScript + JSX + JavaScript | .js |
| .mjs | JavaScript | .js |
| .cjs | JavaScript | .js |
| .mts | TypeScript | .js |
| .cts | TypeScript | .js |
| .toml | TOML | .js |
| .css | CSS | .css |
| .env | Env | N/A |
| .\* | file | string |
Everything else is treated as `file`. `file` replaces the import with a URL (or a path).
You can configure which loaders map to which extensions by passing `--loaders` to `bun`. For example:
```sh
bun --loader=.js:js
```
This will disable JSX transforms for `.js` files.
#### CSS in JS (bun dev only)
When importing CSS in JavaScript-like loaders, CSS is treated special.
By default, bun will transform a statement like this:
```js
import "../styles/global.css";
```
##### When `platform` is `browser`
```js
globalThis.document?.dispatchEvent(
new CustomEvent("onimportcss", {
detail: "http://localhost:3000/styles/globals.css",
}),
);
```
An event handler for turning that into a `` is automatically registered when HMR is enabled. That event handler can be turned off either in a framework’s `package.json` or by setting `globalThis["Bun_disableCSSImports"] = true;` in client-side code. Additionally, you can get a list of every .css file imported this way via `globalThis["__BUN"].allImportedStyles`.
##### When `platform` is `bun`
```js
//@import url("http://localhost:3000/styles/globals.css");
```
Additionally, bun exposes an API for SSR/SSG that returns a flat list of URLs to css files imported. That function is `Bun.getImportedStyles()`.
```ts
// This specifically is for "framework" in package.json when loaded via `bun dev`
// This API needs to be changed somewhat to work more generally with Bun.js
// Initially, you could only use bun.js through `bun dev`
// and this API was created at that time
addEventListener("fetch", async (event: FetchEvent) => {
let route = Bun.match(event);
const App = await import("pages/_app");
// This returns all .css files that were imported in the line above.
// It’s recursive, so any file that imports a CSS file will be included.
const appStylesheets = bun.getImportedStyles();
// ...rest of code
});
```
This is useful for preventing flash of unstyled content.
### CSS Loader
bun bundles `.css` files imported via `@import` into a single file. It doesn’t autoprefix or minify CSS today. Multiple `.css` files imported in one JavaScript file will _not_ be bundled into one file. You’ll have to import those from a `.css` file.
This input:
```css
@import url("./hi.css");
@import url("./hello.css");
@import url("./yo.css");
```
Becomes:
```css
/* hi.css */
/* ...contents of hi.css */
/* hello.css */
/* ...contents of hello.css */
/* yo.css */
/* ...contents of yo.css */
```
### CSS runtime
To support hot CSS reloading, bun inserts `@supports` annotations into CSS that tag which files a stylesheet is composed of. Browsers ignore this, so it doesn’t impact styles.
By default, bun’s runtime code automatically listens to `onimportcss` and will insert the `event.detail` into a `` if there is no existing `link` tag with that stylesheet. That’s how bun’s equivalent of `style-loader` works.
### Frameworks
> **Warning**
> This will soon have breaking changes. It was designed when Bun was mostly a dev server and not a JavaScript runtime.
Frameworks preconfigure bun to enable developers to use bun with their existing tooling.
Frameworks are configured via the `framework` object in the `package.json` of the framework (not in the application’s `package.json`):
Here is an example:
```json
{
"name": "bun-framework-next",
"version": "0.0.0-18",
"description": "",
"framework": {
"displayName": "Next.js",
"static": "public",
"assetPrefix": "_next/",
"router": {
"dir": ["pages", "src/pages"],
"extensions": [".js", ".ts", ".tsx", ".jsx"]
},
"css": "onimportcss",
"development": {
"client": "client.development.tsx",
"fallback": "fallback.development.tsx",
"server": "server.development.tsx",
"css": "onimportcss",
"define": {
"client": {
".env": "NEXT_PUBLIC_",
"defaults": {
"process.env.__NEXT_TRAILING_SLASH": "false",
"process.env.NODE_ENV": "\"development\"",
"process.env.__NEXT_ROUTER_BASEPATH": "''",
"process.env.__NEXT_SCROLL_RESTORATION": "false",
"process.env.__NEXT_I18N_SUPPORT": "false",
"process.env.__NEXT_HAS_REWRITES": "false",
"process.env.__NEXT_ANALYTICS_ID": "null",
"process.env.__NEXT_OPTIMIZE_CSS": "false",
"process.env.__NEXT_CROSS_ORIGIN": "''",
"process.env.__NEXT_STRICT_MODE": "false",
"process.env.__NEXT_IMAGE_OPTS": "null"
}
},
"server": {
".env": "NEXT_",
"defaults": {
"process.env.__NEXT_TRAILING_SLASH": "false",
"process.env.__NEXT_OPTIMIZE_FONTS": "false",
"process.env.NODE_ENV": "\"development\"",
"process.env.__NEXT_OPTIMIZE_IMAGES": "false",
"process.env.__NEXT_OPTIMIZE_CSS": "false",
"process.env.__NEXT_ROUTER_BASEPATH": "''",
"process.env.__NEXT_SCROLL_RESTORATION": "false",
"process.env.__NEXT_I18N_SUPPORT": "false",
"process.env.__NEXT_HAS_REWRITES": "false",
"process.env.__NEXT_ANALYTICS_ID": "null",
"process.env.__NEXT_CROSS_ORIGIN": "''",
"process.env.__NEXT_STRICT_MODE": "false",
"process.env.__NEXT_IMAGE_OPTS": "null",
"global": "globalThis",
"window": "undefined"
}
}
}
}
}
}
```
Here are type definitions:
```ts
type Framework = Environment & {
// This changes what’s printed in the console on load
displayName?: string;
// This allows a prefix to be added (and ignored) to requests.
// Useful for integrating an existing framework that expects internal routes to have a prefix
// e.g. "_next"
assetPrefix?: string;
development?: Environment;
production?: Environment;
// The directory used for serving unmodified assets like fonts and images
// Defaults to "public" if exists, else "static", else disabled.
static?: string;
// "onimportcss" disables the automatic "onimportcss" feature
// If the framework does routing, you may want to handle CSS manually
// "facade" removes CSS imports from JavaScript files,
// and replaces an imported object with a proxy that mimics CSS module support without doing any class renaming.
css?: "onimportcss" | "facade";
// bun’s filesystem router
router?: Router;
};
type Define = {
// By passing ".env", bun will automatically load .env.local, .env.development, and .env if exists in the project root
// (in addition to the processes’ environment variables)
// When "*", all environment variables will be automatically injected into the JavaScript loader
// When a string like "NEXT_PUBLIC_", only environment variables starting with that prefix will be injected
".env": string | "*";
// These environment variables will be injected into the JavaScript loader
// These are the equivalent of Webpack’s resolve.alias and esbuild’s --define.
// Values are parsed as JSON, so they must be valid JSON. The only exception is '' is a valid string, to simplify writing stringified JSON in JSON.
// If not set, `process.env.NODE_ENV` will be transformed into "development".
defaults: Record;
};
type Environment = {
// This is a wrapper for the client-side entry point for a route.
// This allows frameworks to run initialization code on pages.
client: string;
// This is a wrapper for the server-side entry point for a route.
// This allows frameworks to run initialization code on pages.
server: string;
// This runs when "server" code fails to load due to an exception.
fallback: string;
// This is how environment variables and .env is configured.
define?: Define;
};
// bun’s filesystem router
// Currently, bun supports pages by either an absolute match or a parameter match.
// pages/index.tsx will be executed on navigation to "/" and "/index"
// pages/posts/[id].tsx will be executed on navigation to "/posts/123"
// Routes & parameters are automatically passed to `fallback` and `server`.
type Router = {
// This determines the folder to look for pages
dir: string[];
// These are the allowed file extensions for pages.
extensions?: string[];
};
```
To use a framework, you pass `bun bun --use package-name`.
Your framework’s `package.json` `name` should start with `bun-framework-`. This is so that people can type something like `bun bun --use next` and it will check `bun-framework-next` first. This is similar to how Babel plugins tend to start with `babel-plugin-`.
For developing frameworks, you can also do `bun bun --use ./relative-path-to-framework`.
If you’re interested in adding a framework integration, please reach out. There’s a lot here, and it’s not entirely documented yet.
## Troubleshooting
### bun not running on an M1 (or Apple Silicon)
If you see a message like this
> [1] 28447 killed bun create next ./test
It most likely means you’re running bun’s x64 version on Apple Silicon. This happens if bun is running via Rosetta. Rosetta is unable to emulate AVX2 instructions, which bun indirectly uses.
The fix is to ensure you installed a version of bun built for Apple Silicon.
### error: Unexpected
If you see an error like this:
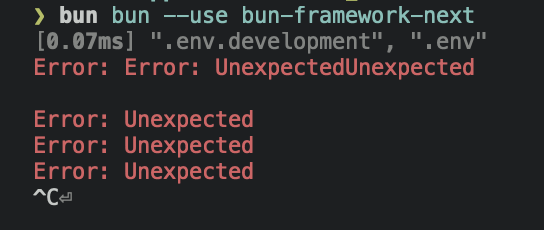
It usually means the max number of open file descriptors is being explicitly set to a low number. By default, bun requests the max number of file descriptors available (which on macOS, is something like 32,000). But, if you previously ran into ulimit issues with, e.g., Chokidar, someone on The Internet may have advised you to run `ulimit -n 8096`.
That advice unfortunately **lowers** the hard limit to `8096`. This can be a problem in large repositories or projects with lots of dependencies. Chokidar (and other watchers) don’t seem to call `setrlimit`, which means they’re reliant on the (much lower) soft limit.
To fix this issue:
1. Remove any scripts that call `ulimit -n` and restart your shell.
2. Try again, and if the error still occurs, try setting `ulimit -n` to an absurdly high number, such as `ulimit -n 2147483646`
3. Try again, and if that still doesn’t fix it, open an issue
### Unzip is required
Unzip is required to install bun on Linux. You can use one of the following commands to install `unzip`:
#### Debian / Ubuntu / Mint
```sh
sudo apt install unzip
```
#### RedHat / CentOS / Fedora
```sh
sudo dnf install unzip
```
#### Arch / Manjaro
```sh
sudo pacman -S unzip
```
#### OpenSUSE
```sh
sudo zypper install unzip
```
### bun install is stuck
Please run `bun install --verbose 2> logs.txt` and send them to me in bun's discord. If you're on Linux, it would also be helpful if you run `sudo perf trace bun install --silent` and attach the logs.
## Reference
### `bun install`
bun install is a fast package manager & npm client.
bun install can be configured via `bunfig.toml`, environment variables, and CLI flags.
#### Configuring bun install with `bunfig.toml`
`bunfig.toml` is searched for in the following paths on `bun install`, `bun remove`, and `bun add`:
1. `$XDG_CONFIG_HOME/.bunfig.toml` or `$HOME/.bunfig.toml`
2. `./bunfig.toml`
If both are found, the results are merged together.
Configuring with `bunfig.toml` is optional. bun tries to be zero configuration in general, but that's not always possible.
```toml
# Using scoped packages with bun install
[install.scopes]
# Scope name The value can be a URL string or an object
"@mybigcompany" = { token = "123456", url = "https://registry.mybigcompany.com" }
# URL is optional and fallsback to the default registry
# The "@" in the scope is optional
mybigcompany2 = { token = "123456" }
# Environment variables can be referenced as a string that starts with $ and it will be replaced
mybigcompany3 = { token = "$npm_config_token" }
# Setting username and password turns it into a Basic Auth header by taking base64("username:password")
mybigcompany4 = { username = "myusername", password = "$npm_config_password", url = "https://registry.yarnpkg.com/" }
# You can set username and password in the registry URL. This is the same as above.
mybigcompany5 = "https://username:password@registry.yarnpkg.com/"
# You can set a token for a registry URL:
mybigcompany6 = "https://:$NPM_CONFIG_TOKEN@registry.yarnpkg.com/"
[install]
# Default registry
# can be a URL string or an object
registry = "https://registry.yarnpkg.com/"
# as an object
#registry = { url = "https://registry.yarnpkg.com/", token = "123456" }
# Install for production? This is the equivalent to the "--production" CLI argument
production = false
# Don't actually install
dryRun = true
# Install optionalDependencies (default: true)
optional = true
# Install local devDependencies (default: true)
dev = true
# Install peerDependencies (default: false)
peer = false
# When using `bun install -g`, install packages here
globalDir = "~/.bun/install/global"
# When using `bun install -g`, link package bins here
globalBinDir = "~/.bun/bin"
# cache-related configuration
[install.cache]
# The directory to use for the cache
dir = "~/.bun/install/cache"
# Don't load from the global cache.
# Note: bun may still write to node_modules/.cache
disable = false
# Always resolve the latest versions from the registry
disableManifest = false
# Lockfile-related configuration
[install.lockfile]
# Print a yarn v1 lockfile
# Note: it does not load the lockfile, it just converts bun.lockb into a yarn.lock
print = "yarn"
# Path to read bun.lockb from
path = "bun.lockb"
# Path to save bun.lockb to
savePath = "bun.lockb"
# Save the lockfile to disk
save = true
```
If it's easier to read as TypeScript types:
```ts
export interface Root {
install: Install;
}
export interface Install {
scopes: Scopes;
registry: Registry;
production: boolean;
dryRun: boolean;
optional: boolean;
dev: boolean;
peer: boolean;
globalDir: string;
globalBinDir: string;
cache: Cache;
lockfile: Lockfile;
logLevel: "debug" | "error" | "warn";
}
type Registry =
| string
| {
url?: string;
token?: string;
username?: string;
password?: string;
};
type Scopes = Record;
export interface Cache {
dir: string;
disable: boolean;
disableManifest: boolean;
}
export interface Lockfile {
print?: "yarn";
path: string;
savePath: string;
save: boolean;
}
```
#### Configuring with environment variables
Environment variables have a higher priority than `bunfig.toml`.
| Name | Description |
| -------------------------------- | ------------------------------------------------------------- |
| BUN_CONFIG_REGISTRY | Set an npm registry (default: ) |
| BUN_CONFIG_TOKEN | Set an auth token (currently does nothing) |
| BUN_CONFIG_LOCKFILE_SAVE_PATH | File path to save the lockfile to (default: bun.lockb) |
| BUN_CONFIG_YARN_LOCKFILE | Save a Yarn v1-style yarn.lock |
| BUN_CONFIG_LINK_NATIVE_BINS | Point `bin` in package.json to a platform-specific dependency |
| BUN_CONFIG_SKIP_SAVE_LOCKFILE | Don’t save a lockfile |
| BUN_CONFIG_SKIP_LOAD_LOCKFILE | Don’t load a lockfile |
| BUN_CONFIG_SKIP_INSTALL_PACKAGES | Don’t install any packages |
bun always tries to use the fastest available installation method for the target platform. On macOS, that’s `clonefile` and on Linux, that’s `hardlink`. You can change which installation method is used with the `--backend` flag. When unavailable or on error, `clonefile` and `hardlink` fallsback to a platform-specific implementation of copying files.
bun stores installed packages from npm in `~/.bun/install/cache/${name}@${version}`. Note that if the semver version has a `build` or a `pre` tag, it is replaced with a hash of that value instead. This is to reduce the chances of errors from long file paths, but unfortunately complicates figuring out where a package was installed on disk.
When the `node_modules` folder exists, before installing, bun checks if the `"name"` and `"version"` in `package/package.json` in the expected node_modules folder matches the expected `name` and `version`. This is how it determines whether it should install. It uses a custom JSON parser which stops parsing as soon as it finds `"name"` and `"version"`.
When a `bun.lockb` doesn’t exist or `package.json` has changed dependencies, tarballs are downloaded & extracted eagerly while resolving.
When a `bun.lockb` exists and `package.json` hasn’t changed, bun downloads missing dependencies lazily. If the package with a matching `name` & `version` already exists in the expected location within `node_modules`, bun won’t attempt to download the tarball.
#### Platform-specific dependencies?
bun stores normalized `cpu` and `os` values from npm in the lockfile, along with the resolved packages. It skips downloading, extracting, and installing packages disabled for the current target at runtime. This means the lockfile won’t change between platforms/architectures even if the packages ultimately installed do change.
#### Peer dependencies?
Peer dependencies are handled similarly to yarn. `bun install` does not automatically install peer dependencies and will try to choose an existing dependency.
#### Lockfile
`bun.lockb` is bun’s binary lockfile format.
#### Why is it binary?
In a word: Performance. bun’s lockfile saves & loads incredibly quickly, and saves a lot more data than what is typically inside lockfiles.
#### How do I inspect it?
For now, the easiest thing is to run `bun install -y`. That prints a Yarn v1-style yarn.lock file.
#### What does the lockfile store?
Packages, metadata for those packages, the hoisted install order, dependencies for each package, what packages those dependencies resolved to, an integrity hash (if available), what each package was resolved to and which version (or equivalent).
#### Why is it fast?
It uses linear arrays for all data. [Packages](https://github.com/oven-sh/bun/blob/be03fc273a487ac402f19ad897778d74b6d72963/src/install/install.zig#L1825) are referenced by an auto-incrementing integer ID or a hash of the package name. Strings longer than 8 characters are de-duplicated. Prior to saving on disk, the lockfile is garbage-collected & made deterministic by walking the package tree and cloning the packages in dependency order.
#### Cache
To delete the cache:
```bash
rm -rf ~/.bun/install/cache
```
#### Platform-specific backends
`bun install` uses different system calls to install dependencies depending on the platform. This is a performance optimization. You can force a specific backend with the `--backend` flag.
**`hardlink`** is the default backend on Linux. Benchmarking showed it to be the fastest on Linux.
```bash
rm -rf node_modules
bun install --backend hardlink
```
**`clonefile`** is the default backend on macOS. Benchmarking showed it to be the fastest on macOS. It is only available on macOS.
```bash
rm -rf node_modules
bun install --backend clonefile
```
**`clonefile_each_dir`** is similar to `clonefile`, except it clones each file individually per directory. It is only available on macOS and tends to perform slower than `clonefile`. Unlike `clonefile`, this does not recursively clone subdirectories in one system call.
```bash
rm -rf node_modules
bun install --backend clonefile_each_dir
```
**`copyfile`** is the fallback used when any of the above fail, and is the slowest. on macOS, it uses `fcopyfile()` and on linux it uses `copy_file_range()`.
```bash
rm -rf node_modules
bun install --backend copyfile
```
**`symlink`** is typically only used for `file:` dependencies (and eventually `link:`) internally. To prevent infinite loops, it skips symlinking the `node_modules` folder.
If you install with `--backend=symlink`, Node.js won't resolve node_modules of dependencies unless each dependency has it's own node_modules folder or you pass `--preserve-symlinks` to `node`. See [Node.js documentation on `--preserve-symlinks`](https://nodejs.org/api/cli.html#--preserve-symlinks).
```bash
rm -rf node_modules
bun install --backend symlink
# https://nodejs.org/api/cli.html#--preserve-symlinks
node --preserve-symlinks ./my-file.js
```
bun's runtime does not currently expose an equivalent of `--preserve-symlinks`, though the code for it does exist.
#### npm registry metadata
bun uses a binary format for caching NPM registry responses. This loads much faster than JSON and tends to be smaller on disk.
You will see these files in `~/.bun/install/cache/*.npm`. The filename pattern is `${hash(packageName)}.npm`. It’s a hash so that extra directories don’t need to be created for scoped packages.
bun’s usage of `Cache-Control` ignores `Age`. This improves performance, but means bun may be about 5 minutes out of date to receive the latest package version metadata from npm.
### `bun run`
`bun run` is a fast `package.json` script runner. Instead of waiting 170ms for your npm client to start every time, you wait 6ms for bun.
By default, `bun run` prints the script that will be invoked:
```bash
bun run clean
$ rm -rf node_modules/.cache dist
```
You can disable that with `--silent`
```bash
bun run --silent clean
```
`bun run ${script-name}` runs the equivalent of `npm run script-name`. For example, `bun run dev` runs the `dev` script in `package.json`, which may sometimes spin up non-bun processes.
`bun run ${javascript-file.js}` will run it with bun, as long as the file doesn't have a node shebang.
To print a list of `scripts`, `bun run` without additional args:
```bash
# This command
bun run
# Prints this
hello-create-react-app scripts:
bun run start
react-scripts start
bun run build
react-scripts build
bun run test
react-scripts test
bun run eject
react-scripts eject
4 scripts
```
`bun run` automatically loads environment variables from `.env` into the shell/task. `.env` files are loaded with the same priority as the rest of bun, so that means:
1. `.env.local` is first
2. if (`$NODE_ENV` === `"production"`) `.env.production` else `.env.development`
3. `.env`
If something is unexpected there, you can run `bun run env` to get a list of environment variables.
The default shell it uses is `bash`, but if that’s not found, it tries `sh` and if still not found, it tries `zsh`. This is not configurable right now, but if you care, file an issue.
`bun run` automatically adds any parent `node_modules/.bin` to `$PATH` and if no scripts match, it will load that binary instead. That means you can run executables from packages, too.
```bash
# If you use Relay
bun run relay-compiler
# You can also do this, but:
# - It will only lookup packages in `node_modules/.bin` instead of `$PATH`
# - It will start bun’s dev server if the script name doesn’t exist (`bun` starts the dev server by default)
bun relay-compiler
```
To pass additional flags through to the task or executable, there are two ways:
```bash
# Explicit: include "--" and anything after will be added. This is the recommended way because it is more reliable.
bun run relay-compiler -- -–help
# Implicit: if you do not include "--", anything *after* the script name will be passed through
# bun flags are parsed first, which means e.g. `bun run relay-compiler --help` will print bun’s help instead of relay-compiler’s help.
bun run relay-compiler --schema foo.graphql
```
`bun run` supports lifecycle hooks like `post${task}` and `pre{task}`. If they exist, they will run, matching the behavior of npm clients. If the `pre${task}` fails, the next task will not be run. There is currently no flag to skip these lifecycle tasks if they exist, if you want that file an issue.
### `bun --hot`
`bun --hot` enables hot reloading of code in Bun's JavaScript runtime. This is a very experimental feature available in Bun v0.2.0.
Unlike file watchers like `nodemon`, `bun --hot` can keep stateful objects like the HTTP server running.
Bun v0.2.0
Nodemon
To use it with Bun's HTTP server (automatic):
`server.ts`:
```ts
// The global object is preserved across code reloads
// You can use it to store state, for now until Bun implements import.meta.hot.
const reloadCount = globalThis.reloadCount || 0;
globalThis.reloadCount = reloadCount + 1;
export default {
fetch(req: Request) {
return new Response(`Code reloaded ${reloadCount} times`, {
headers: { "content-type": "text/plain" },
});
},
};
```
Then, run:
```bash
bun --hot server.ts
```
You can also use `bun run`:
```bash
bun run --hot server.ts
```
To use it manually:
```ts
// The global object is preserved across code reloads
// You can use it to store state, for now until Bun implements import.meta.hot.
const reloadCount = globalThis.reloadCount || 0;
globalThis.reloadCount = reloadCount + 1;
const reloadServer = (globalThis.reloadServer ||= (() => {
let server;
return (handler) => {
if (server) {
// call `server.reload` to reload the server
server.reload(handler);
} else {
server = Bun.serve(handler);
}
return server;
};
})());
const handler = {
fetch(req: Request) {
return new Response(`Code reloaded ${reloadCount} times`, {
headers: { "content-type": "text/plain" },
});
},
};
reloadServer(handler);
```
In a future version of Bun, support for Vite's `import.meta.hot` is planned to enable better lifecycle management for hot reloading and to align with the ecosystem.
#### How `bun --hot` works
`bun --hot` monitors imported files for changes and reloads them. It does not monitor files that are not imported and it does not monitor `node_modules`.
On reload, it resets the internal `require` cache and ES module registry (`Loader.registry`).
Then:
- It runs the garbage collector synchronously (to minimize memory leaks, at the cost of runtime performance)
- Bun re-transpiles all of your code from scratch (including sourcemaps)
- JavaScriptCore (the engine) re-evaluates the code.
Traditional file watchers restart the entire process which means that HTTP servers and other stateful objects are lost. `bun --hot` does not restart the process, so it preserves _some_ state across reloads to be less intrusive.
This implementation isn't particularly optimized. It re-transpiles files that haven't changed. It makes no attempt at incremental compilation. It's a starting point.
### `bun create`
`bun create` is a fast way to create a new project from a template.
At the time of writing, `bun create react app` runs ~11x faster on my local computer than `yarn create react-app app`. `bun create` currently does no caching (though your npm client does)
#### Usage
Create a new Next.js project:
```bash
bun create next ./app
```
Create a new React project:
```bash
bun create react ./app
```
Create from a GitHub repo:
```bash
bun create ahfarmer/calculator ./app
```
To see a list of templates, run:
```bash
bun create
```
Format:
```bash
bun create github-user/repo-name destination
bun create local-example-or-remote-example destination
bun create /absolute/path/to-template-folder destination
bun create https://github.com/github-user/repo-name destination
bun create github.com/github-user/repo-name destination
```
Note: you don’t need `bun create` to use bun. You don’t need any configuration at all. This command exists to make it a little easier.
#### Local templates
If you have your own boilerplate you prefer using, copy it into `$HOME/.bun-create/my-boilerplate-name`.
Before checking bun’s templates on npmjs, `bun create` checks for a local folder matching the input in:
- `$BUN_CREATE_DIR/`
- `$HOME/.bun-create/`
- `$(pwd)/.bun-create/`
If a folder exists in any of those folders with the input, bun will use that instead of a remote template.
To create a local template, run:
```bash
mkdir -p $HOME/.bun-create/new-template-name
echo '{"name":"new-template-name"}' > $HOME/.bun-create/new-template-name/package.json
```
This lets you run:
```bash
bun create new-template-name ./app
```
Now your new template should appear when you run:
```bash
bun create
```
Warning: unlike with remote templates, **bun will delete the entire destination folder if it already exists.**
#### Flags
| Flag | Description |
| ------------ | -------------------------------------- |
| --npm | Use `npm` for tasks & install |
| --yarn | Use `yarn` for tasks & install |
| --pnpm | Use `pnpm` for tasks & install |
| --force | Overwrite existing files |
| --no-install | Skip installing `node_modules` & tasks |
| --no-git | Don’t initialize a git repository |
| --open | Start & open in-browser after finish |
| Environment Variables | Description |
| --------------------- | ------------------------------------------------------------------------------------------------------ |
| GITHUB_API_DOMAIN | If you’re using a GitHub enterprise or a proxy, you can change what the endpoint requests to GitHub go |
| GITHUB_API_TOKEN | This lets `bun create` work with private repositories or if you get rate-limited |
By default, `bun create` will cancel if there are existing files it would overwrite and it's a remote template. You can pass `--force` to disable this behavior.
#### Publishing a new template
Clone [https://github.com/bun-community/create-templates/](https://github.com/bun-community/create-templates/) and create a new folder in root directory with your new template. The `package.json` must have a `name` that starts with `@bun-examples/`. Do not worry about publishing it, that will happen automatically after the PR is merged.
Make sure to include a `.gitignore` that includes `node_modules` so that `node_modules` aren’t checked in to git when people download the template.
#### Testing your new template
To test your new template, add it as a local template or pass the absolute path.
```bash
bun create /path/to/my/new/template destination-dir
```
Warning: **This will always delete everything in destination-dir**.
#### Config
The `bun-create` section of `package.json` is automatically removed from the `package.json` on disk. This lets you add create-only steps without waiting for an extra package to install.
There are currently three options:
- `postinstall`
- `preinstall`
- `start` (customize the displayed start command)
They can be an array of strings or one string. An array of steps will be executed in order.
Here is an example:
```json
{
"name": "@bun-examples/next",
"version": "0.0.31",
"main": "index.js",
"dependencies": {
"next": "11.1.2",
"react": "^17.0.2",
"react-dom": "^17.0.2",
"react-is": "^17.0.2"
},
"devDependencies": {
"@types/react": "^17.0.19",
"bun-framework-next": "^0.0.0-21",
"typescript": "^4.3.5"
},
"bun-create": {
"postinstall": ["bun bun --use next"],
"start": "bun run echo 'Hello world!'"
}
}
```
By default, all commands run inside the environment exposed by the auto-detected npm client. This incurs a significant performance penalty, something like 150ms spent waiting for the npm client to start on each invocation.
Any command that starts with `"bun "` will be run without npm, relying on the first `bun` binary in `$PATH`.
#### How `bun create` works
When you run `bun create ${template} ${destination}`, here’s what happens:
IF remote template
1. GET `registry.npmjs.org/@bun-examples/${template}/latest` and parse it
2. GET `registry.npmjs.org/@bun-examples/${template}/-/${template}-${latestVersion}.tgz`
3. Decompress & extract `${template}-${latestVersion}.tgz` into `${destination}`
- If there are files that would overwrite, warn and exit unless `--force` is passed
IF GitHub repo
1. Download the tarball from GitHub’s API
2. Decompress & extract into `${destination}`
- If there are files that would overwrite, warn and exit unless `--force` is passed
ELSE IF local template
1. Open local template folder
2. Delete destination directory recursively
3. Copy files recursively using the fastest system calls available (on macOS `fcopyfile` and Linux, `copy_file_range`). Do not copy or traverse into `node_modules` folder if exists (this alone makes it faster than `cp`)
4. Parse the `package.json` (again!), update `name` to be `${basename(destination)}`, remove the `bun-create` section from the `package.json` and save the updated `package.json` to disk.
- IF Next.js is detected, add `bun-framework-next` to the list of dependencies
- IF Create React App is detected, add the entry point in /src/index.{js,jsx,ts,tsx} to `public/index.html`
- IF Relay is detected, add `bun-macro-relay` so that Relay works
5. Auto-detect the npm client, preferring `pnpm`, `yarn` (v1), and lastly `npm`
6. Run any tasks defined in `"bun-create": { "preinstall" }` with the npm client
7. Run `${npmClient} install` unless `--no-install` is passed OR no dependencies are in package.json
8. Run any tasks defined in `"bun-create": { "preinstall" }` with the npm client
9. Run `git init; git add -A .; git commit -am "Initial Commit";`
- Rename `gitignore` to `.gitignore`. NPM automatically removes `.gitignore` files from appearing in packages.
- If there are dependencies, this runs in a separate thread concurrently while node_modules are being installed
- Using libgit2 if available was tested and performed 3x slower in microbenchmarks
10. Done
`misctools/publish-examples.js` publishes all examples to npm.
### `bun bun`
Run `bun bun ./path-to.js` to generate a `node_modules.bun` file containing all imported dependencies (recursively).
#### Why bundle?
- For browsers, loading entire apps without bundling dependencies is typically slow. With a fast bundler & transpiler, the bottleneck eventually becomes the web browser’s ability to run many network requests concurrently. There are many workarounds for this. ``, HTTP/3, etc., but none are more effective than bundling. If you have reproducible evidence to the contrary, feel free to submit an issue. It would be better if bundling wasn’t necessary.
- On the server, bundling reduces the number of filesystem lookups to load JavaScript. While filesystem lookups are faster than HTTP requests, there’s still overhead.
#### What is `.bun`?
Note: [This format may change soon](https://github.com/oven-sh/bun/issues/121)
The `.bun` file contains:
- all the bundled source code
- all the bundled source code metadata
- project metadata & configuration
Here are some of the questions `.bun` files answer:
- when I import `react/index.js`, where in the `.bun` is the code for that? (not resolving, just the code)
- what modules of a package are used?
- what framework is used? (e.g., Next.js)
- where is the routes directory?
- how big is each imported dependency?
- what is the hash of the bundle’s contents? (for etags)
- what is the name & version of every npm package exported in this bundle?
- what modules from which packages are used in this project? ("project" is defined as all the entry points used to generate the .bun)
All in one file.
It’s a little like a build cache, but designed for reuse across builds.
#### Position-independent code
From a design perspective, the most important part of the `.bun` format is how code is organized. Each module is exported by a hash like this:
```js
// preact/dist/preact.module.js
export var $eb6819b = $$m({
"preact/dist/preact.module.js": (module, exports) => {
let n, l, u, i, t, o, r, f, e = {}, c = [], s = /acit|ex(?:s|g|n|p|$)|rph|grid|ows|mnc|ntw|ine[ch]|zoo|^ord|itera/i;
// ... rest of code
```
This makes bundled modules [position-independent](https://en.wikipedia.org/wiki/Position-independent_code). In theory, one could import only the exact modules in-use without reparsing code and without generating a new bundle. One bundle can dynamically become many bundles comprising only the modules in use on the webpage. Thanks to the metadata with the byte offsets, a web server can send each module to browsers [zero-copy](https://en.wikipedia.org/wiki/Zero-copy) using [sendfile](https://man7.org/linux/man-pages/man2/sendfile.2.html). bun itself is not quite this smart yet, but these optimizations would be useful in production and potentially very useful for React Server Components.
To see the schema inside, have a look at [`JavascriptBundleContainer`](./src/api/schema.d.ts#:~:text=export%20interface-,JavascriptBundleContainer,-%7B). You can find JavaScript bindings to read the metadata in [src/api/schema.js](./src/api/schema.js). This is not really an API yet. It’s missing the part where it gets the binary data from the bottom of the file. Someday, I want this to be usable by other tools too.
#### Where is the code?
`.bun` files are marked as executable.
To print out the code, run `./node_modules.bun` in your terminal or run `bun ./path-to-node_modules.bun`.
Here is a copy-pastable example:
```bash
./node_modules.bun > node_modules.js
```
This works because every `.bun` file starts with this:
```bash
#!/usr/bin/env bun
```
To deploy to production with bun, you’ll want to get the code from the `.bun` file and stick that somewhere your web server can find it (or if you’re using Vercel or a Rails app, in a `public` folder).
Note that `.bun` is a binary file format, so just opening it in VSCode or vim might render strangely.
#### Advanced
By default, `bun bun` only bundles external dependencies that are `import`ed or `require`d in either app code or another external dependency. An "external dependency" is defined as, "A JavaScript-like file that has `/node_modules/` in the resolved file path and a corresponding `package.json`".
To force bun to bundle packages which are not located in a `node_modules` folder (i.e., the final, resolved path following all symlinks), add a `bun` section to the root project’s `package.json` with `alwaysBundle` set to an array of package names to always bundle. Here’s an example:
```json
{
"name": "my-package-name-in-here",
"bun": {
"alwaysBundle": ["@mybigcompany/my-workspace-package"]
}
}
```
Bundled dependencies are not eligible for Hot Module Reloading. The code is served to browsers & bun.js verbatim. But, in the future, it may be sectioned off into only parts of the bundle being used. That’s possible in the current version of the `.bun` file (so long as you know which files are necessary), but it’s not implemented yet. Longer-term, it will include all `import` and `export` of each module inside.
#### What is the module ID hash?
The `$eb6819b` hash used here:
```js
export var $eb6819b = $$m({
```
Is generated like this:
1. Murmur3 32-bit hash of `package.name@package.version`. This is the hash uniquely identifying the npm package.
2. Wyhash 64 of the `package.hash` + `package_path`. `package_path` means "relative to the root of the npm package, where is the module imported?". For example, if you imported `react/jsx-dev-runtime.js`, the `package_path` is `jsx-dev-runtime.js`. `react-dom/cjs/react-dom.development.js` would be `cjs/react-dom.development.js`
3. Truncate the hash generated above to a `u32`
The implementation details of this module ID hash will vary between versions of bun. The important part is the metadata contains the module IDs, the package paths, and the package hashes, so it shouldn’t really matter in practice if other tooling wants to make use of any of this.
### `bun upgrade`
To upgrade bun, run `bun upgrade`.
It automatically downloads the latest version of bun and overwrites the currently-running version.
This works by checking the latest version of bun in [bun-releases-for-updater](https://github.com/Jarred-Sumner/bun-releases-for-updater/releases) and unzipping it using the system-provided `unzip` library (so that Gatekeeper works on macOS)
If for any reason you run into issues, you can also use the curl install script:
```bash
curl https://bun.sh/install | bash
```
It will still work when bun is already installed.
bun is distributed as a single binary file, so you can also do this manually:
- Download the latest version of bun for your platform in [bun-releases-for-updater](https://github.com/Jarred-Sumner/bun-releases-for-updater/releases/latest) (`darwin` == macOS)
- Unzip the folder
- Move the `bun` binary to `~/.bun/bin` (or anywhere)
### Canary builds
[Canary](https://github.com/oven-sh/bun/releases/tag/canary) builds are generated on every commit.
To install a [canary](https://github.com/oven-sh/bun/releases/tag/canary) build of bun, run:
```bash
bun upgrade --canary
```
This flag is not persistent (though that might change in the future). If you want to always run the canary build of bun, set the `BUN_CANARY` environment variable to `1` in your shell's startup script.
This will download the release zip from https://github.com/oven-sh/bun/releases/tag/canary.
To revert to the latest published version of bun, run:
```bash
bun upgrade
```
### `bun init`
`bun init` is a quick way to start a blank project with Bun. It guesses with sane defaults and is non-destructive when run multiple times.

It creates:
- a `package.json` file with a name that defaults to the current directory name
- a `tsconfig.json` file or a `jsconfig.json` file, depending if the entry point is a TypeScript file or not
- an entry point which defaults to `index.ts` unless any of `index.{tsx, jsx, js, mts, mjs}` exist or the `package.json` specifies a `module` or `main` field
- a `README.md` file
If you pass `-y` or `--yes`, it will assume you want to continue without asking questions.
At the end, it runs `bun install` to install `bun-types`.
Added in Bun v0.1.7.
#### How is `bun init` different than `bun create`?
`bun init` is for blank projects. `bun create` applies templates.
### `bun completions`
This command installs completions for `zsh` and/or `fish`. It runs automatically on every `bun upgrade` and on install. It reads from `$SHELL` to determine which shell to install for. It tries several common shell completion directories for your shell and OS.
If you want to copy the completions manually, run `bun completions > path-to-file`. If you know the completions directory to install them to, run `bun completions /path/to/directory`.
## Loader API
Bun v0.1.11 introduces custom loaders.
- import and require `.svelte`, `.vue`, `.yaml`, `.scss`, `.less` and other file extensions that Bun doesn't implement a builtin loader for
- Dynamically generate ESM & CJS modules
**YAML loader via `js-yaml`**
This is an `"object"` loader. `object` loaders let you return a JS object that Bun converts to an ESM & CJS module.
Plugin implementation (`my-yaml-plugin.js`)
```js
import { plugin } from "bun";
plugin({
name: "YAML",
setup(builder) {
const { load } = require("js-yaml");
const { readFileSync } = require("fs");
// Run this function on any import that ends with .yaml or .yml
builder.onLoad({ filter: /\.(yaml|yml)$/ }, (args) => {
// Read the YAML file from disk
const text = readFileSync(args.path, "utf8");
// parse the YAML file with js-yaml
const exports = load(text);
return {
// Copy the keys and values from the parsed YAML file into the ESM module namespace object
exports,
// we're returning an object
loader: "object",
};
});
},
});
```
Plugin usage:
```js
import "./my-yaml-plugin.js";
import { hello } from "./myfile.yaml";
console.log(hello); // "world"
```
**Svelte loader using `svelte/compiler`**
This is a `"js"` loader, which lets you return a JS string or `ArrayBufferView` that Bun converts to an ESM & CJS module.
Plugin implementation (`myplugin.js`)
```js
import { plugin } from "bun";
await plugin({
name: "svelte loader",
async setup(builder) {
const { compile } = await import("svelte/compiler");
const { readFileSync } = await import("fs");
// Register a loader for .svelte files
builder.onLoad({ filter: /\.svelte$/ }, ({ path }) => ({
// Run the Svelte compiler on the import path
contents: compile(readFileSync(path, "utf8"), {
filename: path,
generate: "ssr",
}).js.code,
// Set the loader to "js"
// This runs it through Bun's transpiler
loader: "js",
}));
},
});
```
Note: in a production implementation, you'd want to cache the compiled output and include additional error handling.
Plugin usage:
```js
import "./myplugin.js";
import MySvelteComponent from "./component.svelte";
console.log(mySvelteComponent.render());
```
### Loader API Reference
Bun's loader API interface is loosely based on [esbuild](https://esbuild.github.io/plugins). Some esbuild plugins "just work" in Bun.
MDX:
```jsx
import { plugin } from "bun";
import { renderToStaticMarkup } from "react-dom/server";
// it's the esbuild plugin, but it works using Bun's transpiler.
import mdx from "@mdx-js/esbuild";
plugin(mdx());
import Foo from "./bar.mdx";
console.log(renderToStaticMarkup());
```
At the core of the loader API are `filter` and `namespace`. `filter` is a RegExp matched against import paths. `namespace` is a prefix inserted into the import path (unlike esbuild, Bun inserts the prefix into transpiled output). For example, if you have a loader with a `filter` of `\.yaml$` and a `namespace` of `yaml:`, then the import path `./myfile.yaml` will be transformed to `yaml:./myfile.yaml`.
**`plugin` function**
At the top-level, a `plugin` function exported from `"bun"` expects a `"name"` string and a `"setup"` function that takes a `builder` object.
For plugins to automatically activate, the `plugin` function must be from an import statement like this:
```js
import { plugin } from "bun";
// This automatically activates on import
plugin({
name: "my plugin",
setup(builder) {},
});
/* Bun.plugin() does not automatically activate. */
```
Inside the `setup` function, you can:
- register loaders using `builder.onLoad()`
- register resolvers using `builder.onResolve()`
Internally, Bun's transpiler automatically turns `plugin()` calls into separate files (at most 1 per file). This lets loaders activate before the rest of your application runs with zero configuration.
#### `builder.onLoad({ filter, namespace?: "optional-namespace" }, callback)`
`builder.onLoad()` registers a loader for a matching `filter` RegExp and `namespace` string.
The `callback` function is called with an `args` object that contains the following properties:
- `path`: the path of the file being loaded
For now, that's the only property. More will likely be added in the future.
**Loader types**
There are different types of loaders:
- `"js"`, `"jsx"`, `"ts"`, `"tsx"`: these loaders run the source text through Bun's transpiler
- `"json"`, `"toml"`: these loaders run the source text through Bun's built-in parsers
- `"object"`: this loader inserts a new ECMAScript Module into the ECMAScript Module registry by copying all the keys and values from the `"exports"` object into the [Module Namespace Object](https://tc39.es/ecma262/#module-namespace-exotic-object)
The `callback` function expects a return value that contains `contents` and `loader` properties,
unless the loader is `"object"`.
`"contents"` is the source code. It can be a string or an `ArrayBufferView`.
`"loader"` is the loader type. It can be `"js"`, `"jsx"`, `"ts"`, `"tsx"`, `"json"`, `"toml"`, or `"object"`.
If `"loader"` is `"object"`, the `callback` function expects a `"exports"` object instead of `"contents"`. The keys and values will be copied onto the ESM module namespace object.
`"object"` loaders are useful when the return value is parsed into an object, like when parsing YAML, JSON, or other data formats. Most loader APIs force you to stringify values and parse again. This loader lets you skip that step, which improves performance and is a little easier sometimes.
## `Bun.serve` - fast HTTP server
For a hello world HTTP server that writes "bun!", `Bun.serve` serves about 2.5x more requests per second than node.js on Linux:
| Requests per second | Runtime |
| ------------------- | ------- |
| ~64,000 | Node 16 |
| ~160,000 | Bun |
Bigger is betterCode
Bun:
```ts
Bun.serve({
fetch(req: Request) {
return new Response(`bun!`);
},
port: 3000,
});
```
Node:
```ts
require("http")
.createServer((req, res) => res.end("bun!"))
.listen(8080);
```
#### Usage
Two ways to start an HTTP server with bun.js:
1. `export default` an object with a `fetch` function
If the file used to start bun has a default export with a `fetch` function, it will start the HTTP server.
```ts
// hi.js
export default {
fetch(req) {
return new Response("HI!");
},
};
// bun ./hi.js
```
`fetch` receives a [`Request`](https://developer.mozilla.org/en-US/docs/Web/API/Request) object and must return either a [`Response` ](https://developer.mozilla.org/en-US/docs/Web/API/Response) or a [`Promise`](https://developer.mozilla.org/en-US/docs/Web/API/Response). In a future version, it might have additional arguments for things like cookies.
2. `Bun.serve` starts the HTTP server explicitly
```ts
Bun.serve({
fetch(req) {
return new Response("HI!");
},
});
```
#### Error handling
For error handling, you get an `error` function.
If `development: true` and `error` is not defined or doesn't return a `Response`, you will get an exception page with a stack trace:
It will hopefully make it easier to debug issues with bun until bun gets debugger support. This error page is based on what `bun dev` does.
**If the error function returns a `Response`, it will be served instead**
```js
Bun.serve({
fetch(req) {
throw new Error("woops!");
},
error(error: Error) {
return new Response("Uh oh!!\n" + error.toString(), { status: 500 });
},
});
```
**If the `error` function itself throws and `development` is `false`, a generic 500 page will be shown**
To stop the server, call `server.stop()`:
```ts
const server = Bun.serve({
fetch() {
return new Response("HI!");
},
});
server.stop();
```
### HTTPS with Bun.serve()
`Bun.serve()` has builtin support for TLS (HTTPS). Pass `keyFile` and `certFile` option to enable HTTPS.
Example:
```ts
Bun.serve({
fetch(req) {
return new Response("Hello!!!");
},
/**
* File path to a TLS key
*
* To enable TLS, this option is required.
*/
keyFile: "./key.pem",
/**
* File path to a TLS certificate
*
* To enable TLS, this option is required.
*/
certFile: "./cert.pem",
/**
* Optional SSL options
*/
// passphrase?: string;
// caFile?: string;
// dhParamsFile?: string;
// lowMemoryMode?: boolean;
});
```
### WebSockets with Bun.serve()
`Bun.serve()` has builtin support for server-side websockets (as of Bun v0.2.1).
Features:
- Compression (pass `perMessageDeflate: true`)
- HTTPS
- Pubsub / broadcast support with MQTT-like topics
It's also fast. For [a chatroom](./bench/websocket-server/) on Linux x64:
| Messages sent per second | Runtime | Clients |
| ------------------------ | ------------------------------ | ------- |
| ~700,000 | (`Bun.serve`) Bun v0.2.1 (x64) | 16 |
| ~100,000 | (`ws`) Node v18.10.0 (x64) | 16 |
Here is an example that echoes back any message it receives:
```ts
Bun.serve({
websocket: {
message(ws, message) {
ws.send(message);
},
},
fetch(req, server) {
// Upgrade to a ServerWebSocket if we can
// This automatically checks for the `Sec-WebSocket-Key` header
// meaning you don't have to check headers, you can just call `upgrade()`
if (server.upgrade(req))
// When upgrading, we return undefined since we don't want to send a Response
return;
return new Response("Regular HTTP response");
},
});
```
Here is a more complete example:
```ts
type User = {
name: string;
};
Bun.serve({
fetch(req, server) {
if (req.url === "/chat") {
if (
server.upgrade(req, {
// This User object becomes ws.data
data: {
name: new URL(req.url).searchParams.get("name") || "Friend",
},
// Pass along some headers to the client
headers: {
"Set-Cookie": "name=" + new URL(req.url).searchParams.get("name"),
},
})
)
return;
}
return new Response("Expected a websocket connection", { status: 400 });
},
websocket: {
open(ws) {
console.log("WebSocket opened");
// subscribe to "the-group-chat" topic
ws.subscribe("the-group-chat");
},
message(ws, message) {
// In a group chat, we want to broadcast to everyone
// so we use publish()
ws.publish("the-group-chat", `${ws.data.name}: ${message}`);
},
close(ws, code, reason) {
ws.publish("the-group-chat", `${ws.data.name} left the chat`);
},
drain(ws) {
console.log("Please send me data. I am ready to receive it.");
},
// enable compression
perMessageDeflate: true,
/*
* perMessageDeflate: {
**
* Enable compression on the {@link ServerWebSocket}
*
* @default false
*
* `true` is equivalent to `"shared"
compress?: WebSocketCompressor | false | true;
**
* Configure decompression
*
* @default false
*
* `true` is equivalent to `"shared"
decompress?: WebSocketCompressor | false | true;
*/
/**
* The maximum size of a message
*/
// maxPayloadLength?: number;
/**
* After a connection has not received a message for this many seconds, it will be closed.
* @default 120 (2 minutes)
*/
// idleTimeout?: number;
/**
* The maximum number of bytes that can be buffered for a single connection.
* @default 16MB
*/
// backpressureLimit?: number;
/**
* Close the connection if the backpressure limit is reached.
* @default false
*/
// closeOnBackpressureLimit?: boolean;
// this makes it so ws.data shows up as a Request object
},
// TLS is also supported with WebSockets
/**
* File path to a TLS key
*
* To enable TLS, this option is required.
*/
// keyFile: "./key.pem",
/**
* File path to a TLS certificate
*
* To enable TLS, this option is required.
*/
// certFile: "./cert.pem",
});
```
#### ServerWebSocket vs WebSocket
For server websocket connections, Bun exposes a `ServerWebSocket` class which is similar to the web-standard `WebSocket` class used for websocket client connections, but with a few differences:
##### Headers
`ServerWebSocket` supports passing headers. This is useful for setting cookies or other headers that you want to send to the client before the connection is upgraded.
```ts
Bun.serve({
fetch(req, server) {
if (
server.upgrade(req, { headers: { "Set-Cookie": "name=HiThereMyNameIs" } })
)
return;
},
websocket: {
message(ws, message) {
ws.send(message);
},
},
});
```
The web-standard `WebSocket` API does not let you specify headers.
##### Publish/subscribe
`ServerWebSocket` has `publish()`, `subscribe()`, and `unsubscribe` methods which let you broadcast the same message to all clients connected to a topic in one line of code.
```ts
ws.publish("stock-prices/GOOG", `${price}`);
```
##### Backpressure
`ServerWebSocket.send` returns a number that indicates:
- `0` if the message was dropped due to a connection issue
- `-1` if the message was enqueued but there is backpressure
- any other number indicates the number of bytes sent
This lets you have **better control over backpressure in your server**.
You can also enable/disable compression per message with the `compress` option:
```ts
// this will compress
ws.send("Hello".repeat(1000), true);
```
`WebSocket.send` returns `undefined` and does not indicate backpressure, which can cause issues if you are sending a lot of data.
`ServerWebSocket` also supports a `drain` callback that runs when the connection is ready to receive more data.
##### Callbacks are per server instead of per socket
`ServerWebSocket` expects you to pass a `WebSocketHandler` object to the `Bun.serve()` method which has methods for `open`, `message`, `close`, `drain`, and `error`. This is different than the client-side `WebSocket` class which extends `EventTarget` (onmessage, onopen, onclose),
Clients tend to not have many socket connections open so an event-based API makes sense.
But servers tend to have **many** socket connections open, which means:
- Time spent adding/removing event listeners for each connection adds up
- Extra memory spent on storing references to callbacks function for each connection
- Usually, people create new functions for each connection, which also means more memory
So, instead of using an event-based API, `ServerWebSocket` expects you to pass a single object with methods for each event in `Bun.serve()` and it is reused for each connection.
This leads to less memory usage and less time spent adding/removing event listeners.
---
The interface for `Bun.serve` is loosely based on what [Cloudflare Workers](https://developers.cloudflare.com/workers/learning/migrating-to-module-workers/#module-workers-in-the-dashboard) does.
The HTTP server and server-side websockets are based on [uWebSockets](https://github.com/uNetworking/uWebSockets).
## `Bun.spawn` – spawn a process
`Bun.spawn` lets you quickly spawn a process. Available as of Bun v0.2.0.
```ts
import { spawn } from "bun";
const { stdout } = spawn(["esbuild"], {
stdin: await fetch(
"https://raw.githubusercontent.com/oven-sh/bun/main/examples/hashing.js",
),
});
const text = await new Response(stdout).text();
console.log(text); // "const input = "hello world".repeat(400); ..."
```
Bun.spawn spawns processes 60% faster than Node.js' `child_process`.
```zig
❯ bun spawn.mjs
cpu: Apple M1 Max
runtime: bun 0.2.0 (arm64-darwin)
benchmark time (avg) (min … max) p75 p99 p995
--------------------------------------------------------- -----------------------------
spawnSync echo hi 888.14 µs/iter (821.83 µs … 1.2 ms) 905.92 µs 1 ms 1.03 ms
❯ node spawn.node.mjs
cpu: Apple M1 Max
runtime: node v18.9.1 (arm64-darwin)
benchmark time (avg) (min … max) p75 p99 p995
--------------------------------------------------------- -----------------------------
spawnSync echo hi 1.47 ms/iter (1.14 ms … 2.64 ms) 1.57 ms 2.37 ms 2.52 ms
```
Synchronous example:
```ts
import { spawnSync } from "bun";
const { stdout } = spawnSync(["echo", "hi"]);
// When using spawnSync, stdout is a Buffer
// this lets you read from it synchronously
const text = stdout.toString();
console.log(text); // "hi\n"
```
You can pass an object as the second argument to customize the process:
```ts
import { spawn } from "bun";
const { stdout } = spawn(["printenv", "FOO"], {
cwd: "/tmp",
env: {
...process.env,
FOO: "bar",
},
// Disable stdin
stdin: null,
// Allow us to read from stdout
stdout: "pipe",
// Point stderr to write to "/tmp/stderr.log"
stderr: Bun.file("/tmp/stderr.log"),
});
const text = await new Response(stdout).text();
console.log(text); // "bar\n"
```
You can also pass a `Bun.file` for `stdin`:
```ts
import { spawn, file, write } from "bun";
await write("/tmp/foo.txt", "hi");
const { stdout } = spawn(["cat"], {
// Set /tmp/foo.txt as stdin
stdin: file("/tmp/foo.txt"),
});
const text = await new Response(stdout).text();
console.log(text); // "hi\n"
```
`stdin` also accepts a TypedArray:
```ts
import { spawn } from "bun";
const { stdout } = spawn(["cat"], {
stdin: new TextEncoder().encode("hi"),
stdout: "pipe",
});
const text = await new Response(stdout).text();
console.log(text); // "hi\n"
```
`Bun.spawn` also supports incrementally writing to stdin:
> :warning: **This API is a little buggy right now**
```ts
import { spawn } from "bun";
const { stdin, stdout } = spawn(["cat"], {
stdin: "pipe",
stdout: "pipe",
});
// You can pass it strings or TypedArrays
// Write "hi" to stdin
stdin.write("hi");
// By default, stdin is buffered so you need to call flush() to send it
stdin.flush(true);
// When you're done, call end()
stdin.end();
const text = await new Response(stdout).text();
console.log(text); // "hi\n"
```
Under the hood, `Bun.spawn` and `Bun.spawnSync` use [`posix_spawn(3)`](https://man7.org/linux/man-pages/man3/posix_spawn.3.html).
**stdin**
`stdin` can be one of:
- `Bun.file()`
- `null` (no stdin)
- `ArrayBufferView`
- `Response`, `Request` with a buffered body or from `fetch()`. `ReadableStream` is not supported yet (TODO)
- `number` (file descriptor)
- `"pipe"` (default), which returns a `FileSink` for fast incremental writing
- `"inherit"` which will inherit the parent's stdin
**stdout** and **stderr**
`stdout` and `stderr` can be one of:
- `Bun.file()`
- `null` (disable)
- `number` (file descriptor)
- `"pipe"` (default for `stdout`), returns a `ReadableStream`
- `"inherit"` (default for `stderr`) which will inherit the parent's stdout/stderr
**When to use `Bun.spawn` vs `Bun.spawnSync`**
There are three main differences between `Bun.spawn` and `Bun.spawnSync`.
1. `Bun.spawnSync` blocks the event loop until the subprocess exits. For HTTP servers, you probably should avoid using `Bun.spawnSync` but for CLI apps, you probably should use `Bun.spawnSync`.
2. `spawnSync` returns a different object for `stdout` and `stderr` so you can read the data synchronously.
| `spawn` | `spawnSync` |
| ---------------- | ----------- |
| `ReadableStream` | `Buffer` |
3. `Bun.spawn` supports incrementally writing to `stdin`.
If you need to read from `stdout` or `stderr` synchronously, you should use `Bun.spawnSync`. Otherwise, `Bun.spawn` is preferred.
**More details**
`Bun.spawn` returns a `Subprocess` object.
More complete types are available in [`bun-types`](https://github.com/oven-sh/bun-types).
```ts
interface Subprocess {
readonly pid: number;
readonly stdin: FileSink | undefined;
readonly stdout: ReadableStream | number | undefined;
readonly stderr: ReadableStream | number | undefined;
readonly exitCode: number | undefined;
// Wait for the process to exit
readonly exited: Promise;
// Keep Bun's process alive until the subprocess exits
ref(): void;
// Don't keep Bun's process alive until the subprocess exits
unref(): void;
// Kill the process
kill(code?: number): void;
readonly killed: boolean;
}
```
## `Bun.which` – find the path to a binary
Find the path to an executable, similar to typing `which` in your terminal.
```ts
const ls = Bun.which("ls");
console.log(ls); // "/usr/bin/ls"
```
`Bun.which` defaults the `PATH` to the current `PATH` environment variable, but you can customize it
```ts
const ls = Bun.which("ls", {
PATH: "/usr/local/bin:/usr/bin:/bin",
});
console.log(ls); // "/usr/bin/ls"
```
`Bun.which` also accepts a `cwd` option to search for the binary in a specific directory.
```ts
const ls = Bun.which("ls", {
cwd: "/tmp",
PATH: "",
});
console.log(ls); // null
```
## `Bun.listen` & `Bun.connect` - TCP/TLS sockets
`Bun.listen` and `Bun.connect` is bun's native TCP & TLS socket API. Use it to implement database clients, game servers – anything that needs to communicate over TCP (instead of HTTP). This is a low-level API intended for library authors and for advanced use cases.
Start a TCP server with `Bun.listen`:
```ts
// The server
Bun.listen({
hostname: "localhost",
port: 8080,
socket: {
open(socket) {
socket.write("hello world");
},
data(socket, data) {
console.log(data instanceof Uint8Array); // true
},
drain(socket) {
console.log("gimme more data");
},
close(socket) {
console.log("goodbye!");
},
},
// This is a TLS socket
// certFile: "/path/to/cert.pem",
// keyFile: "/path/to/key.pem",
});
```
`Bun.connect` lets you create a TCP client:
```ts
// The client
Bun.connect({
hostname: "localhost",
port: 8080,
socket: {
open(socket) {
socket.write("hello server, i'm the client!");
},
data(socket, message) {
socket.write("thanks for the message! Sincerely, " + socket.data.name);
},
drain(socket) {
console.log("my socket is ready for more data");
},
close(socket) {
console.log("");
},
timeout(socket) {
console.log("socket timed out");
},
},
data: {
name: "Clienty McClientface",
},
});
```
#### Benchmark-driven API design
Bun's TCP socket API is designed to go fast.
Instead of using promises or assigning callbacks per socket instance (like Node.js' `EventEmitter` or the web-standard `WebSocket` API), assign all callbacks one time
This design decision was made after benchmarking. For performance-sensitive servers, promise-heavy APIs or assigning callbacks per socket instance can cause significant garbage collector pressure and increase memory usage. If you're using a TCP server API, you probably care more about performance.
```ts
Bun.listen({
socket: {
open(socket) {},
data(socket, data) {},
drain(socket) {},
close(socket) {},
error(socket, error) {},
},
hostname: "localhost",
port: 8080,
});
```
Instead of having to allocate unique functions for each instance of a socket, we can use each callback once for all sockets. This is a small optimization, but it adds up.
How do you pass per-socket data to each socket object?
`**data**` is a property on the `TCPSocket` & `TLSSocket` object that you can use to store per-socket data.
```ts
socket.data = { name: "Clienty McClientface" };
```
You can assign a default value to `data` in the `connect` or `listen` options.
```ts
Bun.listen({
socket: {
open(socket) {
console.log(socket.data); // { name: "Servery McServerface" }
},
},
data: {
name: "Servery McServerface",
},
});
```
#### Hot-reloading TCP servers & clients
`TCPSocket` (returned by `Bun.connect` and passed through callbacks in `Bun.listen`) has a `reload` method that lets you reload the callbacks for all related sockets (either just the one for `Bun.connect` or all sockets for `Bun.listen`):
```ts
const socket = Bun.connect({
hostname: "localhost",
port: 8080,
socket: {
data(socket, msg) {
console.log("wow i got a message!");
// this will be called the next time the server sends a message
socket.reload({
data(socket) {
console.log("okay, not so surprising this time");
},
});
},
},
});
```
#### No buffering
Currently, `TCPSocket` & `TLSSocket` in Bun do not buffer data. Adding support for corking (similar to `ServerWebSocket`) is planned, but it means you will need to handle backpressure yourself using the `drain` callback.
Your TCP client/server will have abysmal performance if you don't consider buffering carefully.
For example, this:
```ts
socket.write("h");
socket.write("e");
socket.write("l");
socket.write("l");
socket.write("o");
```
Performs significantly worse than:
```ts
socket.write("hello");
```
To simplify this for now, consider using `ArrayBufferSink` with the `{stream: true}` option:
```ts
const sink = new ArrayBufferSink({ stream: true, highWaterMark: 1024 });
sink.write("h");
sink.write("e");
sink.write("l");
sink.write("l");
sink.write("o");
queueMicrotask(() => {
var data = sink.flush();
if (!socket.write(data)) {
// put it back in the sink if the socket is full
sink.write(data);
}
});
```
Builtin buffering is planned in a future version of Bun.
## `Bun.peek` - read a promise without resolving it
`Bun.peek` is a utility function that lets you read a promise's result without `await` or `.then`, but only if the promise has already fulfilled or rejected.
This function was added in Bun v0.2.2.
```ts
import { peek } from "bun";
const promise = Promise.resolve("hi");
// no await!
const result = peek(promise);
console.log(result); // "hi"
```
`Bun.peek` is useful for performance-sensitive code that wants to reduce the number of extra microticks. It's an advanced API and you probably shouldn't use it unless you know what you're doing.
```ts
import { peek } from "bun";
import { expect, test } from "bun:test";
test("peek", () => {
const promise = Promise.resolve(true);
// no await necessary!
expect(peek(promise)).toBe(true);
// if we peek again, it returns the same value
const again = peek(promise);
expect(again).toBe(true);
// if we peek a non-promise, it returns the value
const value = peek(42);
expect(value).toBe(42);
// if we peek a pending promise, it returns the promise again
const pending = new Promise(() => {});
expect(peek(pending)).toBe(pending);
// If we peek a rejected promise, it:
// - returns the error
// - does not mark the promise as handled
const rejected = Promise.reject(
new Error("Succesfully tested promise rejection"),
);
expect(peek(rejected).message).toBe("Succesfully tested promise rejection");
});
```
`peek.status` lets you read the status of a promise without resolving it.
```ts
import { peek } from "bun";
import { expect, test } from "bun:test";
test("peek.status", () => {
const promise = Promise.resolve(true);
expect(peek.status(promise)).toBe("fulfilled");
const pending = new Promise(() => {});
expect(peek.status(pending)).toBe("pending");
const rejected = Promise.reject(new Error("oh nooo"));
expect(peek.status(rejected)).toBe("rejected");
});
```
## `Bun.write` – optimizing I/O
`Bun.write` lets you write, copy or pipe files automatically using the fastest system calls compatible with the input and platform.
```ts
interface Bun {
write(
destination: string | number | FileBlob,
input: string | FileBlob | Blob | ArrayBufferView,
): Promise;
}
```
| Output | Input | System Call | Platform |
| -------------------------- | -------------- | ----------------------------- | -------- |
| file | file | copy_file_range | Linux |
| file | pipe | sendfile | Linux |
| pipe | pipe | splice | Linux |
| terminal | file | sendfile | Linux |
| terminal | terminal | sendfile | Linux |
| socket | file or pipe | sendfile (if http, not https) | Linux |
| file (path, doesn't exist) | file (path) | clonefile | macOS |
| file | file | fcopyfile | macOS |
| file | Blob or string | write | macOS |
| file | Blob or string | write | Linux |
All this complexity is handled by a single function.
```ts
// Write "Hello World" to output.txt
await Bun.write("output.txt", "Hello World");
```
```ts
// log a file to stdout
await Bun.write(Bun.stdout, Bun.file("input.txt"));
```
```ts
// write the HTTP response body to disk
await Bun.write("index.html", await fetch("http://example.com"));
// this does the same thing
await Bun.write(Bun.file("index.html"), await fetch("http://example.com"));
```
```ts
// copy input.txt to output.txt
await Bun.write("output.txt", Bun.file("input.txt"));
```
## bun:sqlite (SQLite3 module)
`bun:sqlite` is a high-performance built-in [SQLite3](https://www.sqlite.org/) module for bun.js.
- Simple, synchronous API (synchronous _is_ faster)
- Transactions
- Binding named & positional parameters
- Prepared statements
- Automatic type conversions (`BLOB` becomes `Uint8Array`)
- toString() prints as SQL
Installation:
```sh
# there's nothing to install
# bun:sqlite is built-in to bun.js
```
Example:
```ts
import { Database } from "bun:sqlite";
const db = new Database("mydb.sqlite");
db.run(
"CREATE TABLE IF NOT EXISTS foo (id INTEGER PRIMARY KEY AUTOINCREMENT, greeting TEXT)",
);
db.run("INSERT INTO foo (greeting) VALUES (?)", "Welcome to bun!");
db.run("INSERT INTO foo (greeting) VALUES (?)", "Hello World!");
// get the first row
db.query("SELECT * FROM foo").get();
// { id: 1, greeting: "Welcome to bun!" }
// get all rows
db.query("SELECT * FROM foo").all();
// [
// { id: 1, greeting: "Welcome to bun!" },
// { id: 2, greeting: "Hello World!" },
// ]
// get all rows matching a condition
db.query("SELECT * FROM foo WHERE greeting = ?").all("Welcome to bun!");
// [
// { id: 1, greeting: "Welcome to bun!" },
// ]
// get first row matching a named condition
db.query("SELECT * FROM foo WHERE greeting = $greeting").get({
$greeting: "Welcome to bun!",
});
// [
// { id: 1, greeting: "Welcome to bun!" },
// ]
```
### bun:sqlite Benchmark
Database: [Northwind Traders](https://github.com/jpwhite3/northwind-SQLite3/blob/46d5f8a64f396f87cd374d1600dbf521523980e8/Northwind_large.sqlite.zip).
This benchmark can be run from [./bench/sqlite](./bench/sqlite).
Here are results from an M1 Pro (64GB) on macOS 12.3.1.
**SELECT \* FROM "Order"**
| Library | Runtime | ms/iter |
| ------------------ | ----------- | -------------------- |
| bun:sqlite3 | Bun 0.0.83 | 14.31 (1x) |
| better-sqlite3 | Node 18.0.0 | 40.81 (2.8x slower) |
| deno.land/x/sqlite | Deno 1.21.2 | 125.96 (8.9x slower) |
**SELECT \* FROM "Product"**
| Library | Runtime | us/iter |
| ------------------ | ----------- | -------------------- |
| bun:sqlite3 | Bun 0.0.83 | 33.85 (1x) |
| better-sqlite3 | Node 18.0.0 | 121.09 (3.5x slower) |
| deno.land/x/sqlite | Deno 1.21.2 | 187.64 (8.9x slower) |
**SELECT \* FROM "OrderDetail"**
| Library | Runtime | ms/iter |
| ------------------ | ----------- | -------------------- |
| bun:sqlite3 | Bun 0.0.83 | 146.92 (1x) |
| better-sqlite3 | Node 18.0.0 | 875.73 (5.9x slower) |
| deno.land/x/sqlite | Deno 1.21.2 | 541.15 (3.6x slower) |
In screenshot form (which has a different sorting order)
### Getting started with bun:sqlite
bun:sqlite's API is loosely based on [better-sqlite3](https://github.com/JoshuaWise/better-sqlite3), though the implementation is different.
bun:sqlite has two classes:
- `class Database`
- `class Statement`
#### `Database`
Calling `new Database(filename)` opens or creates the SQLite database.
```ts
constructor(
filename: string,
options?:
| number
| {
/**
* Open the database as read-only (no write operations, no create).
*
* Equivalent to {@link constants.SQLITE_OPEN_READONLY}
*/
readonly?: boolean;
/**
* Allow creating a new database
*
* Equivalent to {@link constants.SQLITE_OPEN_CREATE}
*/
create?: boolean;
/**
* Open the database as read-write
*
* Equivalent to {@link constants.SQLITE_OPEN_READWRITE}
*/
readwrite?: boolean;
}
);
```
To open or create a SQLite3 database:
```ts
import { Database } from "bun:sqlite";
const db = new Database("mydb.sqlite");
```
Open an in-memory database:
```ts
import { Database } from "bun:sqlite";
// all of these do the same thing
let db = new Database(":memory:");
let db = new Database();
let db = new Database("");
```
Open read-write and throw if the database doesn't exist:
```ts
import { Database } from "bun:sqlite";
const db = new Database("mydb.sqlite", { readwrite: true });
```
Open read-only and throw if the database doesn't exist:
```ts
import { Database } from "bun:sqlite";
const db = new Database("mydb.sqlite", { readonly: true });
```
Open read-write, don't throw if new file:
```ts
import { Database } from "bun:sqlite";
const db = new Database("mydb.sqlite", { readonly: true, create: true });
```
Open a database from a `Uint8Array`:
```ts
import { Database } from "bun:sqlite";
import { readFileSync } from "fs";
// unlike passing a filepath, this will not persist any changes to disk
// it will be read-write but not persistent
const db = new Database(readFileSync("mydb.sqlite"));
```
Close a database:
```ts
let db = new Database();
db.close();
```
Note: `close()` is called automatically when the database is garbage collected. It is safe to call multiple times but has no effect after the first.
#### Database.prototype.query
`query(sql)` creates a `Statement` for the given SQL and caches it, but does not execute it.
```ts
class Database {
query(sql: string): Statement;
}
```
`query` returns a `Statement` object.
It performs the same operation as `Database.prototype.prepare`, except:
- `query` caches the prepared statement in the `Database` object
- `query` doesn't bind parameters
This intended to make it easier for `bun:sqlite` to be fast by default. Calling `.prepare` compiles a SQLite query, which can take some time, so it's better to cache those a little.
You can bind parameters on any call to a statement.
```js
import { Database } from "bun:sqlite";
// generate some data
let db = new Database();
db.run(
"CREATE TABLE foo (id INTEGER PRIMARY KEY AUTOINCREMENT, greeting TEXT)",
);
db.run("INSERT INTO foo (greeting) VALUES ($greeting)", {
$greeting: "Welcome to bun",
});
// get the query
const stmt = db.query("SELECT * FROM foo WHERE greeting = ?");
// run the query
stmt.all("Welcome to bun!");
stmt.get("Welcome to bun!");
stmt.run("Welcome to bun!");
```
#### Database.prototype.prepare
`prepare(sql)` creates a `Statement` for the given SQL, but does not execute it.
Unlike `query()`, this does not cache the compiled query.
```ts
import { Database } from "bun:sqlite";
// generate some data
let db = new Database();
db.run(
"CREATE TABLE foo (id INTEGER PRIMARY KEY AUTOINCREMENT, greeting TEXT)",
);
// compile the prepared statement
const stmt = db.prepare("SELECT * FROM foo WHERE bar = ?");
// run the prepared statement
stmt.all("baz");
```
Internally, this calls [`sqlite3_prepare_v3`](https://www.sqlite.org/c3ref/prepare.html).
#### Database.prototype.exec & Database.prototype.run
`exec` is for one-off executing a query which does not need to return anything.
`run` is an alias.
```ts
class Database {
// exec is an alias for run
exec(sql: string, ...params: ParamsType): void;
run(sql: string, ...params: ParamsType): void;
}
```
This is useful for things like
Creating a table:
```ts
import { Database } from "bun:sqlite";
let db = new Database();
db.exec(
"CREATE TABLE foo (id INTEGER PRIMARY KEY AUTOINCREMENT, greeting TEXT)",
);
```
Inserting one row:
```ts
import { Database } from "bun:sqlite";
let db = new Database();
db.exec(
"CREATE TABLE foo (id INTEGER PRIMARY KEY AUTOINCREMENT, greeting TEXT)",
);
// insert one row
db.exec("INSERT INTO foo (greeting) VALUES ($greeting)", {
$greeting: "Welcome to bun",
});
```
For queries which aren't intended to be run multiple times, it should be faster to use `exec()` than `prepare()` or `query()` because it doesn't create a `Statement` object.
Internally, this function calls [`sqlite3_prepare`](https://www.sqlite.org/c3ref/prepare.html), [`sqlite3_step`](https://www.sqlite.org/c3ref/step.html), and [`sqlite3_finalize`](https://www.sqlite.org/c3ref/finalize.html).
#### Database.prototype.transaction
Creates a function that always runs inside a transaction. When the function is invoked, it will begin a new transaction. When the function returns, the transaction will be committed. If an exception is thrown, the transaction will be rolled back (and the exception will propagate as usual).
```ts
// setup
import { Database } from "bun:sqlite";
const db = Database.open(":memory:");
db.exec(
"CREATE TABLE cats (id INTEGER PRIMARY KEY AUTOINCREMENT, name TEXT UNIQUE, age INTEGER)",
);
const insert = db.prepare("INSERT INTO cats (name, age) VALUES ($name, $age)");
const insertMany = db.transaction((cats) => {
for (const cat of cats) insert.run(cat);
});
insertMany([
{ $name: "Joey", $age: 2 },
{ $name: "Sally", $age: 4 },
{ $name: "Junior", $age: 1 },
]);
```
Transaction functions can be called from inside other transaction functions. When doing so, the inner transaction becomes a savepoint.
```ts
// setup
import { Database } from "bun:sqlite";
const db = Database.open(":memory:");
db.exec(
"CREATE TABLE expenses (id INTEGER PRIMARY KEY AUTOINCREMENT, note TEXT, dollars INTEGER);",
);
db.exec(
"CREATE TABLE cats (id INTEGER PRIMARY KEY AUTOINCREMENT, name TEXT UNIQUE, age INTEGER)",
);
const newExpense = db.prepare(
"INSERT INTO expenses (note, dollars) VALUES (?, ?)",
);
const insert = db.prepare("INSERT INTO cats (name, age) VALUES ($name, $age)");
const insertMany = db.transaction((cats) => {
for (const cat of cats) insert.run(cat);
});
const adopt = db.transaction((cats) => {
newExpense.run("adoption fees", 20);
insertMany(cats); // nested transaction
});
adopt([
{ $name: "Joey", $age: 2 },
{ $name: "Sally", $age: 4 },
{ $name: "Junior", $age: 1 },
]);
```
Transactions also come with `deferred`, `immediate`, and `exclusive` versions.
```ts
insertMany(cats); // uses "BEGIN"
insertMany.deferred(cats); // uses "BEGIN DEFERRED"
insertMany.immediate(cats); // uses "BEGIN IMMEDIATE"
insertMany.exclusive(cats); // uses "BEGIN EXCLUSIVE"
```
Any arguments passed to the transaction function will be forwarded to the wrapped function, and any values returned from the wrapped function will be returned from the transaction function. The wrapped function will also have access to the same binding as the transaction function.
bun:sqlite's transaction implementation is based on [better-sqlite3](https://github.com/JoshuaWise/better-sqlite3/blob/master/docs/api.md#transactionfunction---function) (along with this section of the docs), so thanks to Joshua Wise and better-sqlite3 contributors.
#### Database.prototype.serialize
SQLite has a built-in way to [serialize](https://www.sqlite.org/c3ref/serialize.html) and [deserialize](https://www.sqlite.org/c3ref/deserialize.html) databases to and from memory.
`bun:sqlite` fully supports it:
```ts
let db = new Database();
// write some data
db.run(
"CREATE TABLE foo (id INTEGER PRIMARY KEY AUTOINCREMENT, greeting TEXT)",
);
db.run("INSERT INTO foo VALUES (?)", "Welcome to bun!");
db.run("INSERT INTO foo VALUES (?)", "Hello World!");
const copy = db.serialize();
// => Uint8Array
const db2 = new Database(copy);
db2.query("SELECT * FROM foo").all();
// => [
// { id: 1, greeting: "Welcome to bun!" },
// { id: 2, greeting: "Hello World!" },
// ]
```
`db.serialize()` returns a `Uint8Array` of the database.
Internally, it calls [`sqlite3_serialize`](https://www.sqlite.org/c3ref/serialize.html).
#### Database.prototype.loadExtension
`bun:sqlite` supports [SQLite extensions](https://www.sqlite.org/loadext.html).
To load a SQLite extension, call `Database.prototype.loadExtension(name)`:
```ts
import { Database } from "bun:sqlite";
let db = new Database();
db.loadExtension("myext");
```
If you're on macOS, you will need to first use a custom SQLite install (you can install with homebrew). By default, bun uses Apple's proprietary build of SQLite because it benchmarks about 50% faster. However, they disabled extension support, so you will need to have a custom build of SQLite to use extensions on macOS.
```ts
import { Database } from "bun:sqlite";
// on macOS, this must be run before any other calls to `Database`
// if called on linux, it will return true and do nothing
// on linux it will still check that a string was passed
Database.setCustomSQLite("/path/to/sqlite.dylib");
let db = new Database();
db.loadExtension("myext");
```
To install sqlite with homebrew:
```bash
brew install sqlite
```
#### Statement
`Statement` is a prepared statement. Use it to run queries that get results.
TLDR:
- [`Statement.all(...optionalParamsToBind)`](#statementall) returns all rows as an array of objects
- [`Statement.values(...optionalParamsToBind)`](#statementvalues) returns all rows as an array of arrays
- [`Statement.get(...optionalParamsToBind)`](#statementget) returns the first row as an object
- [`Statement.run(...optionalParamsToBind)`](#statementrun) runs the statement and returns nothing
- [`Statement.finalize()`](#statementfinalize) closes the statement
- [`Statement.toString()`](#statementtostring) prints the expanded SQL, including bound parameters
- `get Statement.columnNames` get the returned column names
- `get Statement.paramsCount` how many parameters are expected?
You can bind parameters on any call to a statement. Named parameters and positional parameters are supported. Bound parameters are remembered between calls and reset the next time you pass parameters to bind.
```ts
import { Database } from "bun:sqlite";
// setup
let db = new Database();
db.run(
"CREATE TABLE foo (id INTEGER PRIMARY KEY AUTOINCREMENT, greeting TEXT)",
);
db.run("INSERT INTO foo VALUES (?)", "Welcome to bun!");
db.run("INSERT INTO foo VALUES (?)", "Hello World!");
// Statement object
let statement = db.query("SELECT * FROM foo");
// returns all the rows
statement.all();
// returns the first row
statement.get();
// runs the query, without returning anything
statement.run();
```
#### Statement.all
Calling `all()` on a `Statement` instance runs the query and returns the rows as an array of objects.
```ts
import { Database } from "bun:sqlite";
// setup
let db = new Database();
db.run(
"CREATE TABLE foo (id INTEGER PRIMARY KEY AUTOINCREMENT, greeting TEXT, count INTEGER)",
);
db.run("INSERT INTO foo (greeting, count) VALUES (?, ?)", "Welcome to bun!", 2);
db.run("INSERT INTO foo (greeting, count) VALUES (?, ?)", "Hello World!", 0);
db.run(
"INSERT INTO foo (greeting, count) VALUES (?, ?)",
"Welcome to bun!!!!",
2,
);
// Statement object
let statement = db.query("SELECT * FROM foo WHERE count = ?");
// return all the query results, binding 2 to the count parameter
statement.all(2);
// => [
// { id: 1, greeting: "Welcome to bun!", count: 2 },
// { id: 3, greeting: "Welcome to bun!!!!", count: 2 },
// ]
```
Internally, this calls [`sqlite3_reset`](https://www.sqlite.org/capi3ref.html#sqlite3_reset) and repeatedly calls [`sqlite3_step`](https://www.sqlite.org/capi3ref.html#sqlite3_step) until it returns `SQLITE_DONE`.
#### Statement.values
Calling `values()` on a `Statement` instance runs the query and returns the rows as an array of arrays.
```ts
import { Database } from "bun:sqlite";
// setup
let db = new Database();
db.run(
"CREATE TABLE foo (id INTEGER PRIMARY KEY AUTOINCREMENT, greeting TEXT, count INTEGER)",
);
db.run("INSERT INTO foo (greeting, count) VALUES (?, ?)", "Welcome to bun!", 2);
db.run("INSERT INTO foo (greeting, count) VALUES (?, ?)", "Hello World!", 0);
db.run(
"INSERT INTO foo (greeting, count) VALUES (?, ?)",
"Welcome to bun!!!!",
2,
);
// Statement object
let statement = db.query("SELECT * FROM foo WHERE count = ?");
// return all the query results as an array of arrays, binding 2 to "count"
statement.values(2);
// => [
// [ 1, "Welcome to bun!", 2 ],
// [ 3, "Welcome to bun!!!!", 2 ],
// ]
// Statement object, but with named parameters
let statement = db.query("SELECT * FROM foo WHERE count = $count");
// return all the query results as an array of arrays, binding 2 to "count"
statement.values({ $count: 2 });
// => [
// [ 1, "Welcome to bun!", 2 ],
// [ 3, "Welcome to bun!!!!", 2 ],
// ]
```
Internally, this calls [`sqlite3_reset`](https://www.sqlite.org/capi3ref.html#sqlite3_reset) and repeatedly calls [`sqlite3_step`](https://www.sqlite.org/capi3ref.html#sqlite3_step) until it returns `SQLITE_DONE`.
#### Statement.get
Calling `get()` on a `Statement` instance runs the query and returns the first result as an object.
```ts
import { Database } from "bun:sqlite";
// setup
let db = new Database();
db.run(
"CREATE TABLE foo (id INTEGER PRIMARY KEY AUTOINCREMENT, greeting TEXT, count INTEGER)",
);
db.run("INSERT INTO foo (greeting, count) VALUES (?, ?)", "Welcome to bun!", 2);
db.run("INSERT INTO foo (greeting, count) VALUES (?, ?)", "Hello World!", 0);
db.run(
"INSERT INTO foo (greeting, count) VALUES (?, ?)",
"Welcome to bun!!!!",
2,
);
// Statement object
let statement = db.query("SELECT * FROM foo WHERE count = ?");
// return the first row as an object, binding 2 to the count parameter
statement.get(2);
// => { id: 1, greeting: "Welcome to bun!", count: 2 }
// Statement object, but with named parameters
let statement = db.query("SELECT * FROM foo WHERE count = $count");
// return the first row as an object, binding 2 to the count parameter
statement.get({ $count: 2 });
// => { id: 1, greeting: "Welcome to bun!", count: 2 }
```
Internally, this calls [`sqlite3_reset`](https://www.sqlite.org/capi3ref.html#sqlite3_reset) and calls [`sqlite3_step`](https://www.sqlite.org/capi3ref.html#sqlite3_step) once. Stepping through all the rows is not necessary when you only want the first row.
#### Statement.run
Calling `run()` on a `Statement` instance runs the query and returns nothing.
This is useful if you want to repeatedly run a query, but don't care about the results.
```ts
import { Database } from "bun:sqlite";
// setup
let db = new Database();
db.run(
"CREATE TABLE foo (id INTEGER PRIMARY KEY AUTOINCREMENT, greeting TEXT, count INTEGER)",
);
db.run("INSERT INTO foo (greeting, count) VALUES (?, ?)", "Welcome to bun!", 2);
db.run("INSERT INTO foo (greeting, count) VALUES (?, ?)", "Hello World!", 0);
db.run(
"INSERT INTO foo (greeting, count) VALUES (?, ?)",
"Welcome to bun!!!!",
2,
);
// Statement object (TODO: use a better example query)
let statement = db.query("SELECT * FROM foo");
// run the query, returning nothing
statement.run();
```
Internally, this calls [`sqlite3_reset`](https://www.sqlite.org/capi3ref.html#sqlite3_reset) and calls [`sqlite3_step`](https://www.sqlite.org/capi3ref.html#sqlite3_step) once. Stepping through all the rows is not necessary when you don't care about the results.
#### Statement.finalize
This method finalizes the statement, freeing any resources associated with it.
After a statement has been finalized, it cannot be used for any further queries. Any attempt to run the statement will throw an error. Calling it multiple times will have no effect.
It is a good idea to finalize a statement when you are done with it, but the garbage collector will do it for you if you don't.
```ts
import { Database } from "bun:sqlite";
// setup
let db = new Database();
db.run(
"CREATE TABLE foo (id INTEGER PRIMARY KEY AUTOINCREMENT, greeting TEXT, count INTEGER)",
);
db.run("INSERT INTO foo (greeting, count) VALUES (?, ?)", "Welcome to bun!", 2);
db.run("INSERT INTO foo (greeting, count) VALUES (?, ?)", "Hello World!", 0);
db.run(
"INSERT INTO foo (greeting, count) VALUES (?, ?)",
"Welcome to bun!!!!",
2,
);
// Statement object
let statement = db.query("SELECT * FROM foo WHERE count = ?");
statement.finalize();
// this will throw
statement.run();
```
#### Statement.toString()
Calling `toString()` on a `Statement` instance prints the expanded SQL query. This is useful for debugging.
```ts
import { Database } from "bun:sqlite";
// setup
let db = new Database();
db.run(
"CREATE TABLE foo (id INTEGER PRIMARY KEY AUTOINCREMENT, greeting TEXT, count INTEGER)",
);
db.run("INSERT INTO foo (greeting, count) VALUES (?, ?)", "Welcome to bun!", 2);
db.run("INSERT INTO foo (greeting, count) VALUES (?, ?)", "Hello World!", 0);
db.run(
"INSERT INTO foo (greeting, count) VALUES (?, ?)",
"Welcome to bun!!!!",
2,
);
// Statement object
const statement = db.query("SELECT * FROM foo WHERE count = ?");
console.log(statement.toString());
// => "SELECT * FROM foo WHERE count = NULL"
statement.run(2); // bind the param
console.log(statement.toString());
// => "SELECT * FROM foo WHERE count = 2"
```
Internally, this calls [`sqlite3_expanded_sql`](https://www.sqlite.org/capi3ref.html#sqlite3_expanded_sql).
#### Datatypes
| JavaScript type | SQLite type |
| --------------- | ---------------------- |
| `string` | `TEXT` |
| `number` | `INTEGER` or `DECIMAL` |
| `boolean` | `INTEGER` (1 or 0) |
| `Uint8Array` | `BLOB` |
| `Buffer` | `BLOB` |
| `bigint` | `INTEGER` |
| `null` | `NULL` |
### `bun:ffi` (Foreign Functions Interface)
`bun:ffi` lets you efficiently call native libraries from JavaScript. It works with languages that support the C ABI (Zig, Rust, C/C++, C#, Nim, Kotlin, etc).
This snippet prints sqlite3's version number:
```ts
import { dlopen, FFIType, suffix } from "bun:ffi";
// `suffix` is either "dylib", "so", or "dll" depending on the platform
// you don't have to use "suffix", it's just there for convenience
const path = `libsqlite3.${suffix}`;
const {
symbols: {
// sqlite3_libversion is the function we will call
sqlite3_libversion,
},
} =
// dlopen() expects:
// 1. a library name or file path
// 2. a map of symbols
dlopen(path, {
// `sqlite3_libversion` is a function that returns a string
sqlite3_libversion: {
// sqlite3_libversion takes no arguments
args: [],
// sqlite3_libversion returns a pointer to a string
returns: FFIType.cstring,
},
});
console.log(`SQLite 3 version: ${sqlite3_libversion()}`);
```
#### Low-overhead FFI
3ns to go from JavaScript <> native code with `bun:ffi` (on my machine, an M1 Pro with 64GB of RAM)
- 5x faster than napi (Node v17.7.1)
- 100x faster than Deno v1.21.1
As measured in [this simple benchmark](./bench/ffi)
Why is bun:ffi fast?
Bun generates & just-in-time compiles C bindings that efficiently convert values between JavaScript types and native types.
To compile C, Bun embeds [TinyCC](https://github.com/TinyCC/tinycc), a small and fast C compiler.
#### Usage
With Zig:
```zig
// add.zig
pub export fn add(a: i32, b: i32) i32 {
return a + b;
}
```
To compile:
```bash
zig build-lib add.zig -dynamic -OReleaseFast
```
Pass `dlopen` the path to the shared library and the list of symbols you want to import.
```ts
import { dlopen, FFIType, suffix } from "bun:ffi";
const path = `libadd.${suffix}`;
const lib = dlopen(path, {
add: {
args: [FFIType.i32, FFIType.i32],
returns: FFIType.i32,
},
});
lib.symbols.add(1, 2);
```
With Rust:
```rust
// add.rs
#[no_mangle]
pub extern "C" fn add(a: isize, b: isize) -> isize {
a + b
}
```
To compile:
```bash
rustc --crate-type cdylib add.rs
```
#### Supported FFI types (`FFIType`)
| `FFIType` | C Type | Aliases |
| --------- | -------------- | --------------------------- |
| cstring | `char*` | |
| function | `(void*)(*)()` | `fn`, `callback` |
| ptr | `void*` | `pointer`, `void*`, `char*` |
| i8 | `int8_t` | `int8_t` |
| i16 | `int16_t` | `int16_t` |
| i32 | `int32_t` | `int32_t`, `int` |
| i64 | `int64_t` | `int64_t` |
| i64_fast | `int64_t` | |
| u8 | `uint8_t` | `uint8_t` |
| u16 | `uint16_t` | `uint16_t` |
| u32 | `uint32_t` | `uint32_t` |
| u64 | `uint64_t` | `uint64_t` |
| u64_fast | `uint64_t` | |
| f32 | `float` | `float` |
| f64 | `double` | `double` |
| bool | `bool` | |
| char | `char` | |
#### Strings (`CString`)
JavaScript strings and C-like strings are different, and that complicates using strings with native libraries.
How are JavaScript strings and C strings different?
JavaScript strings:
- UTF16 (2 bytes per letter) or potentially latin1, depending on the JavaScript engine & what characters are used
- `length` stored separately
- Immutable
C strings:
- UTF8 (1 byte per letter), usually
- The length is not stored. Instead, the string is null-terminated which means the length is the index of the first `\0` it finds
- Mutable
To help with that, `bun:ffi` exports `CString` which extends JavaScript's built-in `String` to support null-terminated strings and add a few extras:
```ts
class CString extends String {
/**
* Given a `ptr`, this will automatically search for the closing `\0` character and transcode from UTF-8 to UTF-16 if necessary.
*/
constructor(ptr: number, byteOffset?: number, byteLength?: number): string;
/**
* The ptr to the C string
*
* This `CString` instance is a clone of the string, so it
* is safe to continue using this instance after the `ptr` has been
* freed.
*/
ptr: number;
byteOffset?: number;
byteLength?: number;
}
```
To convert from a null-terminated string pointer to a JavaScript string:
```ts
const myString = new CString(ptr);
```
To convert from a pointer with a known length to a JavaScript string:
```ts
const myString = new CString(ptr, 0, byteLength);
```
`new CString` clones the C string, so it is safe to continue using `myString` after `ptr` has been freed.
```ts
my_library_free(myString.ptr);
// this is safe because myString is a clone
console.log(myString);
```
##### Returning a string
When used in `returns`, `FFIType.cstring` coerces the pointer to a JavaScript `string`. When used in `args`, `cstring` is identical to `ptr`.
#### Function pointers (`CFunction`)
To call a function pointer from JavaScript, use `CFunction`
This is useful if using Node-API (napi) with Bun, and you've already loaded some symbols.
```ts
import { CFunction } from "bun:ffi";
let myNativeLibraryGetVersion = /* somehow, you got this pointer */
const getVersion = new CFunction({
returns: "cstring",
args: [],
ptr: myNativeLibraryGetVersion,
});
getVersion();
```
If you have multiple function pointers, you can define them all at once with `linkSymbols`:
```ts
import { linkSymbols } from "bun:ffi";
// getVersionPtrs defined elsewhere
const [majorPtr, minorPtr, patchPtr] = getVersionPtrs();
const lib = linkSymbols({
// Unlike with dlopen(), the names here can be whatever you want
getMajor: {
returns: "cstring",
args: [],
// Since this doesn't use dlsym(), you have to provide a valid ptr
// That ptr could be a number or a bigint
// An invalid pointer will crash your program.
ptr: majorPtr,
},
getMinor: {
returns: "cstring",
args: [],
ptr: minorPtr,
},
getPatch: {
returns: "cstring",
args: [],
ptr: patchPtr,
},
});
const [major, minor, patch] = [
lib.symbols.getMajor(),
lib.symbols.getMinor(),
lib.symbols.getPatch(),
];
```
#### Callbacks (`JSCallback`)
Bun v0.2.3 added `JSCallback` which lets you create JavaScript callback functions that you can pass to C/FFI functions. The C/FFI function can call into the JavaScript/TypeScript code. This is useful for asynchronous code or otherwise when you want to call into JavaScript code from C.
```ts
import { dlopen, JSCallback, ptr, CString } from "bun:ffi";
const {
symbols: { search },
close,
} = dlopen("libmylib", {
search: {
returns: "usize",
args: ["cstring", "callback"],
},
});
const searchIterator = new JSCallback(
(ptr, length) => /hello/.test(new CString(ptr, length)),
{
returns: "bool",
args: ["ptr", "usize"],
},
);
const str = Buffer.from("wwutwutwutwutwutwutwutwutwutwutut\0", "utf8");
if (search(ptr(str), searchIterator)) {
// found a match!
}
// Sometime later:
setTimeout(() => {
searchIterator.close();
close();
}, 5000);
```
When you're done with a JSCallback, you should call `close()` to free the memory.
For a slight performance boost, directly pass `JSCallback.prototype.ptr` instead of the `JSCallback` object:
```ts
const onResolve = new JSCallback((arg) => arg === 42, {
returns: "bool",
args: ["i32"],
});
const setOnResolve = new CFunction({
returns: "bool",
args: ["function"],
ptr: myNativeLibrarySetOnResolve,
});
// This code runs slightly faster:
setOnResolve(onResolve.ptr);
// Compared to this:
setOnResolve(onResolve);
```
#### Pointers
Bun represents [pointers]() as a `number` in JavaScript.
How does a 64 bit pointer fit in a JavaScript number?
64-bit processors support up to [52 bits of addressable space](https://en.wikipedia.org/wiki/64-bit_computing#Limits_of_processors).
[JavaScript numbers](https://en.wikipedia.org/wiki/Double-precision_floating-point_format#IEEE_754_double-precision_binary_floating-point_format:_binary64) support 53 bits of usable space, so that leaves us with about 11 bits of extra space.
Why not `BigInt`?
`BigInt` is slower. JavaScript engines allocate a separate `BigInt` which means they can't just fit in a regular javascript value.
If you pass a `BigInt` to a function, it will be converted to a `number`
**To convert from a TypedArray to a pointer**:
```ts
import { ptr } from "bun:ffi";
let myTypedArray = new Uint8Array(32);
const myPtr = ptr(myTypedArray);
```
**To convert from a pointer to an ArrayBuffer**:
```ts
import { ptr, toArrayBuffer } from "bun:ffi";
let myTypedArray = new Uint8Array(32);
const myPtr = ptr(myTypedArray);
// toArrayBuffer accepts a `byteOffset` and `byteLength`
// if `byteLength` is not provided, it is assumed to be a null-terminated pointer
myTypedArray = new Uint8Array(toArrayBuffer(myPtr, 0, 32), 0, 32);
```
**To read data from a pointer**
You have two options.
For long-lived pointers, a `DataView` is the fastest option:
```ts
import { toArrayBuffer } from "bun:ffi";
let myDataView = new DataView(toArrayBuffer(myPtr, 0, 32));
console.log(
myDataView.getUint8(0, true),
myDataView.getUint8(1, true),
myDataView.getUint8(2, true),
myDataView.getUint8(3, true),
);
```
For short-lived pointers, `read` is the fastest option:
_Available in Bun v0.1.12+_
```ts
import { read } from "bun:ffi";
console.log(
// ptr, byteOffset
read.u8(myPtr, 0),
read.u8(myPtr, 1),
read.u8(myPtr, 2),
read.u8(myPtr, 3),
);
```
`read` behaves similarly to `DataView`, but it can be faster because it doesn't need to create a `DataView` or `ArrayBuffer`.
| `FFIType` | `read` function |
| --------- | --------------- |
| ptr | `read.ptr` |
| i8 | `read.i8` |
| i16 | `read.i16` |
| i32 | `read.i32` |
| i64 | `read.i64` |
| u8 | `read.u8` |
| u16 | `read.u16` |
| u32 | `read.u32` |
| u64 | `read.u64` |
| f32 | `read.f32` |
| f64 | `read.f64` |
**Memory management with pointers**:
`bun:ffi` does not manage memory for you because it doesn't have the information necessary. You must free the memory when you're done with it.
**From JavaScript**:
If you want to track when a TypedArray is no longer in use from JavaScript, you can use a [FinalizationRegistry](https://developer.mozilla.org/en-US/docs/Web/JavaScript/Reference/Global_Objects/FinalizationRegistry).
**From FFI (C, Rust, Zig, etc)**:
Available in Bun v0.1.8 and later.
If you want to track when a TypedArray is no longer in use from C or FFI, you can pass a callback and an optional context pointer to `toArrayBuffer` or `toBuffer`. This function is called at some point later, once the garbage collector frees the underlying `ArrayBuffer` JavaScript object.
The expected signature is the same as in [JavaScriptCore's C API](https://developer.apple.com/documentation/javascriptcore/jstypedarraybytesdeallocator?language=objc):
```c
typedef void (*JSTypedArrayBytesDeallocator)(void *bytes, void *deallocatorContext);
```
```ts
import { toArrayBuffer } from "bun:ffi";
// with a deallocatorContext:
toArrayBuffer(
bytes,
byteOffset,
byteLength,
// this is an optional pointer to a callback
deallocatorContext,
// this is a pointer to a function
jsTypedArrayBytesDeallocator,
);
// without a deallocatorContext:
toArrayBuffer(
bytes,
byteOffset,
byteLength,
// this is a pointer to a function
jsTypedArrayBytesDeallocator,
);
```
**Pointers & memory safety**
Using raw pointers outside of FFI is extremely not recommended.
A future version of bun may add a CLI flag to disable `bun:ffi` (or potentially a separate build of bun).
**Pointer alignment**
If an API expects a pointer sized to something other than `char` or `u8`, make sure the typed array is also that size.
A `u64*` is not exactly the same as `[8]u8*` due to alignment
##### Passing a pointer
Where FFI functions expect a pointer, pass a TypedArray of equivalent size
Easymode:
```ts
import { dlopen, FFIType } from "bun:ffi";
const {
symbols: { encode_png },
} = dlopen(myLibraryPath, {
encode_png: {
// FFIType's can be specified as strings too
args: ["ptr", "u32", "u32"],
returns: FFIType.ptr,
},
});
const pixels = new Uint8ClampedArray(128 * 128 * 4);
pixels.fill(254);
pixels.subarray(0, 32 * 32 * 2).fill(0);
const out = encode_png(
// pixels will be passed as a pointer
pixels,
128,
128,
);
```
The [auto-generated wrapper](https://github.com/oven-sh/bun/blob/6a65631cbdcae75bfa1e64323a6ad613a922cd1a/src/bun.js/ffi.exports.js#L180-L182) converts the pointer to a TypedArray
Hardmode
If you don't want the automatic conversion or you want a pointer to a specific byte offset within the TypedArray, you can also directly get the pointer to the TypedArray:
```ts
import { dlopen, FFIType, ptr } from "bun:ffi";
const {
symbols: { encode_png },
} = dlopen(myLibraryPath, {
encode_png: {
// FFIType's can be specified as strings too
args: ["ptr", "u32", "u32"],
returns: FFIType.ptr,
},
});
const pixels = new Uint8ClampedArray(128 * 128 * 4);
pixels.fill(254);
// this returns a number! not a BigInt!
const myPtr = ptr(pixels);
const out = encode_png(
myPtr,
// dimensions:
128,
128,
);
```
##### Reading pointers
```ts
const out = encode_png(
// pixels will be passed as a pointer
pixels,
// dimensions:
128,
128,
);
// assuming it is 0-terminated, it can be read like this:
let png = new Uint8Array(toArrayBuffer(out));
// save it to disk:
await Bun.write("out.png", png);
```
##### Not implemented yet
`bun:ffi` has a few more things planned but not implemented yet:
- callback functions
- async functions
### Node-API (napi)
Bun.js implements 90% of the APIs available in [Node-API](https://nodejs.org/api/n-api.html) (napi).
You can see the status of [this here](https://github.com/oven-sh/bun/issues/158).
Loading Node-API modules in Bun.js works the same as in Node.js:
```js
const napi = require("./my-node-module.node");
```
You can also use `process.dlopen`:
```js
let mod = { exports: {} };
process.dlopen(mod, "./my-node-module.node");
```
As part of that work, Bun.js also polyfills the [`detect-libc`](https://npmjs.com/package/detect-libc) package, which is used by many Node-API modules to detect which `.node` binding to `require`.
This implementation of Node-API is from scratch. It doesn't use any code from Node.js.
**Some implementation details**
When requiring a `*.node` module, Bun's JavaScript transpiler transforms the `require` expression into a call to `import.meta.require`:
```js
// this is the input
require("./my-node-module.node");
// this is the output
import.meta.require("./my-node-module.node");
```
Bun doesn't currently support dynamic requires, but `import.meta.require` is an escape hatch for that. It uses a [JavaScriptCore built-in function](https://github.com/oven-sh/bun/blob/aa87d40f4b7fdfb52575f44d151906ddba6a82d0/src/javascript/jsc/bindings/builtins/js/JSZigGlobalObject.js#L26).
### `Bun.Transpiler`
`Bun.Transpiler` lets you use Bun's transpiler from JavaScript (available in Bun.js)
````ts
type Loader = "jsx" | "js" | "ts" | "tsx";
interface TranspilerOptions {
// Replace key with value. Value must be a JSON string.
// @example
// ```
// { "process.env.NODE_ENV": "\"production\"" }
// ```
define: Record,
// What is the default loader used for this transpiler?
loader: Loader,
// What platform are we targeting? This may affect how import and/or require is used
platform: "browser" | "bun" | "macro" | "node",
// TSConfig.json file as stringified JSON or an object
// Use this to set a custom JSX factory, fragment, or import source
// For example, if you want to use Preact instead of React. Or if you want to use Emotion.
tsconfig: string | TSConfig,
// Replace imports with macros
macros: MacroMap,
}
// This lets you use macros
interface MacroMap {
// @example
// ```
// {
// "react-relay": {
// "graphql": "bun-macro-relay/bun-macro-relay.tsx"
// }
// }
// ```
[packagePath: string]: {
[importItemName: string]: string,
},
}
class Bun.Transpiler {
constructor(options: TranspilerOptions)
transform(code: string, loader?: Loader): Promise
transformSync(code: string, loader?: Loader): string
scan(code: string): {exports: string[], imports: Import}
scanImports(code: string): Import[]
}
type Import = {
path: string,
kind:
// import foo from 'bar'; in JavaScript
| "import-statement"
// require("foo") in JavaScript
| "require-call"
// require.resolve("foo") in JavaScript
| "require-resolve"
// Dynamic import() in JavaScript
| "dynamic-import"
// @import() in CSS
| "import-rule"
// url() in CSS
| "url-token"
// The import was injected by Bun
| "internal"
// Entry point
// Probably won't see this one
| "entry-point"
}
const transpiler = new Bun.Transpiler({ loader: "jsx" });
````
#### `Bun.Transpiler.transformSync`
This lets you transpile JavaScript, TypeScript, TSX, and JSX using Bun's transpiler. It does not resolve modules.
It is synchronous and runs in the same thread as other JavaScript code.
```js
const transpiler = new Bun.Transpiler({ loader: "jsx" });
transpiler.transformSync("
hi!
");
```
```js
import { __require as require } from "bun:wrap";
import * as JSX from "react/jsx-dev-runtime";
var jsx = require(JSX).jsxDEV;
export default jsx(
"div",
{
children: "hi!",
},
undefined,
false,
undefined,
this,
);
```
If a macro is used, it will be run in the same thread as the transpiler, but in a separate event loop from the rest of your application. Currently, globals between macros and regular code are shared, which means it is possible (but not recommended) to share states between macros and regular code. Attempting to use AST nodes outside of a macro is undefined behavior.
#### `Bun.Transpiler.transform`
This lets you transpile JavaScript, TypeScript, TSX, and JSX using Bun's transpiler. It does not resolve modules.
It is async and automatically runs in Bun's worker threadpool. That means, if you run it 100 times, it will run it across `Math.floor($cpu_count * 0.8)` threads without blocking the main JavaScript thread.
If code uses a macro, it will potentially spawn a new copy of Bun.js' JavaScript runtime environment in that new thread.
Unless you're transpiling _many_ large files, you should probably use `Bun.Transpiler.transformSync`. The cost of the threadpool will often take longer than actually transpiling code.
```js
const transpiler = new Bun.Transpiler({ loader: "jsx" });
await transpiler.transform("
hi!
");
```
```js
import { __require as require } from "bun:wrap";
import * as JSX from "react/jsx-dev-runtime";
var jsx = require(JSX).jsxDEV;
export default jsx(
"div",
{
children: "hi!",
},
undefined,
false,
undefined,
this,
);
```
You can also pass a `Loader` as a string
```js
await transpiler.transform("
hi!
", "tsx");
```
#### `Bun.Transpiler.scan`
This is a fast way to get a list of imports & exports used in a JavaScript/jsx or TypeScript/tsx file.
This function is synchronous.
```ts
const transpiler = new Bun.Transpiler({ loader: "ts" });
transpiler.scan(`
import React from 'react';
import Remix from 'remix';
import type {ReactNode} from 'react';
export const loader = () => import('./loader');
`);
```
```ts
{
"exports": [
"loader"
],
"imports": [
{
"kind": "import-statement",
"path": "react"
},
{
"kind": "import-statement",
"path": "remix"
},
{
"kind": "dynamic-import",
"path": "./loader"
}
]
}
```
#### `Bun.Transpiler.scanImports`
This is a fast path for getting a list of imports used in a JavaScript/jsx or TypeScript/tsx file. It skips the visiting pass, which means it is faster but less accurate. You probably won't notice a difference between `Bun.Transpiler.scan` and `Bun.Transpiler.scanImports` often. You might notice it for very large files (megabytes).
This function is synchronous.
```ts
const transpiler = new Bun.Transpiler({ loader: "ts" });
transpiler.scanImports(`
import React from 'react';
import Remix from 'remix';
import type {ReactNode} from 'react';
export const loader = () => import('./loader');
`);
```
```json
[
{
"kind": "import-statement",
"path": "react"
},
{
"kind": "import-statement",
"path": "remix"
},
{
"kind": "dynamic-import",
"path": "./loader"
}
]
```
## Module resolution in Bun
Loading & resolving modules in JavaScript & TypeScript is complicated.
### Module loading
Bun supports CommonJS and ESM. Bun automatically transpiles CommonJS into synchronous ESM. Bun assumes projects internally use ESM, but dependencies may use either ESM or CommonJS. Using CommonJS is discouraged in new projects because it lacks support for top-level await and syntax like `export * from` is less reliable in CommonJS (without bundling the entire dependency tree ahead of time).
Bun supports the `"bun"` `exports` condition and will prefer that over other conditions.
To load a bun-specific module, set the `"bun"` export condition in package.json:
```json
{
"name": "foo",
"exports": {
"bun": "./index.bun.js",
"default": "./index.js"
}
}
```
When importing `"foo"` in a bun project, it will load `./index.bun.js` instead of `./index.js`.
If the library strictly uses ESM (excluding dependencies), specify `"type": "module"` in package.json.
```json
{
"name": "foo",
"type": "module"
}
```
### Module resolution
Bun implements the Node Module Resolution Algorithm, which is the same algorithm used by Node.js. It is also the same algorithm used by Webpack, Rollup, esbuild and many other bundlers.
```js
import "./foo";
// This will check:
// - ./foo.ts
// - ./foo.tsx
// - ./foo.js
// - ./foo.mjs
// - ./foo.cjs
// - ./foo/index.ts
// - ./foo/index.js
// - ./foo/index.json
// - ./foo/index.mjs
```
Bun also supports `package.json`, including `exports`, `imports`, `module`, `main` and `browser` fields.
Bun supports `tsconfig.json`'s `paths` field, allowing you to override how paths resolve.
```json
{
"compilerOptions": {
"paths": {
"foo": ["./bar"]
}
}
}
```
```js
import "foo";
// This will check:
// - ./bar
// - ./bar.ts
// - ./bar.tsx
// - ./bar.js
// - ./bar.mjs
// - ./bar.cjs
// - ./bar/index.ts
// - ./bar/index.js
// - ./bar/index.json
// - ./bar/index.mjs
```
You can also use `jsconfig.json` if you don't want to use TypeScript.
### Bun's Module Resolution Algorithm
Added in Bun v0.2.3
Bun's module resolution algorithm is a lot like Node's except one key difference: `node_modules` folder is optional and `package.json` is optional.
Highlights:
- Automatic package installs, there is no need to run `npm install` or `bun install` before running a project.
- Save disk space & time by not copying/linking dependencies into `node_modules`. Instead, Bun uses a shared global cache to store & load dependencies from a single location on disk.
- `package.json` is optional
- Compatible with npm packages
- Security: dependencies can't run postinstall scripts. No malicious code can be run when installing dependencies.
- One name@version of a dependency is used instead of multiple copies. Bun still supports different versions of the same package. Since `node_modules` relies on directory structure to resolve dependencies, projects often end up with the same name@version of a dependency installed multiple times in one `node_modules` folder. This is not a problem with Bun's module resolution algorithm because it uses a single flat global cache for all dependencies on your computer.
For ecosystem compatibility, when the `node_modules` folder is present, it will be used to resolve modules like in node and Bun-specific features like automatic package installs are disabled.
When the `node_modules` folder is _not_ present, that's when it gets more interesting.
Bun lazily loads a lockfile for the project. It checks for `bun.lockb` in the project root.
If the lockfile is present, the lockfile will be used to resolve modules first. If the lockfile is not present, the lockfile will be lazily generated.
```js
// unspecified version:
import React from "react";
// set version in import specifier: (only supported if no package.json is present)
import React18_2 from "react@18.2.0";
// range version: (only supported if no package.json is present)
import React18 from "react@^18";
```
It will check the lockfile for the version. If the lockfile doesn't have a version, it will check the nearest `package.json` for a `react` dependency and use that version. If the `package.json` doesn't have a `react` dependency, it will use the latest version. If the latest version is not installed in the global cache, it will download the latest version from npm's registry.
Lowlights:
- TypeScript type support isn't implmented yet
- patch package support isn't implemented yet
#### Resolving packages
`bun install` uses a shared global cache. After packages install, we add a symlink indexing the version of the package to allow us to quickly see what versions of a package are installed on-disk.
Bun's module resolver shares the same global cache as `bun install` so it can resolve packages without needing to install them into a local `node_modules` folder. Instead, it uses the global cache to resolve packages.
When you import a module like `lodash` in Bun without a node_modules folder, here's what happens:
```js
import { debounce } from "lodash";
```
1. Check if auto-install is enabled and if so, load the lockfile or lazily generate it.
2. Check if the lockfile has an existing dependency for `lodash`.
3. If the lockfile has an existing dependency for `lodash`, use the resolved version specified in the lockfile.
4. If the lockfile does not have an existing resolved version for `lodash`, check if there is a `package.json` in the current or parent directories with a dependency on `lodash`. If so, use that as the range specifier for the dependency. Since no version is specified for the `"lodash"` string, it is assumed that you meant the version specified in the `package.json`'s `"dependencies"` field.
5. If there is no `package.json` in the current or parent directories which has a dependency on `lodash`, use the latest version of `lodash` listed in the package manifest cache. If the package manifest cache is out of date, refresh it.
6. Once a version is chosen, add the dependency to the lockfile and all the dependencies of the dependency to the lockfile.
7. Return the file path to the resolved version of `lodash`. If the version is not installed on-disk, download & install it, along with all dependencies.
More details:
- `bun install` ordinarily caches package manifests from npm for up to 5 minutes. For automatic package installs in Bun's JavaScript runtime, that cache is refreshed daily instead. This is to minimize startup time cost when no lockfile is present.
- The `BUN_INSTALL_CACHE_DIR` environment variable lets you customize the location of the cache. Currently, it defaults to `$XDG_CACHE_HOME/.bun/install/cache` or `$HOME/.bun/install/cache`.
- The implementation details of Bun's install cache will change between versions. Don't think of it as an API. To reliably resolve packages, use bun's builtin APIs (such as `Bun.resolveSync` or `import.meta.resolve`) instead of relying on the filesystem directly. Bun will likely move to a binary archive format where packages may not correspond to files/folders on disk at all - so if you depend on the filesystem structure instead of the JavaScript API, your code will eventually break.
##### Prefer offline
Instead of checking npm for latest versions, you can pass the `--prefer-offline` flag to prefer locally-installed versions of packages.
```bash
bun run --prefer-offline my-script.ts
```
This will check the install cache for installed versions of packages before checking the npm registry. If no matching version of a package is installed, only then will it check npm for the latest version.
##### Prefer latest
To always use the latest version of a package, you can pass the `--prefer-latest` flag.
```bash
bun run --prefer-latest my-script.ts
```
#### Resolving modules
After ensuring the package is installed, Bun resolves the module.
For the most part, this is the same as what Node.js does.
The main difference is instead of looking for `node_modules` folders to resolve packages, Bun looks in bun's install cache.
This only activates for "package paths". That is, paths that start with a package name. For example, `lodash/debounce` is a package path. `./foo` is not a package path.
#### Frequently asked questions
**How is this different than what Node.js does?**
Per-project `node_modules` folders are not necessary when using Bun. This saves you disk space and time spent copying/linking dependencies into `node_modules` folders for every project.
| Runtime | require/import | in package | resolution |
| ------- | -------------- | ---------- | ------------------------------------------------------ |
| Node.js | "react-dom" | "react" | `./node_modules/react-dom/index.js` |
| Bun | "react-dom" | "react" | `$BUN_INSTALL_CACHE_DIR/react-dom@${version}/index.js` |
When multiple versions of a package are installed, Node.js relies on the directory tree structure to resolve the correct version.
Bun uses bun's lockfile to figure out what the version SHOULD be and then installs it into the global cache (if that version is not already installed).
With a dependency tree like this:
```zig
- root 1.0.0
- dep1 1.0.0
- dep2 1.0.0
- dep3 1.0.0
- dep2 2.0.0
- dep2 2.0.0
```
To satisfy the Node.js Module Resolution algorithm, npm clients are forced to install the same version of `dep2` **multiple times for the same project**. This is because `dep2` is a dependency of `dep1` and `dep3`, and `dep3` depends on a different version of `dep2` than `dep1`.
With Bun, the lockfile is used to resolve the correct version of `dep2` to use. This means that `dep2` only needs to be installed once and it will be reused for all projects on your computer that depend on it.

**How do I debug an issue with a dependency?**
If you run `bun install` (or any other npm package manager), it will create a `node_modules` folder and install dependencies into that folder.
Bun's runtime continues to fully support the `node_modules` folder.
**How is this different than what pnpm does?**
With pnpm, you have to run `pnpm install`, which creates a `node_modules` folder of symlinks for the runtime to resolve.
With Bun, you don't have to run any commands to install dependencies. Bun doesn't create a `node_modules` folder.
Just run `bun run foo.js` and it will automatically install the dependencies for you on-demand.
**How is this different than Yarn Plug'N'Play does?**
Two things:
1. Bun's JavaScript runtime automatically installs dependencies when running a file. With yarn, you have to run `yarn install` before you run a script.
2. Yarn Plug'N'Play [makes loading dependencies slower](https://twitter.com/jarredsumner/status/1458207919636287490) at runtime because under the hood, it uses zip files to store dependencies. zip files tend not to be as performant for random access reads as files on disk.
**How is this different than what Deno does?**
Deno requires an `npm:` specifier before each npm import, lacks support for reading `"paths"` from tsconfig.json, and doesn't have as much support for package.json fields.
**What about security?**
Bun doesn't run postinstall scripts. No malicious code can be run from installing dependencies.
**Can I use bun install with Node.js projects?**
Yes. `bun install` creates a ordinary node_modules folder. It's designed to be compatible with other package managers and Node.js.
## Environment variables
- `GOMAXPROCS`: For `bun bun`, this sets the maximum number of threads to use. If you’re experiencing an issue with `bun bun`, try setting `GOMAXPROCS=1` to force bun to run single-threaded
- `DISABLE_BUN_ANALYTICS=1` this disables bun’s analytics. bun records bundle timings (so we can answer with data, "is bun getting faster?") and feature usage (e.g., "are people actually using macros?"). The request body size is about 60 bytes, so it’s not a lot of data
- `TMPDIR`: Before `bun bun` completes, it stores the new `.bun` in `$TMPDIR`. If unset, `TMPDIR` defaults to the platform-specific temporary directory (on Linux, `/tmp` and on macOS `/private/tmp`)
## Credits
- While written in Zig instead of Go, bun’s JS transpiler, CSS lexer, and node module resolver source code is based on [@evanw](https://github.com/evanw)’s [esbuild](https://github.com/evanw/esbuild) project. Evan did a fantastic job with esbuild.
- The idea for the name "bun" came from [@kipply](https://github.com/kipply)
## License
bun itself is MIT-licensed.
However, JavaScriptCore (and WebKit) is LGPL-2 and bun statically links it. WebCore files from WebKit are also licensed under LGPL2.
Per LGPL2:
> (1) If you statically link against an LGPL’d library, you must also provide your application in an object (not necessarily source) format, so that a user has the opportunity to modify the library and relink the application.
You can find the patched version of WebKit used by bun here: . If you would like to relink bun with changes:
- `git submodule update --init --recursive`
- `make jsc`
- `zig build`
This compiles JavaScriptCore, compiles bun’s `.cpp` bindings for JavaScriptCore (which are the object files using JavaScriptCore) and outputs a new `bun` binary with your changes.
bun also statically links these libraries:
- [`boringssl`](https://boringssl.googlesource.com/boringssl/), which has [several licenses](https://boringssl.googlesource.com/boringssl/+/refs/heads/master/LICENSE)
- [`libarchive`](https://github.com/libarchive/libarchive), which has [several licenses](https://github.com/libarchive/libarchive/blob/master/COPYING)
- [`libiconv`](https://www.gnu.org/software/libiconv/), which is LGPL2. It’s a dependency of libarchive.
- [`lol-html`](https://github.com/cloudflare/lol-html/tree/master/c-api), which is BSD 3-Clause licensed
- [`mimalloc`](https://github.com/microsoft/mimalloc), which is MIT licensed
- [`picohttp`](https://github.com/h2o/picohttpparser), which is dual-licensed under the Perl License or the MIT License
- [`simdutf`](https://github.com/simdutf/simdutf), which is Apache 2.0 licensed
- [`tinycc`](https://github.com/tinycc/tinycc), which is LGPL v2.1 licensed
- [`uSockets`](https://github.com/uNetworking/uSockets), which is Apache 2.0 licensed
- [`zlib-cloudflare`](https://github.com/cloudflare/zlib), which is zlib licensed
- `libicu` 66.1, which can be found here:
- A fork of [`uWebsockets`](https://github.com/jarred-sumner/uwebsockets), which is Apache 2.0 licensed
For compatibility reasons, these NPM packages are embedded into bun’s binary and injected if imported.
- [`assert`](https://npmjs.com/package/assert) (MIT license)
- [`browserify-zlib`](https://npmjs.com/package/browserify-zlib) (MIT license)
- [`buffer`](https://npmjs.com/package/buffer) (MIT license)
- [`constants-browserify`](https://npmjs.com/package/constants-browserify) (MIT license)
- [`crypto-browserify`](https://npmjs.com/package/crypto-browserify) (MIT license)
- [`domain-browser`](https://npmjs.com/package/domain-browser) (MIT license)
- [`events`](https://npmjs.com/package/events) (MIT license)
- [`https-browserify`](https://npmjs.com/package/https-browserify) (MIT license)
- [`os-browserify`](https://npmjs.com/package/os-browserify) (MIT license)
- [`path-browserify`](https://npmjs.com/package/path-browserify) (MIT license)
- [`process`](https://npmjs.com/package/process) (MIT license)
- [`punycode`](https://npmjs.com/package/punycode) (MIT license)
- [`querystring-es3`](https://npmjs.com/package/querystring-es3) (MIT license)
- [`stream-browserify`](https://npmjs.com/package/stream-browserify) (MIT license)
- [`stream-http`](https://npmjs.com/package/stream-http) (MIT license)
- [`string_decoder`](https://npmjs.com/package/string_decoder) (MIT license)
- [`timers-browserify`](https://npmjs.com/package/timers-browserify) (MIT license)
- [`tty-browserify`](https://npmjs.com/package/tty-browserify) (MIT license)
- [`url`](https://npmjs.com/package/url) (MIT license)
- [`util`](https://npmjs.com/package/util) (MIT license)
- [`vm-browserify`](https://npmjs.com/package/vm-browserify) (MIT license)
## Developing bun
Some links you should read about JavaScriptCore, the JavaScript engine Bun uses:
- https://webkit.org/blog/12967/understanding-gc-in-jsc-from-scratch/
- https://webkit.org/blog/7122/introducing-riptide-webkits-retreating-wavefront-concurrent-garbage-collector/
To get your development environment configured, expect it to take 30-90 minutes :(
### Dev Container (Linux/Windows)
The [Dev Container](https://containers.dev) in this repository is the easiest way to get started. It comes with Zig, JavaScriptCore, Zig Language Server, vscode-zig, and more pre-installed on an instance of Ubuntu.
To develop on Linux/Windows, [Docker](https://www.docker.com) is required. If using WSL on Windows, it is recommended to use [Docker Desktop](https://docs.microsoft.com/en-us/windows/wsl/tutorials/wsl-containers) for its WSL2 integration.
#### Visual Studio Code
If you're using VSCode, you'll need to have the [Dev Containers](https://marketplace.visualstudio.com/items?itemName=ms-vscode-remote.remote-containers) extension installed.
To get started, open VS Code in the `bun` repository. The first time you try to open the dev container, the extension will automatically build it for you, based on [`Dockerfile.devcontainer`](Dockerfile.devcontainer).
To open the dev container, open the command palette (Ctrl + Shift + P) and run: `Dev Containers: Reopen in Container`. To later rebuild it (only needed when the devcontainer itself changes, not the bun code), run: `Dev Containers: Rebuild and Reopen in Container`.
#### Other editors and CLI
If you're using another editor or want to manually control the dev container from the command line or a script, you'll need to install the [Dev Container CLI](https://www.npmjs.com/package/@devcontainers/cli): `npm install -g @devcontainers/cli`.
To create and start the dev container, in the `bun` repository, locally run:
```bash
# `make devcontainer-` should be equivalent to `devcontainer `, it just sets the
# architecture so if you're on ARM64, it'll do the right thing
make devcontainer-up
```
To just build the dev container image, run:
```bash
make devcontainer-build
```
To start a shell inside the container, run:
```bash
make devcontainer-sh
# if it attaches to the container non-interactively, instead use the regular docker exec command:
docker exec -it zsh
```
#### In the dev container
You will then need to clone the GitHub repository inside that container.
Inside the container, run this:
```bash
# First time setup
gh auth login # if it fails to open a browser, use Personal Access Token instead
gh repo clone oven-sh/bun . -- --depth=1 --progress -j8
# Compile bun dependencies (zig is already compiled)
make devcontainer
# It initializes and updates all submodules except webkit, because webkit takes a while and it's already compiled for you.
# To do it manually, use:
# git -c submodule."src/bun.js/WebKit".update=none submodule update --init --recursive --depth=1 --progress
# Build bun for development
make dev
# Run bun
bun-debug
```
It is very similar to my own development environment (except I use macOS)
### MacOS
Install LLVM 13 and homebrew dependencies:
```bash
brew install llvm@13 coreutils libtool cmake libiconv automake ninja gnu-sed pkg-config esbuild go rust
```
bun (& the version of Zig) need LLVM 13 and Clang 13 (clang is part of LLVM). Weird build & runtime errors will happen otherwise.
Make sure LLVM 13 is in your `$PATH`:
```bash
which clang-13
```
If it is not, you will have to run this to link it:
```bash
export PATH="$(brew --prefix llvm@13)/bin:$HOME/.bun-tools/zig:$PATH"
export LDFLAGS="$LDFLAGS -L$(brew --prefix llvm@13)/lib"
export CPPFLAGS="$CPPFLAGS -I$(brew --prefix llvm@13)/include"
```
On fish that looks like `fish_add_path (brew --prefix llvm@13)/bin`
#### Install Zig (macOS)
Note: **you must use the same version of Zig used by Bun in [oven-sh/zig](https://github.com/oven-sh/zig)**. Installing `zig` from brew will not work. Installing the latest stable version of Zig won't work. If you don't use the same version Bun uses, you will get strange build errors and be sad because you put all this work into trying to get Bun to compile and it failed for weird reasons.
To install the zig binary:
```bash
# Custom path for the custom zig install
mkdir -p $HOME/.bun-tools
# Requires jq & grab latest binary
curl -o zig.tar.gz -sL https://github.com/oven-sh/zig/releases/download/jul1/zig-macos-$(uname -m).tar.gz
# This will extract to $HOME/.bun-tools/zig
tar -xvf zig.tar.gz -C $HOME/.bun-tools/
rm zig.tar.gz
# Make sure it gets trusted
# If you get an error 'No such xattr: com.apple.quarantine', that means it's already trusted and you can continue
xattr -d com.apple.quarantine $HOME/.bun-tools/zig/zig
```
Now you'll need to add Zig to your PATH.
Using `zsh`:
```zsh
echo 'export PATH="$HOME/.bun-tools/zig:$PATH"' >> ~/.zshrc
source ~/.zshrc
```
Using `fish`:
```fish
# Add to PATH (fish)
fish_add_path $HOME/.bun-tools/zig
```
Using `bash`:
```bash
echo 'export PATH="$HOME/.bun-tools/zig:$PATH"' >> ~/.bash_profile
source ~/.bash_profile
```
The version of Zig used by Bun is not a fork, just a slightly older version. Zig is a new programming language and moves quickly.
#### Build bun (macOS)
If you're building on a macOS device, you'll need to have a valid Developer Certificate, or else the code signing step will fail. To check if you have one, open the `Keychain Access` app, go to the `login` profile and search for `Apple Development`. You should have at least one certificate with a name like `Apple Development: user@example.com (WDYABC123)`. If you don't have one, follow [this guide](https://ioscodesigning.com/generating-code-signing-files/#generate-a-code-signing-certificate-using-xcode) to get one.
You can still work with the generated binary locally at `packages/debug-bun-*/bun-debug` even if the code signing fails.
In `bun`:
```bash
# If you omit --depth=1, `git submodule update` will take 17.5 minutes on 1gbps internet, mostly due to WebKit.
git submodule update --init --recursive --progress --depth=1 --checkout
make vendor identifier-cache bindings jsc dev
```
#### Verify it worked (macOS)
First ensure the node dependencies are installed
```bash
(cd test/snippets && npm i)
(cd test/scripts && npm i)
```
Then
```bash
make test-dev-all
```
#### Troubleshooting (macOS)
If you see an error when compiling `libarchive`, run this:
```bash
brew install pkg-config
```
If you see an error about missing files on `zig build obj`, make sure you built the headers
## vscode-zig
Note: this is automatically installed on the devcontainer
You will want to install the fork of `vscode-zig` so you get a `Run test` and a `Debug test` button.
To do that:
```bash
curl -L https://github.com/Jarred-Sumner/vscode-zig/releases/download/fork-v1/zig-0.2.5.vsix > vscode-zig.vsix
code --install-extension vscode-zig.vsix
```
### Troubleshooting (general)
If you encounter `error: the build command failed with exit code 9` during the build process, this means you ran out of memory or swap. Bun currently needs about 22 GB of RAM to compile.

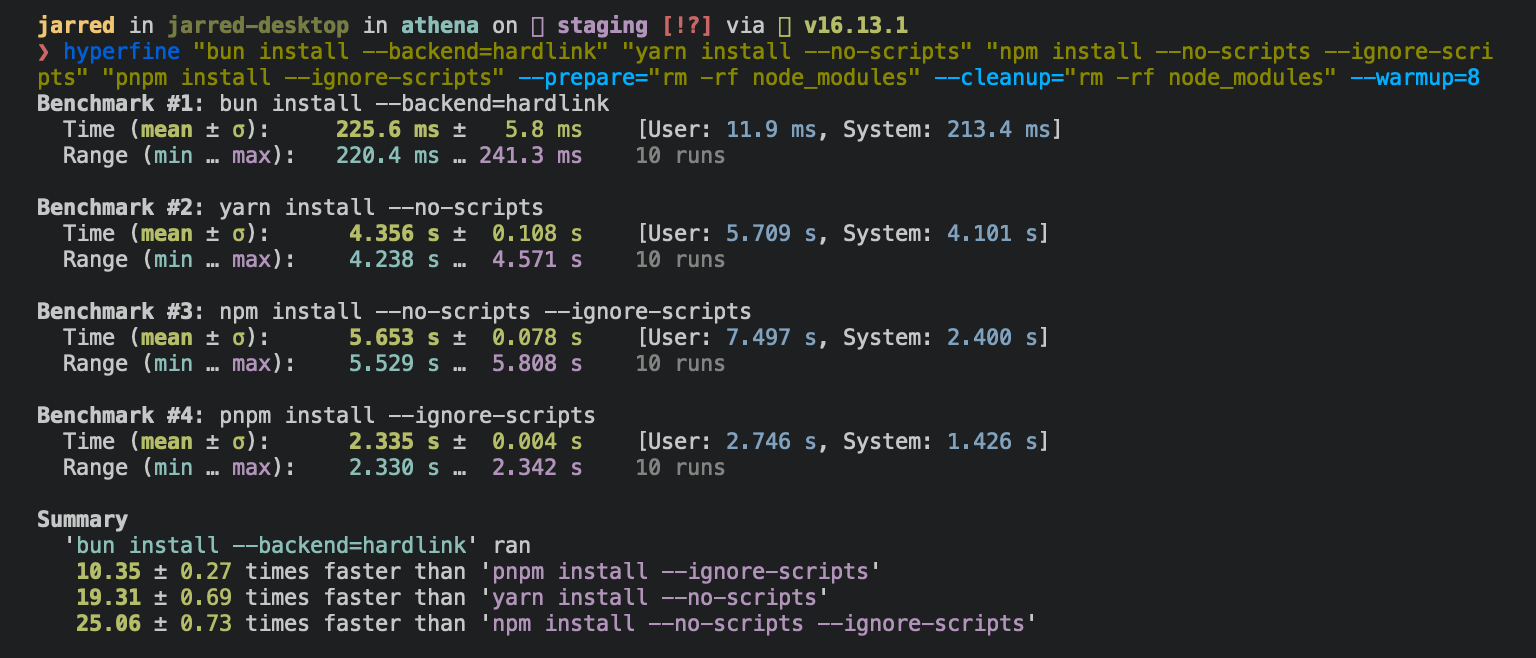 To install packages from package.json:
```bash
bun install
```
To add or remove packages from package.json:
```bash
bun remove react
bun add preact
```
To install packages from package.json:
```bash
bun install
```
To add or remove packages from package.json:
```bash
bun remove react
bun add preact
```
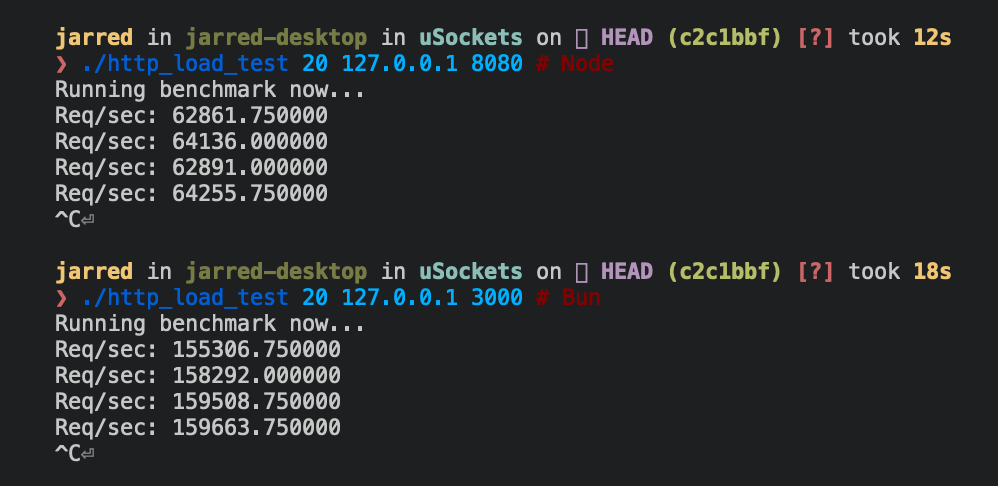
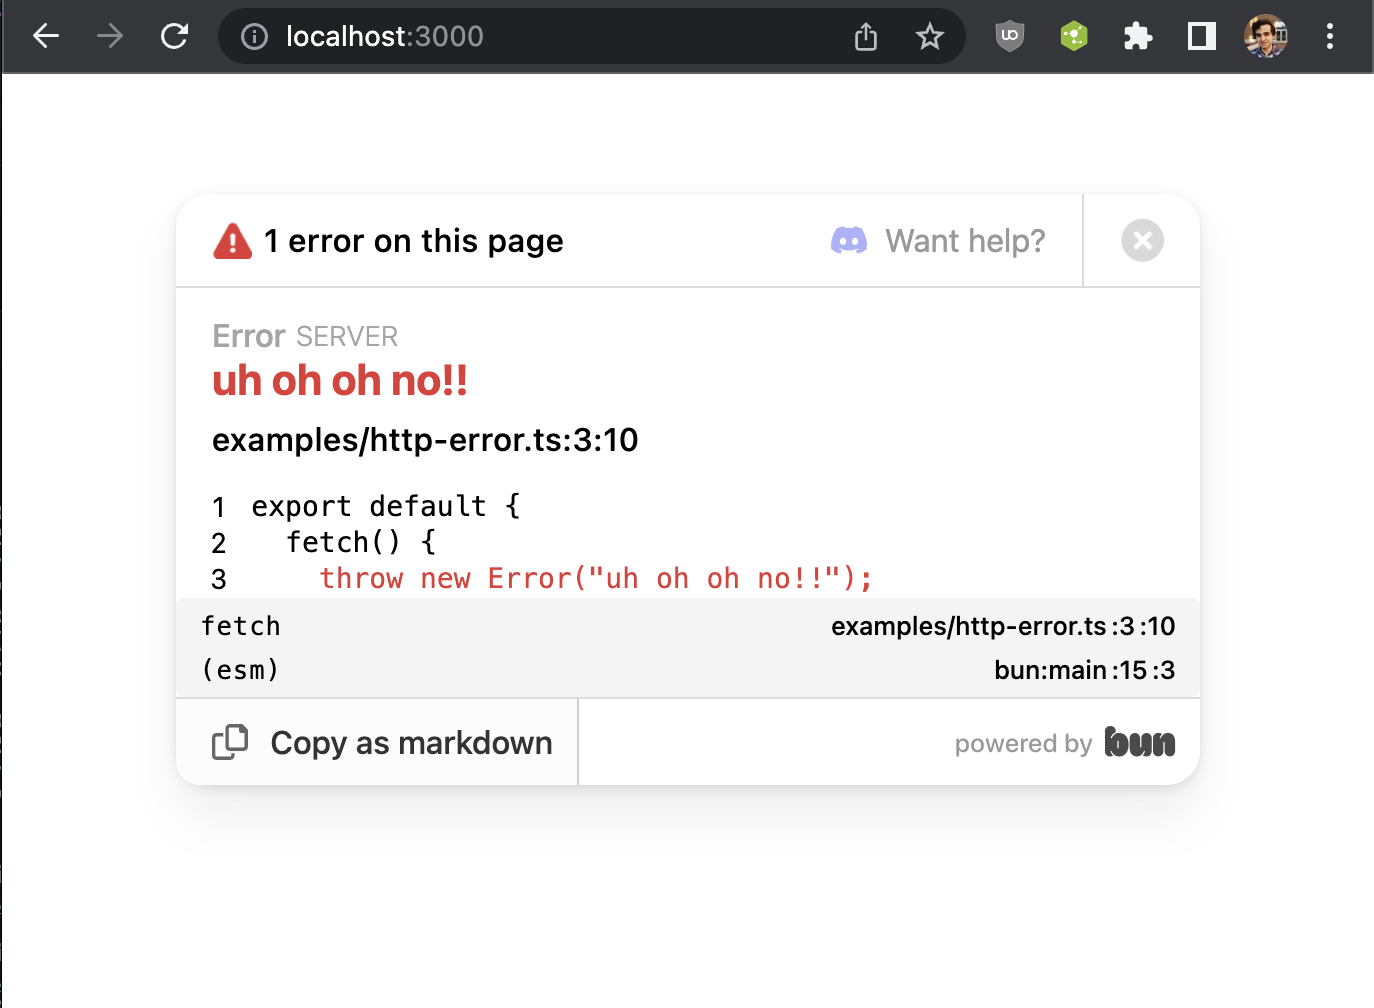 It will hopefully make it easier to debug issues with bun until bun gets debugger support. This error page is based on what `bun dev` does.
**If the error function returns a `Response`, it will be served instead**
```js
Bun.serve({
fetch(req) {
throw new Error("woops!");
},
error(error: Error) {
return new Response("Uh oh!!\n" + error.toString(), { status: 500 });
},
});
```
**If the `error` function itself throws and `development` is `false`, a generic 500 page will be shown**
To stop the server, call `server.stop()`:
```ts
const server = Bun.serve({
fetch() {
return new Response("HI!");
},
});
server.stop();
```
### HTTPS with Bun.serve()
`Bun.serve()` has builtin support for TLS (HTTPS). Pass `keyFile` and `certFile` option to enable HTTPS.
Example:
```ts
Bun.serve({
fetch(req) {
return new Response("Hello!!!");
},
/**
* File path to a TLS key
*
* To enable TLS, this option is required.
*/
keyFile: "./key.pem",
/**
* File path to a TLS certificate
*
* To enable TLS, this option is required.
*/
certFile: "./cert.pem",
/**
* Optional SSL options
*/
// passphrase?: string;
// caFile?: string;
// dhParamsFile?: string;
// lowMemoryMode?: boolean;
});
```
### WebSockets with Bun.serve()
`Bun.serve()` has builtin support for server-side websockets (as of Bun v0.2.1).
Features:
- Compression (pass `perMessageDeflate: true`)
- HTTPS
- Pubsub / broadcast support with MQTT-like topics
It's also fast. For [a chatroom](./bench/websocket-server/) on Linux x64:
| Messages sent per second | Runtime | Clients |
| ------------------------ | ------------------------------ | ------- |
| ~700,000 | (`Bun.serve`) Bun v0.2.1 (x64) | 16 |
| ~100,000 | (`ws`) Node v18.10.0 (x64) | 16 |
Here is an example that echoes back any message it receives:
```ts
Bun.serve({
websocket: {
message(ws, message) {
ws.send(message);
},
},
fetch(req, server) {
// Upgrade to a ServerWebSocket if we can
// This automatically checks for the `Sec-WebSocket-Key` header
// meaning you don't have to check headers, you can just call `upgrade()`
if (server.upgrade(req))
// When upgrading, we return undefined since we don't want to send a Response
return;
return new Response("Regular HTTP response");
},
});
```
Here is a more complete example:
```ts
type User = {
name: string;
};
Bun.serve
It will hopefully make it easier to debug issues with bun until bun gets debugger support. This error page is based on what `bun dev` does.
**If the error function returns a `Response`, it will be served instead**
```js
Bun.serve({
fetch(req) {
throw new Error("woops!");
},
error(error: Error) {
return new Response("Uh oh!!\n" + error.toString(), { status: 500 });
},
});
```
**If the `error` function itself throws and `development` is `false`, a generic 500 page will be shown**
To stop the server, call `server.stop()`:
```ts
const server = Bun.serve({
fetch() {
return new Response("HI!");
},
});
server.stop();
```
### HTTPS with Bun.serve()
`Bun.serve()` has builtin support for TLS (HTTPS). Pass `keyFile` and `certFile` option to enable HTTPS.
Example:
```ts
Bun.serve({
fetch(req) {
return new Response("Hello!!!");
},
/**
* File path to a TLS key
*
* To enable TLS, this option is required.
*/
keyFile: "./key.pem",
/**
* File path to a TLS certificate
*
* To enable TLS, this option is required.
*/
certFile: "./cert.pem",
/**
* Optional SSL options
*/
// passphrase?: string;
// caFile?: string;
// dhParamsFile?: string;
// lowMemoryMode?: boolean;
});
```
### WebSockets with Bun.serve()
`Bun.serve()` has builtin support for server-side websockets (as of Bun v0.2.1).
Features:
- Compression (pass `perMessageDeflate: true`)
- HTTPS
- Pubsub / broadcast support with MQTT-like topics
It's also fast. For [a chatroom](./bench/websocket-server/) on Linux x64:
| Messages sent per second | Runtime | Clients |
| ------------------------ | ------------------------------ | ------- |
| ~700,000 | (`Bun.serve`) Bun v0.2.1 (x64) | 16 |
| ~100,000 | (`ws`) Node v18.10.0 (x64) | 16 |
Here is an example that echoes back any message it receives:
```ts
Bun.serve({
websocket: {
message(ws, message) {
ws.send(message);
},
},
fetch(req, server) {
// Upgrade to a ServerWebSocket if we can
// This automatically checks for the `Sec-WebSocket-Key` header
// meaning you don't have to check headers, you can just call `upgrade()`
if (server.upgrade(req))
// When upgrading, we return undefined since we don't want to send a Response
return;
return new Response("Regular HTTP response");
},
});
```
Here is a more complete example:
```ts
type User = {
name: string;
};
Bun.serve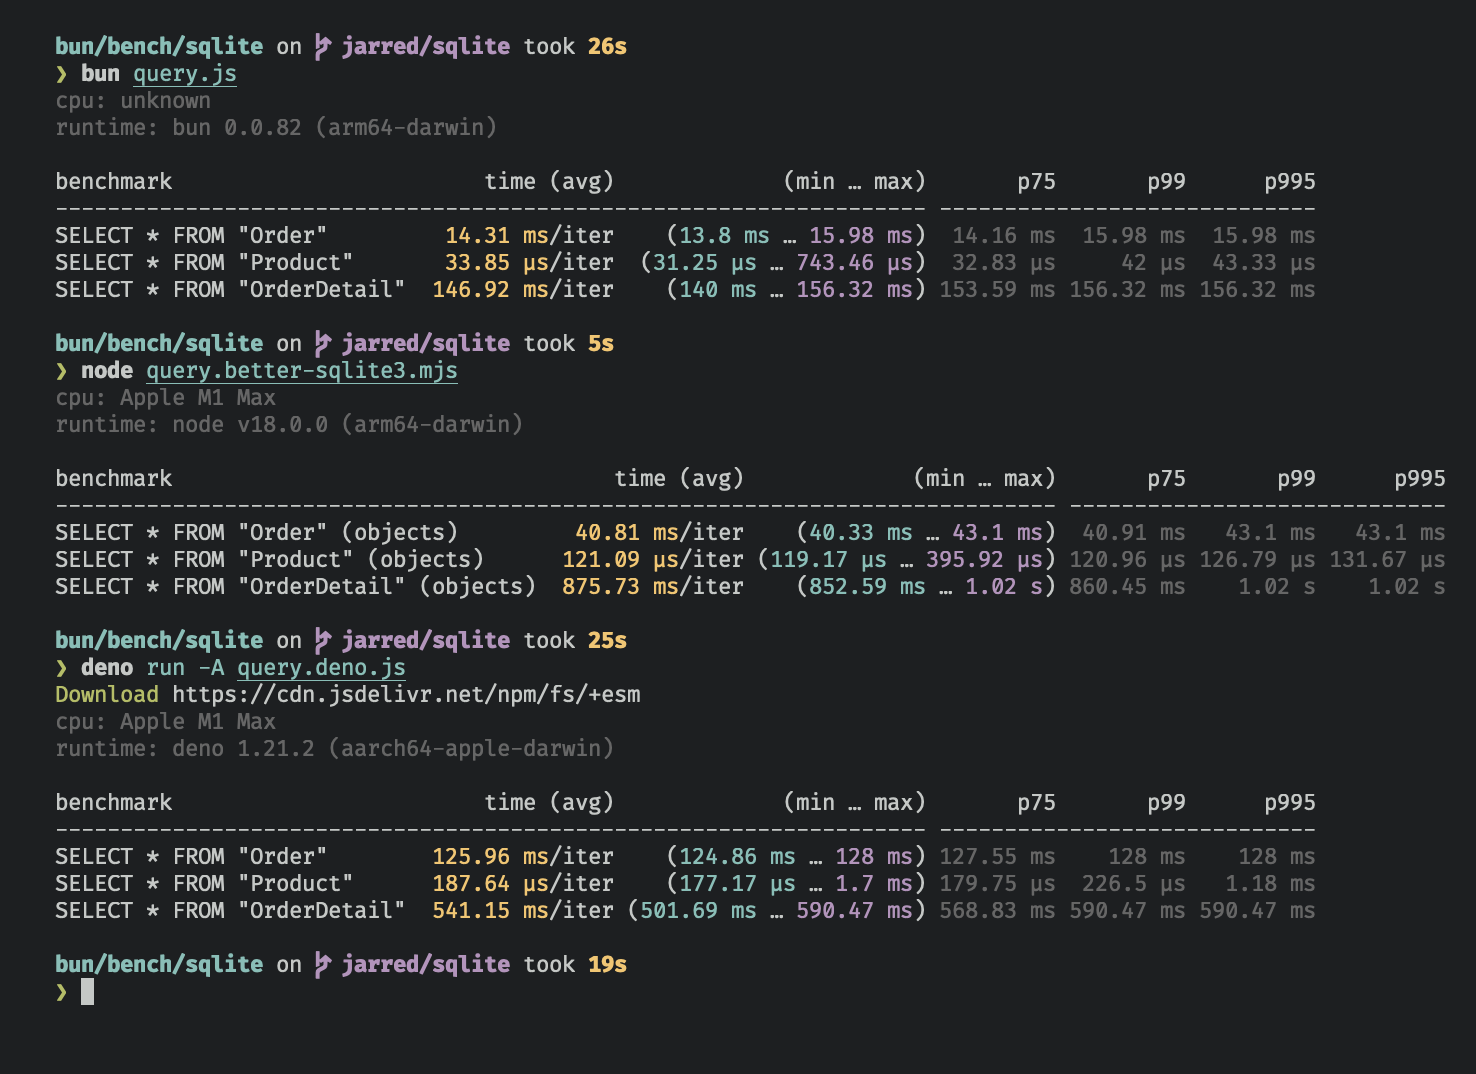 ### Getting started with bun:sqlite
bun:sqlite's API is loosely based on [better-sqlite3](https://github.com/JoshuaWise/better-sqlite3), though the implementation is different.
bun:sqlite has two classes:
- `class Database`
- `class Statement`
#### `Database`
Calling `new Database(filename)` opens or creates the SQLite database.
```ts
constructor(
filename: string,
options?:
| number
| {
/**
* Open the database as read-only (no write operations, no create).
*
* Equivalent to {@link constants.SQLITE_OPEN_READONLY}
*/
readonly?: boolean;
/**
* Allow creating a new database
*
* Equivalent to {@link constants.SQLITE_OPEN_CREATE}
*/
create?: boolean;
/**
* Open the database as read-write
*
* Equivalent to {@link constants.SQLITE_OPEN_READWRITE}
*/
readwrite?: boolean;
}
);
```
To open or create a SQLite3 database:
```ts
import { Database } from "bun:sqlite";
const db = new Database("mydb.sqlite");
```
Open an in-memory database:
```ts
import { Database } from "bun:sqlite";
// all of these do the same thing
let db = new Database(":memory:");
let db = new Database();
let db = new Database("");
```
Open read-write and throw if the database doesn't exist:
```ts
import { Database } from "bun:sqlite";
const db = new Database("mydb.sqlite", { readwrite: true });
```
Open read-only and throw if the database doesn't exist:
```ts
import { Database } from "bun:sqlite";
const db = new Database("mydb.sqlite", { readonly: true });
```
Open read-write, don't throw if new file:
```ts
import { Database } from "bun:sqlite";
const db = new Database("mydb.sqlite", { readonly: true, create: true });
```
Open a database from a `Uint8Array`:
```ts
import { Database } from "bun:sqlite";
import { readFileSync } from "fs";
// unlike passing a filepath, this will not persist any changes to disk
// it will be read-write but not persistent
const db = new Database(readFileSync("mydb.sqlite"));
```
Close a database:
```ts
let db = new Database();
db.close();
```
Note: `close()` is called automatically when the database is garbage collected. It is safe to call multiple times but has no effect after the first.
#### Database.prototype.query
`query(sql)` creates a `Statement` for the given SQL and caches it, but does not execute it.
```ts
class Database {
query(sql: string): Statement;
}
```
`query` returns a `Statement` object.
It performs the same operation as `Database.prototype.prepare`, except:
- `query` caches the prepared statement in the `Database` object
- `query` doesn't bind parameters
This intended to make it easier for `bun:sqlite` to be fast by default. Calling `.prepare` compiles a SQLite query, which can take some time, so it's better to cache those a little.
You can bind parameters on any call to a statement.
```js
import { Database } from "bun:sqlite";
// generate some data
let db = new Database();
db.run(
"CREATE TABLE foo (id INTEGER PRIMARY KEY AUTOINCREMENT, greeting TEXT)",
);
db.run("INSERT INTO foo (greeting) VALUES ($greeting)", {
$greeting: "Welcome to bun",
});
// get the query
const stmt = db.query("SELECT * FROM foo WHERE greeting = ?");
// run the query
stmt.all("Welcome to bun!");
stmt.get("Welcome to bun!");
stmt.run("Welcome to bun!");
```
#### Database.prototype.prepare
`prepare(sql)` creates a `Statement` for the given SQL, but does not execute it.
Unlike `query()`, this does not cache the compiled query.
```ts
import { Database } from "bun:sqlite";
// generate some data
let db = new Database();
db.run(
"CREATE TABLE foo (id INTEGER PRIMARY KEY AUTOINCREMENT, greeting TEXT)",
);
// compile the prepared statement
const stmt = db.prepare("SELECT * FROM foo WHERE bar = ?");
// run the prepared statement
stmt.all("baz");
```
Internally, this calls [`sqlite3_prepare_v3`](https://www.sqlite.org/c3ref/prepare.html).
#### Database.prototype.exec & Database.prototype.run
`exec` is for one-off executing a query which does not need to return anything.
`run` is an alias.
```ts
class Database {
// exec is an alias for run
exec(sql: string, ...params: ParamsType): void;
run(sql: string, ...params: ParamsType): void;
}
```
This is useful for things like
Creating a table:
```ts
import { Database } from "bun:sqlite";
let db = new Database();
db.exec(
"CREATE TABLE foo (id INTEGER PRIMARY KEY AUTOINCREMENT, greeting TEXT)",
);
```
Inserting one row:
```ts
import { Database } from "bun:sqlite";
let db = new Database();
db.exec(
"CREATE TABLE foo (id INTEGER PRIMARY KEY AUTOINCREMENT, greeting TEXT)",
);
// insert one row
db.exec("INSERT INTO foo (greeting) VALUES ($greeting)", {
$greeting: "Welcome to bun",
});
```
For queries which aren't intended to be run multiple times, it should be faster to use `exec()` than `prepare()` or `query()` because it doesn't create a `Statement` object.
Internally, this function calls [`sqlite3_prepare`](https://www.sqlite.org/c3ref/prepare.html), [`sqlite3_step`](https://www.sqlite.org/c3ref/step.html), and [`sqlite3_finalize`](https://www.sqlite.org/c3ref/finalize.html).
#### Database.prototype.transaction
Creates a function that always runs inside a transaction. When the function is invoked, it will begin a new transaction. When the function returns, the transaction will be committed. If an exception is thrown, the transaction will be rolled back (and the exception will propagate as usual).
```ts
// setup
import { Database } from "bun:sqlite";
const db = Database.open(":memory:");
db.exec(
"CREATE TABLE cats (id INTEGER PRIMARY KEY AUTOINCREMENT, name TEXT UNIQUE, age INTEGER)",
);
const insert = db.prepare("INSERT INTO cats (name, age) VALUES ($name, $age)");
const insertMany = db.transaction((cats) => {
for (const cat of cats) insert.run(cat);
});
insertMany([
{ $name: "Joey", $age: 2 },
{ $name: "Sally", $age: 4 },
{ $name: "Junior", $age: 1 },
]);
```
Transaction functions can be called from inside other transaction functions. When doing so, the inner transaction becomes a savepoint.
```ts
// setup
import { Database } from "bun:sqlite";
const db = Database.open(":memory:");
db.exec(
"CREATE TABLE expenses (id INTEGER PRIMARY KEY AUTOINCREMENT, note TEXT, dollars INTEGER);",
);
db.exec(
"CREATE TABLE cats (id INTEGER PRIMARY KEY AUTOINCREMENT, name TEXT UNIQUE, age INTEGER)",
);
const newExpense = db.prepare(
"INSERT INTO expenses (note, dollars) VALUES (?, ?)",
);
const insert = db.prepare("INSERT INTO cats (name, age) VALUES ($name, $age)");
const insertMany = db.transaction((cats) => {
for (const cat of cats) insert.run(cat);
});
const adopt = db.transaction((cats) => {
newExpense.run("adoption fees", 20);
insertMany(cats); // nested transaction
});
adopt([
{ $name: "Joey", $age: 2 },
{ $name: "Sally", $age: 4 },
{ $name: "Junior", $age: 1 },
]);
```
Transactions also come with `deferred`, `immediate`, and `exclusive` versions.
```ts
insertMany(cats); // uses "BEGIN"
insertMany.deferred(cats); // uses "BEGIN DEFERRED"
insertMany.immediate(cats); // uses "BEGIN IMMEDIATE"
insertMany.exclusive(cats); // uses "BEGIN EXCLUSIVE"
```
Any arguments passed to the transaction function will be forwarded to the wrapped function, and any values returned from the wrapped function will be returned from the transaction function. The wrapped function will also have access to the same binding as the transaction function.
bun:sqlite's transaction implementation is based on [better-sqlite3](https://github.com/JoshuaWise/better-sqlite3/blob/master/docs/api.md#transactionfunction---function) (along with this section of the docs), so thanks to Joshua Wise and better-sqlite3 contributors.
#### Database.prototype.serialize
SQLite has a built-in way to [serialize](https://www.sqlite.org/c3ref/serialize.html) and [deserialize](https://www.sqlite.org/c3ref/deserialize.html) databases to and from memory.
`bun:sqlite` fully supports it:
```ts
let db = new Database();
// write some data
db.run(
"CREATE TABLE foo (id INTEGER PRIMARY KEY AUTOINCREMENT, greeting TEXT)",
);
db.run("INSERT INTO foo VALUES (?)", "Welcome to bun!");
db.run("INSERT INTO foo VALUES (?)", "Hello World!");
const copy = db.serialize();
// => Uint8Array
const db2 = new Database(copy);
db2.query("SELECT * FROM foo").all();
// => [
// { id: 1, greeting: "Welcome to bun!" },
// { id: 2, greeting: "Hello World!" },
// ]
```
`db.serialize()` returns a `Uint8Array` of the database.
Internally, it calls [`sqlite3_serialize`](https://www.sqlite.org/c3ref/serialize.html).
#### Database.prototype.loadExtension
`bun:sqlite` supports [SQLite extensions](https://www.sqlite.org/loadext.html).
To load a SQLite extension, call `Database.prototype.loadExtension(name)`:
```ts
import { Database } from "bun:sqlite";
let db = new Database();
db.loadExtension("myext");
```
If you're on macOS, you will need to first use a custom SQLite install (you can install with homebrew). By default, bun uses Apple's proprietary build of SQLite because it benchmarks about 50% faster. However, they disabled extension support, so you will need to have a custom build of SQLite to use extensions on macOS.
```ts
import { Database } from "bun:sqlite";
// on macOS, this must be run before any other calls to `Database`
// if called on linux, it will return true and do nothing
// on linux it will still check that a string was passed
Database.setCustomSQLite("/path/to/sqlite.dylib");
let db = new Database();
db.loadExtension("myext");
```
To install sqlite with homebrew:
```bash
brew install sqlite
```
#### Statement
`Statement` is a prepared statement. Use it to run queries that get results.
TLDR:
- [`Statement.all(...optionalParamsToBind)`](#statementall) returns all rows as an array of objects
- [`Statement.values(...optionalParamsToBind)`](#statementvalues) returns all rows as an array of arrays
- [`Statement.get(...optionalParamsToBind)`](#statementget) returns the first row as an object
- [`Statement.run(...optionalParamsToBind)`](#statementrun) runs the statement and returns nothing
- [`Statement.finalize()`](#statementfinalize) closes the statement
- [`Statement.toString()`](#statementtostring) prints the expanded SQL, including bound parameters
- `get Statement.columnNames` get the returned column names
- `get Statement.paramsCount` how many parameters are expected?
You can bind parameters on any call to a statement. Named parameters and positional parameters are supported. Bound parameters are remembered between calls and reset the next time you pass parameters to bind.
```ts
import { Database } from "bun:sqlite";
// setup
let db = new Database();
db.run(
"CREATE TABLE foo (id INTEGER PRIMARY KEY AUTOINCREMENT, greeting TEXT)",
);
db.run("INSERT INTO foo VALUES (?)", "Welcome to bun!");
db.run("INSERT INTO foo VALUES (?)", "Hello World!");
// Statement object
let statement = db.query("SELECT * FROM foo");
// returns all the rows
statement.all();
// returns the first row
statement.get();
// runs the query, without returning anything
statement.run();
```
#### Statement.all
Calling `all()` on a `Statement` instance runs the query and returns the rows as an array of objects.
```ts
import { Database } from "bun:sqlite";
// setup
let db = new Database();
db.run(
"CREATE TABLE foo (id INTEGER PRIMARY KEY AUTOINCREMENT, greeting TEXT, count INTEGER)",
);
db.run("INSERT INTO foo (greeting, count) VALUES (?, ?)", "Welcome to bun!", 2);
db.run("INSERT INTO foo (greeting, count) VALUES (?, ?)", "Hello World!", 0);
db.run(
"INSERT INTO foo (greeting, count) VALUES (?, ?)",
"Welcome to bun!!!!",
2,
);
// Statement object
let statement = db.query("SELECT * FROM foo WHERE count = ?");
// return all the query results, binding 2 to the count parameter
statement.all(2);
// => [
// { id: 1, greeting: "Welcome to bun!", count: 2 },
// { id: 3, greeting: "Welcome to bun!!!!", count: 2 },
// ]
```
Internally, this calls [`sqlite3_reset`](https://www.sqlite.org/capi3ref.html#sqlite3_reset) and repeatedly calls [`sqlite3_step`](https://www.sqlite.org/capi3ref.html#sqlite3_step) until it returns `SQLITE_DONE`.
#### Statement.values
Calling `values()` on a `Statement` instance runs the query and returns the rows as an array of arrays.
```ts
import { Database } from "bun:sqlite";
// setup
let db = new Database();
db.run(
"CREATE TABLE foo (id INTEGER PRIMARY KEY AUTOINCREMENT, greeting TEXT, count INTEGER)",
);
db.run("INSERT INTO foo (greeting, count) VALUES (?, ?)", "Welcome to bun!", 2);
db.run("INSERT INTO foo (greeting, count) VALUES (?, ?)", "Hello World!", 0);
db.run(
"INSERT INTO foo (greeting, count) VALUES (?, ?)",
"Welcome to bun!!!!",
2,
);
// Statement object
let statement = db.query("SELECT * FROM foo WHERE count = ?");
// return all the query results as an array of arrays, binding 2 to "count"
statement.values(2);
// => [
// [ 1, "Welcome to bun!", 2 ],
// [ 3, "Welcome to bun!!!!", 2 ],
// ]
// Statement object, but with named parameters
let statement = db.query("SELECT * FROM foo WHERE count = $count");
// return all the query results as an array of arrays, binding 2 to "count"
statement.values({ $count: 2 });
// => [
// [ 1, "Welcome to bun!", 2 ],
// [ 3, "Welcome to bun!!!!", 2 ],
// ]
```
Internally, this calls [`sqlite3_reset`](https://www.sqlite.org/capi3ref.html#sqlite3_reset) and repeatedly calls [`sqlite3_step`](https://www.sqlite.org/capi3ref.html#sqlite3_step) until it returns `SQLITE_DONE`.
#### Statement.get
Calling `get()` on a `Statement` instance runs the query and returns the first result as an object.
```ts
import { Database } from "bun:sqlite";
// setup
let db = new Database();
db.run(
"CREATE TABLE foo (id INTEGER PRIMARY KEY AUTOINCREMENT, greeting TEXT, count INTEGER)",
);
db.run("INSERT INTO foo (greeting, count) VALUES (?, ?)", "Welcome to bun!", 2);
db.run("INSERT INTO foo (greeting, count) VALUES (?, ?)", "Hello World!", 0);
db.run(
"INSERT INTO foo (greeting, count) VALUES (?, ?)",
"Welcome to bun!!!!",
2,
);
// Statement object
let statement = db.query("SELECT * FROM foo WHERE count = ?");
// return the first row as an object, binding 2 to the count parameter
statement.get(2);
// => { id: 1, greeting: "Welcome to bun!", count: 2 }
// Statement object, but with named parameters
let statement = db.query("SELECT * FROM foo WHERE count = $count");
// return the first row as an object, binding 2 to the count parameter
statement.get({ $count: 2 });
// => { id: 1, greeting: "Welcome to bun!", count: 2 }
```
Internally, this calls [`sqlite3_reset`](https://www.sqlite.org/capi3ref.html#sqlite3_reset) and calls [`sqlite3_step`](https://www.sqlite.org/capi3ref.html#sqlite3_step) once. Stepping through all the rows is not necessary when you only want the first row.
#### Statement.run
Calling `run()` on a `Statement` instance runs the query and returns nothing.
This is useful if you want to repeatedly run a query, but don't care about the results.
```ts
import { Database } from "bun:sqlite";
// setup
let db = new Database();
db.run(
"CREATE TABLE foo (id INTEGER PRIMARY KEY AUTOINCREMENT, greeting TEXT, count INTEGER)",
);
db.run("INSERT INTO foo (greeting, count) VALUES (?, ?)", "Welcome to bun!", 2);
db.run("INSERT INTO foo (greeting, count) VALUES (?, ?)", "Hello World!", 0);
db.run(
"INSERT INTO foo (greeting, count) VALUES (?, ?)",
"Welcome to bun!!!!",
2,
);
// Statement object (TODO: use a better example query)
let statement = db.query("SELECT * FROM foo");
// run the query, returning nothing
statement.run();
```
Internally, this calls [`sqlite3_reset`](https://www.sqlite.org/capi3ref.html#sqlite3_reset) and calls [`sqlite3_step`](https://www.sqlite.org/capi3ref.html#sqlite3_step) once. Stepping through all the rows is not necessary when you don't care about the results.
#### Statement.finalize
This method finalizes the statement, freeing any resources associated with it.
After a statement has been finalized, it cannot be used for any further queries. Any attempt to run the statement will throw an error. Calling it multiple times will have no effect.
It is a good idea to finalize a statement when you are done with it, but the garbage collector will do it for you if you don't.
```ts
import { Database } from "bun:sqlite";
// setup
let db = new Database();
db.run(
"CREATE TABLE foo (id INTEGER PRIMARY KEY AUTOINCREMENT, greeting TEXT, count INTEGER)",
);
db.run("INSERT INTO foo (greeting, count) VALUES (?, ?)", "Welcome to bun!", 2);
db.run("INSERT INTO foo (greeting, count) VALUES (?, ?)", "Hello World!", 0);
db.run(
"INSERT INTO foo (greeting, count) VALUES (?, ?)",
"Welcome to bun!!!!",
2,
);
// Statement object
let statement = db.query("SELECT * FROM foo WHERE count = ?");
statement.finalize();
// this will throw
statement.run();
```
#### Statement.toString()
Calling `toString()` on a `Statement` instance prints the expanded SQL query. This is useful for debugging.
```ts
import { Database } from "bun:sqlite";
// setup
let db = new Database();
db.run(
"CREATE TABLE foo (id INTEGER PRIMARY KEY AUTOINCREMENT, greeting TEXT, count INTEGER)",
);
db.run("INSERT INTO foo (greeting, count) VALUES (?, ?)", "Welcome to bun!", 2);
db.run("INSERT INTO foo (greeting, count) VALUES (?, ?)", "Hello World!", 0);
db.run(
"INSERT INTO foo (greeting, count) VALUES (?, ?)",
"Welcome to bun!!!!",
2,
);
// Statement object
const statement = db.query("SELECT * FROM foo WHERE count = ?");
console.log(statement.toString());
// => "SELECT * FROM foo WHERE count = NULL"
statement.run(2); // bind the param
console.log(statement.toString());
// => "SELECT * FROM foo WHERE count = 2"
```
Internally, this calls [`sqlite3_expanded_sql`](https://www.sqlite.org/capi3ref.html#sqlite3_expanded_sql).
#### Datatypes
| JavaScript type | SQLite type |
| --------------- | ---------------------- |
| `string` | `TEXT` |
| `number` | `INTEGER` or `DECIMAL` |
| `boolean` | `INTEGER` (1 or 0) |
| `Uint8Array` | `BLOB` |
| `Buffer` | `BLOB` |
| `bigint` | `INTEGER` |
| `null` | `NULL` |
### `bun:ffi` (Foreign Functions Interface)
`bun:ffi` lets you efficiently call native libraries from JavaScript. It works with languages that support the C ABI (Zig, Rust, C/C++, C#, Nim, Kotlin, etc).
This snippet prints sqlite3's version number:
```ts
import { dlopen, FFIType, suffix } from "bun:ffi";
// `suffix` is either "dylib", "so", or "dll" depending on the platform
// you don't have to use "suffix", it's just there for convenience
const path = `libsqlite3.${suffix}`;
const {
symbols: {
// sqlite3_libversion is the function we will call
sqlite3_libversion,
},
} =
// dlopen() expects:
// 1. a library name or file path
// 2. a map of symbols
dlopen(path, {
// `sqlite3_libversion` is a function that returns a string
sqlite3_libversion: {
// sqlite3_libversion takes no arguments
args: [],
// sqlite3_libversion returns a pointer to a string
returns: FFIType.cstring,
},
});
console.log(`SQLite 3 version: ${sqlite3_libversion()}`);
```
#### Low-overhead FFI
3ns to go from JavaScript <> native code with `bun:ffi` (on my machine, an M1 Pro with 64GB of RAM)
- 5x faster than napi (Node v17.7.1)
- 100x faster than Deno v1.21.1
As measured in [this simple benchmark](./bench/ffi)
### Getting started with bun:sqlite
bun:sqlite's API is loosely based on [better-sqlite3](https://github.com/JoshuaWise/better-sqlite3), though the implementation is different.
bun:sqlite has two classes:
- `class Database`
- `class Statement`
#### `Database`
Calling `new Database(filename)` opens or creates the SQLite database.
```ts
constructor(
filename: string,
options?:
| number
| {
/**
* Open the database as read-only (no write operations, no create).
*
* Equivalent to {@link constants.SQLITE_OPEN_READONLY}
*/
readonly?: boolean;
/**
* Allow creating a new database
*
* Equivalent to {@link constants.SQLITE_OPEN_CREATE}
*/
create?: boolean;
/**
* Open the database as read-write
*
* Equivalent to {@link constants.SQLITE_OPEN_READWRITE}
*/
readwrite?: boolean;
}
);
```
To open or create a SQLite3 database:
```ts
import { Database } from "bun:sqlite";
const db = new Database("mydb.sqlite");
```
Open an in-memory database:
```ts
import { Database } from "bun:sqlite";
// all of these do the same thing
let db = new Database(":memory:");
let db = new Database();
let db = new Database("");
```
Open read-write and throw if the database doesn't exist:
```ts
import { Database } from "bun:sqlite";
const db = new Database("mydb.sqlite", { readwrite: true });
```
Open read-only and throw if the database doesn't exist:
```ts
import { Database } from "bun:sqlite";
const db = new Database("mydb.sqlite", { readonly: true });
```
Open read-write, don't throw if new file:
```ts
import { Database } from "bun:sqlite";
const db = new Database("mydb.sqlite", { readonly: true, create: true });
```
Open a database from a `Uint8Array`:
```ts
import { Database } from "bun:sqlite";
import { readFileSync } from "fs";
// unlike passing a filepath, this will not persist any changes to disk
// it will be read-write but not persistent
const db = new Database(readFileSync("mydb.sqlite"));
```
Close a database:
```ts
let db = new Database();
db.close();
```
Note: `close()` is called automatically when the database is garbage collected. It is safe to call multiple times but has no effect after the first.
#### Database.prototype.query
`query(sql)` creates a `Statement` for the given SQL and caches it, but does not execute it.
```ts
class Database {
query(sql: string): Statement;
}
```
`query` returns a `Statement` object.
It performs the same operation as `Database.prototype.prepare`, except:
- `query` caches the prepared statement in the `Database` object
- `query` doesn't bind parameters
This intended to make it easier for `bun:sqlite` to be fast by default. Calling `.prepare` compiles a SQLite query, which can take some time, so it's better to cache those a little.
You can bind parameters on any call to a statement.
```js
import { Database } from "bun:sqlite";
// generate some data
let db = new Database();
db.run(
"CREATE TABLE foo (id INTEGER PRIMARY KEY AUTOINCREMENT, greeting TEXT)",
);
db.run("INSERT INTO foo (greeting) VALUES ($greeting)", {
$greeting: "Welcome to bun",
});
// get the query
const stmt = db.query("SELECT * FROM foo WHERE greeting = ?");
// run the query
stmt.all("Welcome to bun!");
stmt.get("Welcome to bun!");
stmt.run("Welcome to bun!");
```
#### Database.prototype.prepare
`prepare(sql)` creates a `Statement` for the given SQL, but does not execute it.
Unlike `query()`, this does not cache the compiled query.
```ts
import { Database } from "bun:sqlite";
// generate some data
let db = new Database();
db.run(
"CREATE TABLE foo (id INTEGER PRIMARY KEY AUTOINCREMENT, greeting TEXT)",
);
// compile the prepared statement
const stmt = db.prepare("SELECT * FROM foo WHERE bar = ?");
// run the prepared statement
stmt.all("baz");
```
Internally, this calls [`sqlite3_prepare_v3`](https://www.sqlite.org/c3ref/prepare.html).
#### Database.prototype.exec & Database.prototype.run
`exec` is for one-off executing a query which does not need to return anything.
`run` is an alias.
```ts
class Database {
// exec is an alias for run
exec(sql: string, ...params: ParamsType): void;
run(sql: string, ...params: ParamsType): void;
}
```
This is useful for things like
Creating a table:
```ts
import { Database } from "bun:sqlite";
let db = new Database();
db.exec(
"CREATE TABLE foo (id INTEGER PRIMARY KEY AUTOINCREMENT, greeting TEXT)",
);
```
Inserting one row:
```ts
import { Database } from "bun:sqlite";
let db = new Database();
db.exec(
"CREATE TABLE foo (id INTEGER PRIMARY KEY AUTOINCREMENT, greeting TEXT)",
);
// insert one row
db.exec("INSERT INTO foo (greeting) VALUES ($greeting)", {
$greeting: "Welcome to bun",
});
```
For queries which aren't intended to be run multiple times, it should be faster to use `exec()` than `prepare()` or `query()` because it doesn't create a `Statement` object.
Internally, this function calls [`sqlite3_prepare`](https://www.sqlite.org/c3ref/prepare.html), [`sqlite3_step`](https://www.sqlite.org/c3ref/step.html), and [`sqlite3_finalize`](https://www.sqlite.org/c3ref/finalize.html).
#### Database.prototype.transaction
Creates a function that always runs inside a transaction. When the function is invoked, it will begin a new transaction. When the function returns, the transaction will be committed. If an exception is thrown, the transaction will be rolled back (and the exception will propagate as usual).
```ts
// setup
import { Database } from "bun:sqlite";
const db = Database.open(":memory:");
db.exec(
"CREATE TABLE cats (id INTEGER PRIMARY KEY AUTOINCREMENT, name TEXT UNIQUE, age INTEGER)",
);
const insert = db.prepare("INSERT INTO cats (name, age) VALUES ($name, $age)");
const insertMany = db.transaction((cats) => {
for (const cat of cats) insert.run(cat);
});
insertMany([
{ $name: "Joey", $age: 2 },
{ $name: "Sally", $age: 4 },
{ $name: "Junior", $age: 1 },
]);
```
Transaction functions can be called from inside other transaction functions. When doing so, the inner transaction becomes a savepoint.
```ts
// setup
import { Database } from "bun:sqlite";
const db = Database.open(":memory:");
db.exec(
"CREATE TABLE expenses (id INTEGER PRIMARY KEY AUTOINCREMENT, note TEXT, dollars INTEGER);",
);
db.exec(
"CREATE TABLE cats (id INTEGER PRIMARY KEY AUTOINCREMENT, name TEXT UNIQUE, age INTEGER)",
);
const newExpense = db.prepare(
"INSERT INTO expenses (note, dollars) VALUES (?, ?)",
);
const insert = db.prepare("INSERT INTO cats (name, age) VALUES ($name, $age)");
const insertMany = db.transaction((cats) => {
for (const cat of cats) insert.run(cat);
});
const adopt = db.transaction((cats) => {
newExpense.run("adoption fees", 20);
insertMany(cats); // nested transaction
});
adopt([
{ $name: "Joey", $age: 2 },
{ $name: "Sally", $age: 4 },
{ $name: "Junior", $age: 1 },
]);
```
Transactions also come with `deferred`, `immediate`, and `exclusive` versions.
```ts
insertMany(cats); // uses "BEGIN"
insertMany.deferred(cats); // uses "BEGIN DEFERRED"
insertMany.immediate(cats); // uses "BEGIN IMMEDIATE"
insertMany.exclusive(cats); // uses "BEGIN EXCLUSIVE"
```
Any arguments passed to the transaction function will be forwarded to the wrapped function, and any values returned from the wrapped function will be returned from the transaction function. The wrapped function will also have access to the same binding as the transaction function.
bun:sqlite's transaction implementation is based on [better-sqlite3](https://github.com/JoshuaWise/better-sqlite3/blob/master/docs/api.md#transactionfunction---function) (along with this section of the docs), so thanks to Joshua Wise and better-sqlite3 contributors.
#### Database.prototype.serialize
SQLite has a built-in way to [serialize](https://www.sqlite.org/c3ref/serialize.html) and [deserialize](https://www.sqlite.org/c3ref/deserialize.html) databases to and from memory.
`bun:sqlite` fully supports it:
```ts
let db = new Database();
// write some data
db.run(
"CREATE TABLE foo (id INTEGER PRIMARY KEY AUTOINCREMENT, greeting TEXT)",
);
db.run("INSERT INTO foo VALUES (?)", "Welcome to bun!");
db.run("INSERT INTO foo VALUES (?)", "Hello World!");
const copy = db.serialize();
// => Uint8Array
const db2 = new Database(copy);
db2.query("SELECT * FROM foo").all();
// => [
// { id: 1, greeting: "Welcome to bun!" },
// { id: 2, greeting: "Hello World!" },
// ]
```
`db.serialize()` returns a `Uint8Array` of the database.
Internally, it calls [`sqlite3_serialize`](https://www.sqlite.org/c3ref/serialize.html).
#### Database.prototype.loadExtension
`bun:sqlite` supports [SQLite extensions](https://www.sqlite.org/loadext.html).
To load a SQLite extension, call `Database.prototype.loadExtension(name)`:
```ts
import { Database } from "bun:sqlite";
let db = new Database();
db.loadExtension("myext");
```
If you're on macOS, you will need to first use a custom SQLite install (you can install with homebrew). By default, bun uses Apple's proprietary build of SQLite because it benchmarks about 50% faster. However, they disabled extension support, so you will need to have a custom build of SQLite to use extensions on macOS.
```ts
import { Database } from "bun:sqlite";
// on macOS, this must be run before any other calls to `Database`
// if called on linux, it will return true and do nothing
// on linux it will still check that a string was passed
Database.setCustomSQLite("/path/to/sqlite.dylib");
let db = new Database();
db.loadExtension("myext");
```
To install sqlite with homebrew:
```bash
brew install sqlite
```
#### Statement
`Statement` is a prepared statement. Use it to run queries that get results.
TLDR:
- [`Statement.all(...optionalParamsToBind)`](#statementall) returns all rows as an array of objects
- [`Statement.values(...optionalParamsToBind)`](#statementvalues) returns all rows as an array of arrays
- [`Statement.get(...optionalParamsToBind)`](#statementget) returns the first row as an object
- [`Statement.run(...optionalParamsToBind)`](#statementrun) runs the statement and returns nothing
- [`Statement.finalize()`](#statementfinalize) closes the statement
- [`Statement.toString()`](#statementtostring) prints the expanded SQL, including bound parameters
- `get Statement.columnNames` get the returned column names
- `get Statement.paramsCount` how many parameters are expected?
You can bind parameters on any call to a statement. Named parameters and positional parameters are supported. Bound parameters are remembered between calls and reset the next time you pass parameters to bind.
```ts
import { Database } from "bun:sqlite";
// setup
let db = new Database();
db.run(
"CREATE TABLE foo (id INTEGER PRIMARY KEY AUTOINCREMENT, greeting TEXT)",
);
db.run("INSERT INTO foo VALUES (?)", "Welcome to bun!");
db.run("INSERT INTO foo VALUES (?)", "Hello World!");
// Statement object
let statement = db.query("SELECT * FROM foo");
// returns all the rows
statement.all();
// returns the first row
statement.get();
// runs the query, without returning anything
statement.run();
```
#### Statement.all
Calling `all()` on a `Statement` instance runs the query and returns the rows as an array of objects.
```ts
import { Database } from "bun:sqlite";
// setup
let db = new Database();
db.run(
"CREATE TABLE foo (id INTEGER PRIMARY KEY AUTOINCREMENT, greeting TEXT, count INTEGER)",
);
db.run("INSERT INTO foo (greeting, count) VALUES (?, ?)", "Welcome to bun!", 2);
db.run("INSERT INTO foo (greeting, count) VALUES (?, ?)", "Hello World!", 0);
db.run(
"INSERT INTO foo (greeting, count) VALUES (?, ?)",
"Welcome to bun!!!!",
2,
);
// Statement object
let statement = db.query("SELECT * FROM foo WHERE count = ?");
// return all the query results, binding 2 to the count parameter
statement.all(2);
// => [
// { id: 1, greeting: "Welcome to bun!", count: 2 },
// { id: 3, greeting: "Welcome to bun!!!!", count: 2 },
// ]
```
Internally, this calls [`sqlite3_reset`](https://www.sqlite.org/capi3ref.html#sqlite3_reset) and repeatedly calls [`sqlite3_step`](https://www.sqlite.org/capi3ref.html#sqlite3_step) until it returns `SQLITE_DONE`.
#### Statement.values
Calling `values()` on a `Statement` instance runs the query and returns the rows as an array of arrays.
```ts
import { Database } from "bun:sqlite";
// setup
let db = new Database();
db.run(
"CREATE TABLE foo (id INTEGER PRIMARY KEY AUTOINCREMENT, greeting TEXT, count INTEGER)",
);
db.run("INSERT INTO foo (greeting, count) VALUES (?, ?)", "Welcome to bun!", 2);
db.run("INSERT INTO foo (greeting, count) VALUES (?, ?)", "Hello World!", 0);
db.run(
"INSERT INTO foo (greeting, count) VALUES (?, ?)",
"Welcome to bun!!!!",
2,
);
// Statement object
let statement = db.query("SELECT * FROM foo WHERE count = ?");
// return all the query results as an array of arrays, binding 2 to "count"
statement.values(2);
// => [
// [ 1, "Welcome to bun!", 2 ],
// [ 3, "Welcome to bun!!!!", 2 ],
// ]
// Statement object, but with named parameters
let statement = db.query("SELECT * FROM foo WHERE count = $count");
// return all the query results as an array of arrays, binding 2 to "count"
statement.values({ $count: 2 });
// => [
// [ 1, "Welcome to bun!", 2 ],
// [ 3, "Welcome to bun!!!!", 2 ],
// ]
```
Internally, this calls [`sqlite3_reset`](https://www.sqlite.org/capi3ref.html#sqlite3_reset) and repeatedly calls [`sqlite3_step`](https://www.sqlite.org/capi3ref.html#sqlite3_step) until it returns `SQLITE_DONE`.
#### Statement.get
Calling `get()` on a `Statement` instance runs the query and returns the first result as an object.
```ts
import { Database } from "bun:sqlite";
// setup
let db = new Database();
db.run(
"CREATE TABLE foo (id INTEGER PRIMARY KEY AUTOINCREMENT, greeting TEXT, count INTEGER)",
);
db.run("INSERT INTO foo (greeting, count) VALUES (?, ?)", "Welcome to bun!", 2);
db.run("INSERT INTO foo (greeting, count) VALUES (?, ?)", "Hello World!", 0);
db.run(
"INSERT INTO foo (greeting, count) VALUES (?, ?)",
"Welcome to bun!!!!",
2,
);
// Statement object
let statement = db.query("SELECT * FROM foo WHERE count = ?");
// return the first row as an object, binding 2 to the count parameter
statement.get(2);
// => { id: 1, greeting: "Welcome to bun!", count: 2 }
// Statement object, but with named parameters
let statement = db.query("SELECT * FROM foo WHERE count = $count");
// return the first row as an object, binding 2 to the count parameter
statement.get({ $count: 2 });
// => { id: 1, greeting: "Welcome to bun!", count: 2 }
```
Internally, this calls [`sqlite3_reset`](https://www.sqlite.org/capi3ref.html#sqlite3_reset) and calls [`sqlite3_step`](https://www.sqlite.org/capi3ref.html#sqlite3_step) once. Stepping through all the rows is not necessary when you only want the first row.
#### Statement.run
Calling `run()` on a `Statement` instance runs the query and returns nothing.
This is useful if you want to repeatedly run a query, but don't care about the results.
```ts
import { Database } from "bun:sqlite";
// setup
let db = new Database();
db.run(
"CREATE TABLE foo (id INTEGER PRIMARY KEY AUTOINCREMENT, greeting TEXT, count INTEGER)",
);
db.run("INSERT INTO foo (greeting, count) VALUES (?, ?)", "Welcome to bun!", 2);
db.run("INSERT INTO foo (greeting, count) VALUES (?, ?)", "Hello World!", 0);
db.run(
"INSERT INTO foo (greeting, count) VALUES (?, ?)",
"Welcome to bun!!!!",
2,
);
// Statement object (TODO: use a better example query)
let statement = db.query("SELECT * FROM foo");
// run the query, returning nothing
statement.run();
```
Internally, this calls [`sqlite3_reset`](https://www.sqlite.org/capi3ref.html#sqlite3_reset) and calls [`sqlite3_step`](https://www.sqlite.org/capi3ref.html#sqlite3_step) once. Stepping through all the rows is not necessary when you don't care about the results.
#### Statement.finalize
This method finalizes the statement, freeing any resources associated with it.
After a statement has been finalized, it cannot be used for any further queries. Any attempt to run the statement will throw an error. Calling it multiple times will have no effect.
It is a good idea to finalize a statement when you are done with it, but the garbage collector will do it for you if you don't.
```ts
import { Database } from "bun:sqlite";
// setup
let db = new Database();
db.run(
"CREATE TABLE foo (id INTEGER PRIMARY KEY AUTOINCREMENT, greeting TEXT, count INTEGER)",
);
db.run("INSERT INTO foo (greeting, count) VALUES (?, ?)", "Welcome to bun!", 2);
db.run("INSERT INTO foo (greeting, count) VALUES (?, ?)", "Hello World!", 0);
db.run(
"INSERT INTO foo (greeting, count) VALUES (?, ?)",
"Welcome to bun!!!!",
2,
);
// Statement object
let statement = db.query("SELECT * FROM foo WHERE count = ?");
statement.finalize();
// this will throw
statement.run();
```
#### Statement.toString()
Calling `toString()` on a `Statement` instance prints the expanded SQL query. This is useful for debugging.
```ts
import { Database } from "bun:sqlite";
// setup
let db = new Database();
db.run(
"CREATE TABLE foo (id INTEGER PRIMARY KEY AUTOINCREMENT, greeting TEXT, count INTEGER)",
);
db.run("INSERT INTO foo (greeting, count) VALUES (?, ?)", "Welcome to bun!", 2);
db.run("INSERT INTO foo (greeting, count) VALUES (?, ?)", "Hello World!", 0);
db.run(
"INSERT INTO foo (greeting, count) VALUES (?, ?)",
"Welcome to bun!!!!",
2,
);
// Statement object
const statement = db.query("SELECT * FROM foo WHERE count = ?");
console.log(statement.toString());
// => "SELECT * FROM foo WHERE count = NULL"
statement.run(2); // bind the param
console.log(statement.toString());
// => "SELECT * FROM foo WHERE count = 2"
```
Internally, this calls [`sqlite3_expanded_sql`](https://www.sqlite.org/capi3ref.html#sqlite3_expanded_sql).
#### Datatypes
| JavaScript type | SQLite type |
| --------------- | ---------------------- |
| `string` | `TEXT` |
| `number` | `INTEGER` or `DECIMAL` |
| `boolean` | `INTEGER` (1 or 0) |
| `Uint8Array` | `BLOB` |
| `Buffer` | `BLOB` |
| `bigint` | `INTEGER` |
| `null` | `NULL` |
### `bun:ffi` (Foreign Functions Interface)
`bun:ffi` lets you efficiently call native libraries from JavaScript. It works with languages that support the C ABI (Zig, Rust, C/C++, C#, Nim, Kotlin, etc).
This snippet prints sqlite3's version number:
```ts
import { dlopen, FFIType, suffix } from "bun:ffi";
// `suffix` is either "dylib", "so", or "dll" depending on the platform
// you don't have to use "suffix", it's just there for convenience
const path = `libsqlite3.${suffix}`;
const {
symbols: {
// sqlite3_libversion is the function we will call
sqlite3_libversion,
},
} =
// dlopen() expects:
// 1. a library name or file path
// 2. a map of symbols
dlopen(path, {
// `sqlite3_libversion` is a function that returns a string
sqlite3_libversion: {
// sqlite3_libversion takes no arguments
args: [],
// sqlite3_libversion returns a pointer to a string
returns: FFIType.cstring,
},
});
console.log(`SQLite 3 version: ${sqlite3_libversion()}`);
```
#### Low-overhead FFI
3ns to go from JavaScript <> native code with `bun:ffi` (on my machine, an M1 Pro with 64GB of RAM)
- 5x faster than napi (Node v17.7.1)
- 100x faster than Deno v1.21.1
As measured in [this simple benchmark](./bench/ffi)
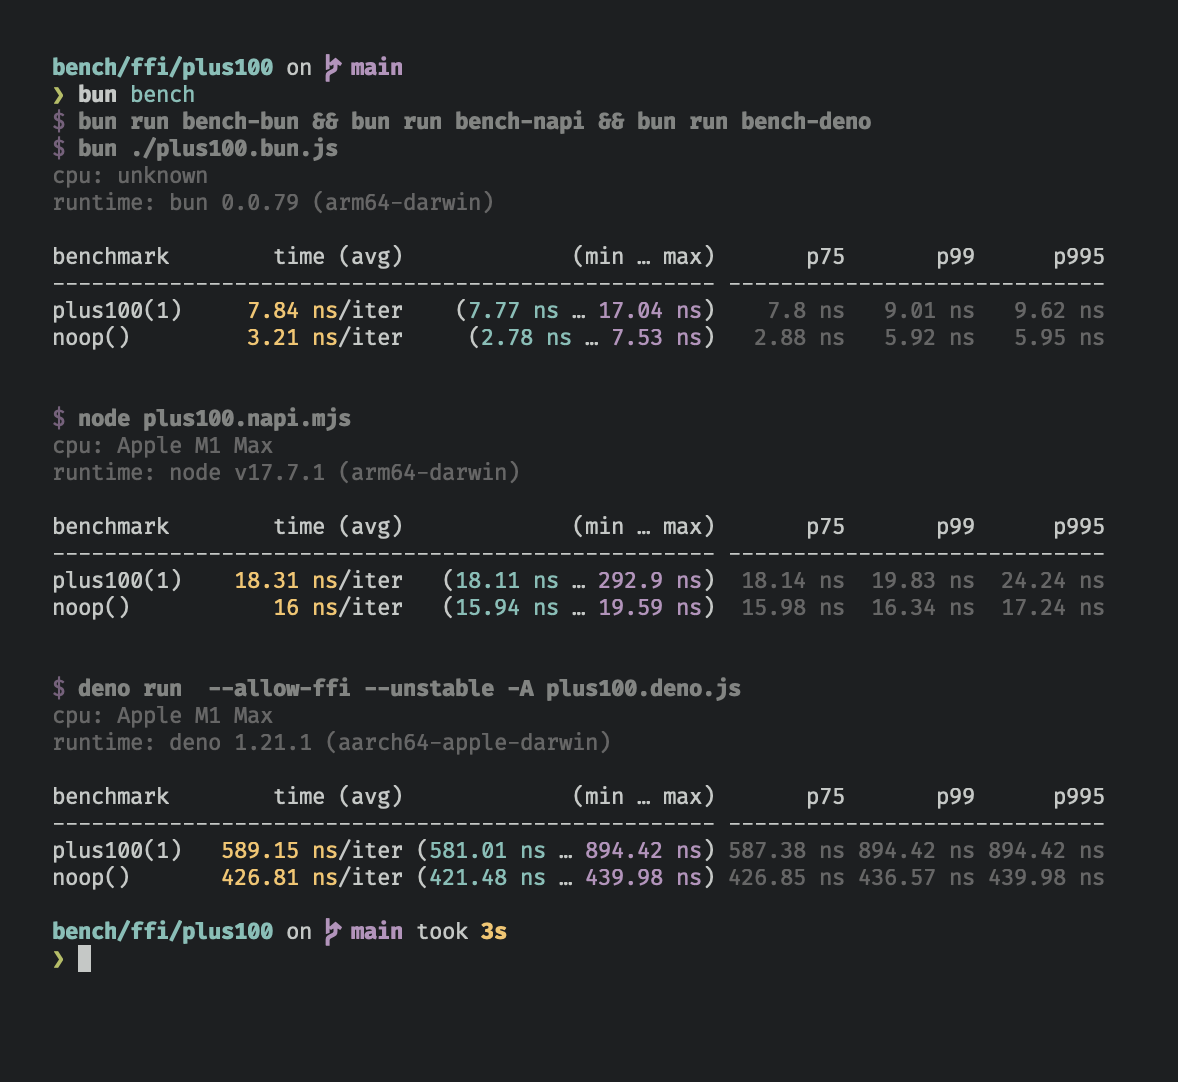
 To develop on Linux/Windows, [Docker](https://www.docker.com) is required. If using WSL on Windows, it is recommended to use [Docker Desktop](https://docs.microsoft.com/en-us/windows/wsl/tutorials/wsl-containers) for its WSL2 integration.
#### Visual Studio Code
If you're using VSCode, you'll need to have the [Dev Containers](https://marketplace.visualstudio.com/items?itemName=ms-vscode-remote.remote-containers) extension installed.
To get started, open VS Code in the `bun` repository. The first time you try to open the dev container, the extension will automatically build it for you, based on [`Dockerfile.devcontainer`](Dockerfile.devcontainer).
To open the dev container, open the command palette (Ctrl + Shift + P) and run: `Dev Containers: Reopen in Container`. To later rebuild it (only needed when the devcontainer itself changes, not the bun code), run: `Dev Containers: Rebuild and Reopen in Container`.
#### Other editors and CLI
If you're using another editor or want to manually control the dev container from the command line or a script, you'll need to install the [Dev Container CLI](https://www.npmjs.com/package/@devcontainers/cli): `npm install -g @devcontainers/cli`.
To create and start the dev container, in the `bun` repository, locally run:
```bash
# `make devcontainer-
To develop on Linux/Windows, [Docker](https://www.docker.com) is required. If using WSL on Windows, it is recommended to use [Docker Desktop](https://docs.microsoft.com/en-us/windows/wsl/tutorials/wsl-containers) for its WSL2 integration.
#### Visual Studio Code
If you're using VSCode, you'll need to have the [Dev Containers](https://marketplace.visualstudio.com/items?itemName=ms-vscode-remote.remote-containers) extension installed.
To get started, open VS Code in the `bun` repository. The first time you try to open the dev container, the extension will automatically build it for you, based on [`Dockerfile.devcontainer`](Dockerfile.devcontainer).
To open the dev container, open the command palette (Ctrl + Shift + P) and run: `Dev Containers: Reopen in Container`. To later rebuild it (only needed when the devcontainer itself changes, not the bun code), run: `Dev Containers: Rebuild and Reopen in Container`.
#### Other editors and CLI
If you're using another editor or want to manually control the dev container from the command line or a script, you'll need to install the [Dev Container CLI](https://www.npmjs.com/package/@devcontainers/cli): `npm install -g @devcontainers/cli`.
To create and start the dev container, in the `bun` repository, locally run:
```bash
# `make devcontainer-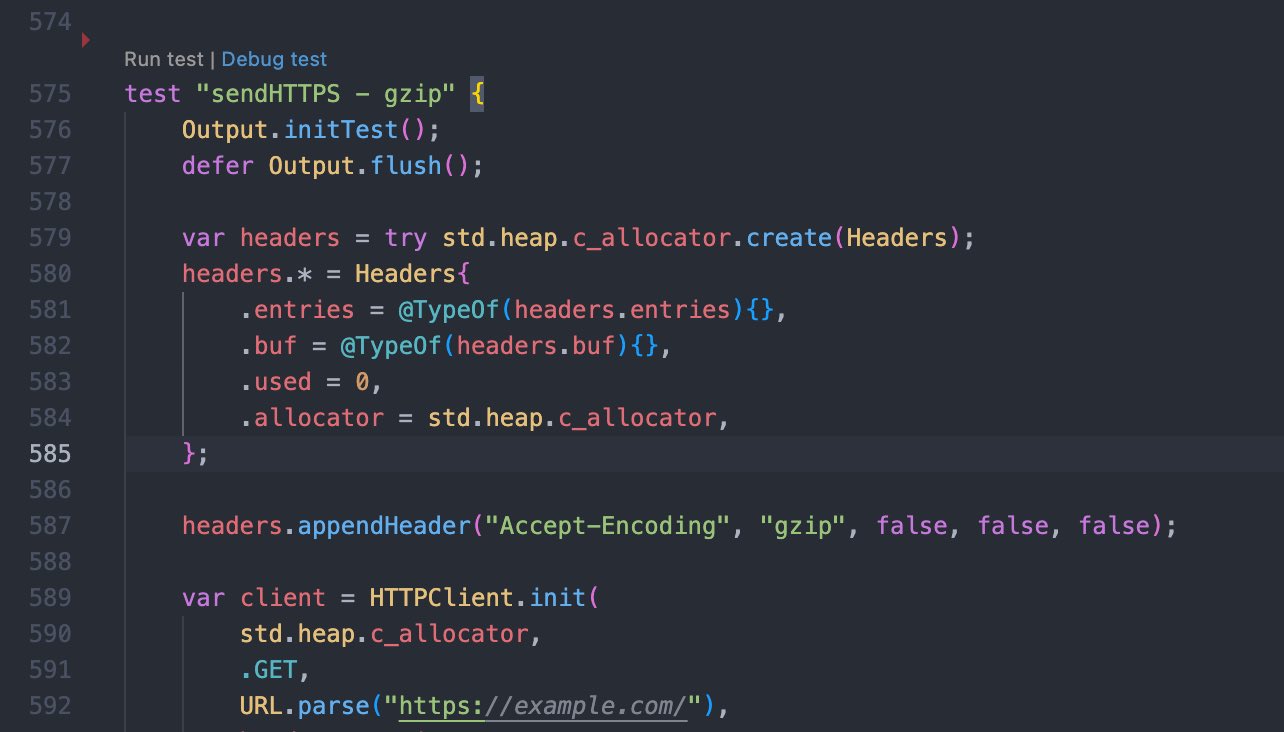 ### Troubleshooting (general)
If you encounter `error: the build command failed with exit code 9` during the build process, this means you ran out of memory or swap. Bun currently needs about 22 GB of RAM to compile.
### Troubleshooting (general)
If you encounter `error: the build command failed with exit code 9` during the build process, this means you ran out of memory or swap. Bun currently needs about 22 GB of RAM to compile.